Seeking opinion on potential mast step repair (pics)

johnhuff

Member
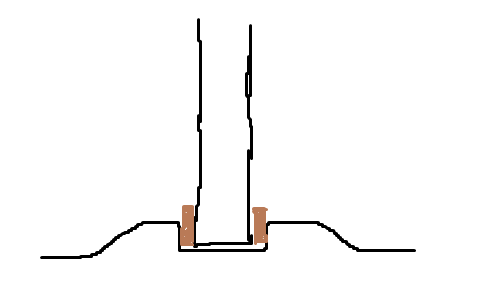
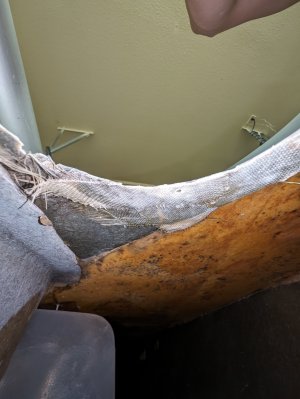
I recently bought a 1986 Laser. It's in great shape, except for the mast step. The previous owner says that while it leak slightly, it's structurally sound, and that he has taken it in high winds (20+ knots) without issue.

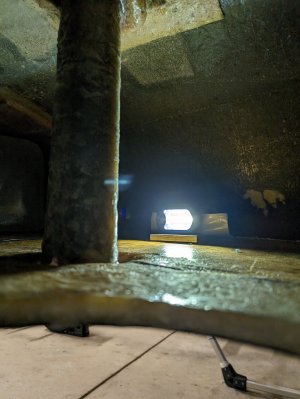
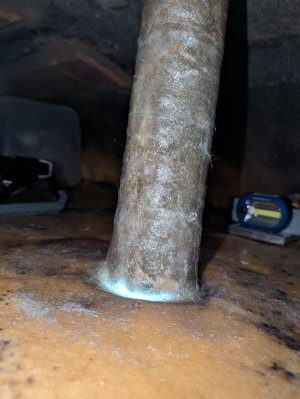
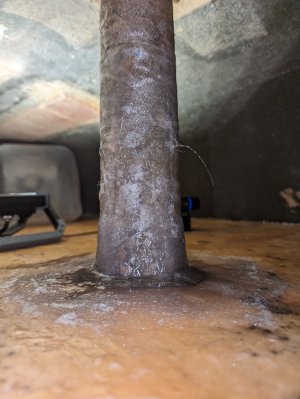
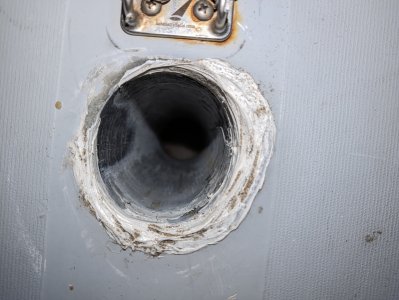
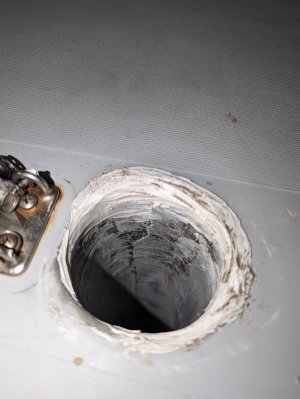
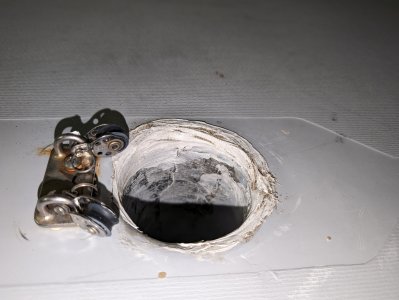
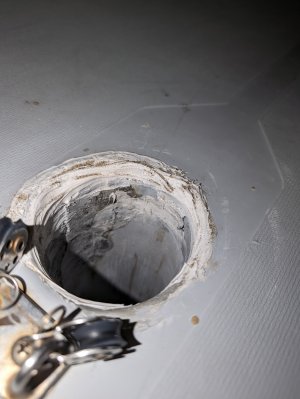
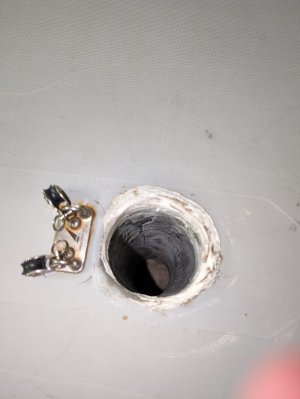
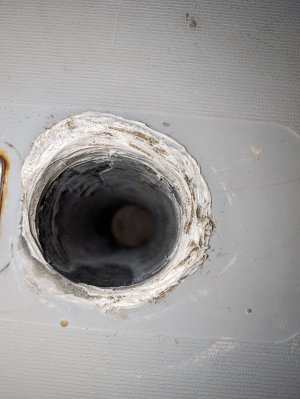
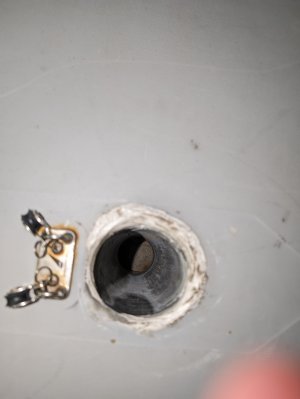
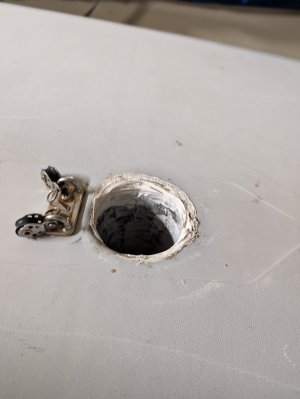
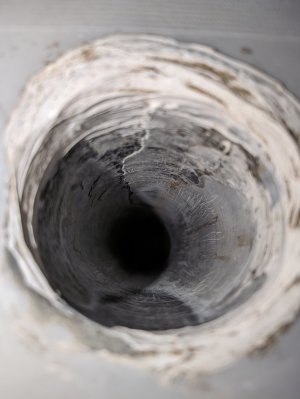
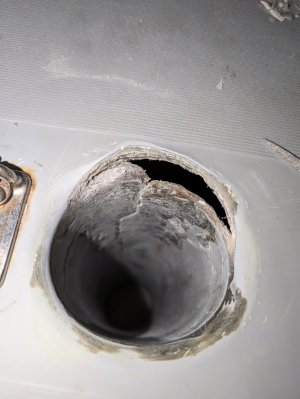
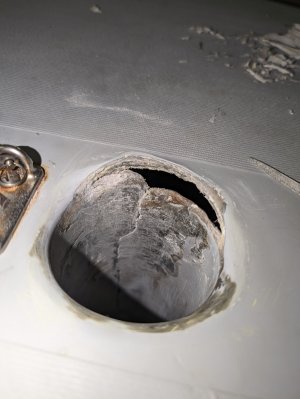
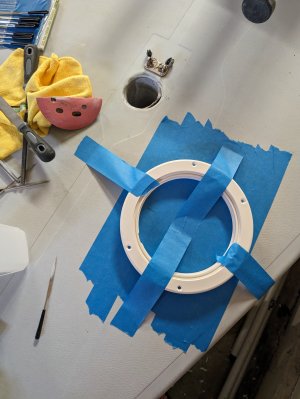
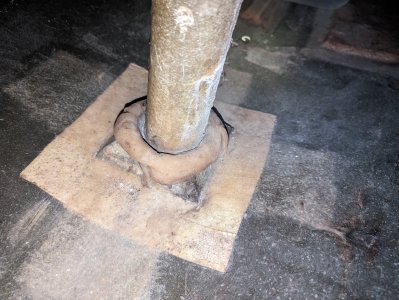
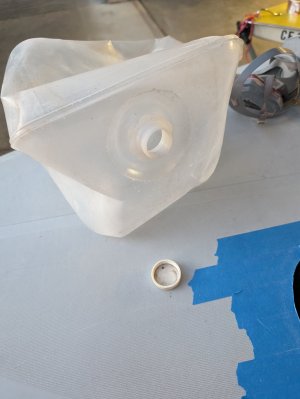
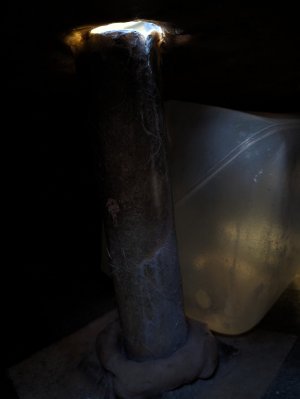
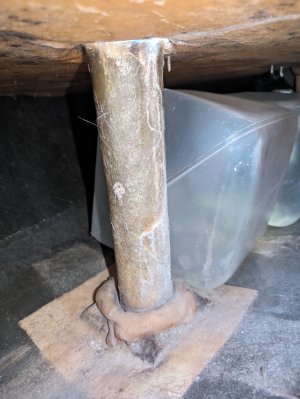
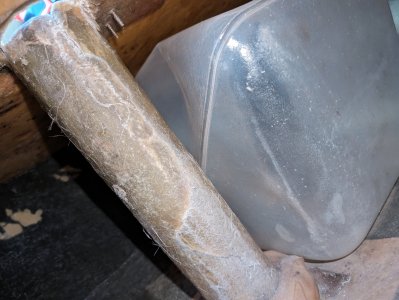
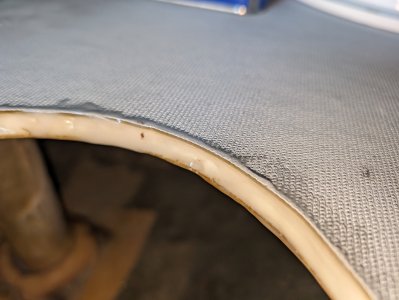
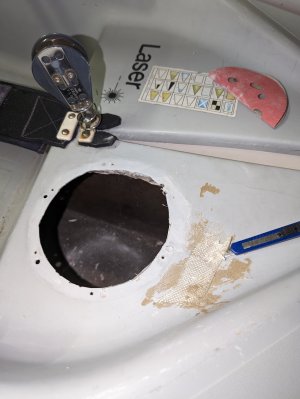
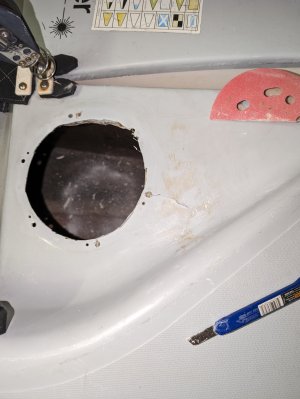
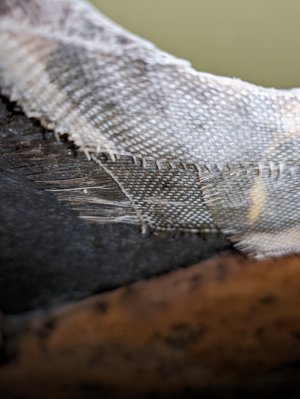
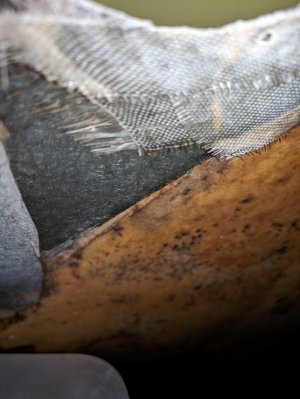
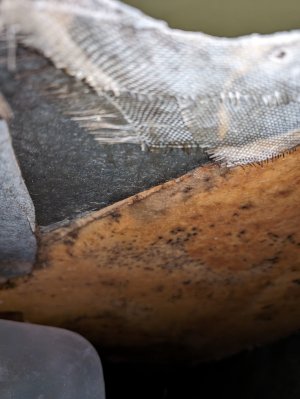
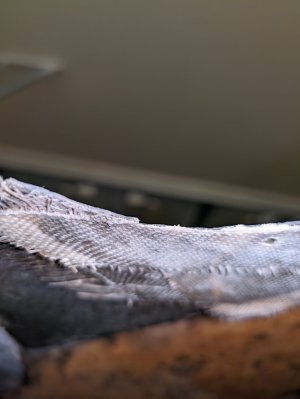
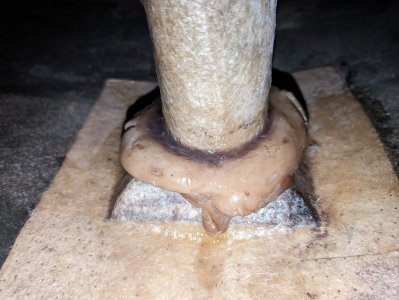
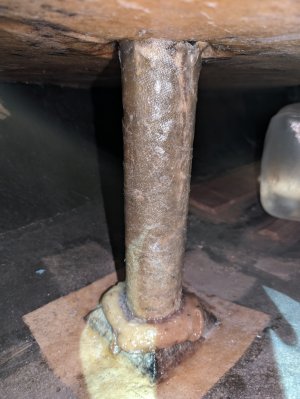
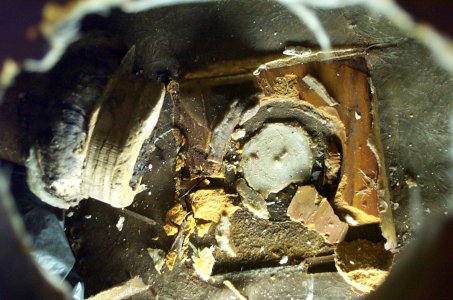
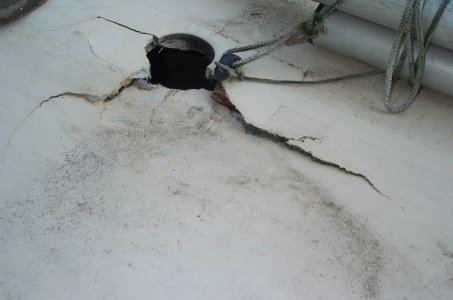
From the pictures, you can see that it is crudely sealed with silicone. There outside layer of fiberglass seems to be separating from the rest of the tube, which gives the appearance of a crack. From what I can see it's only on this outermost layer. I'm unsure what's under the rest of the silicone.

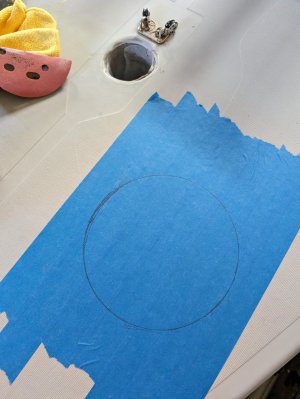
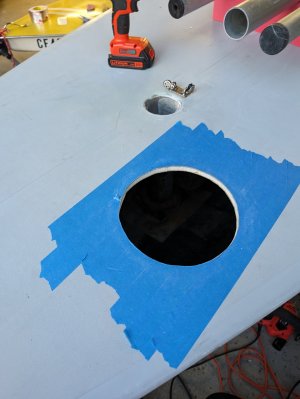
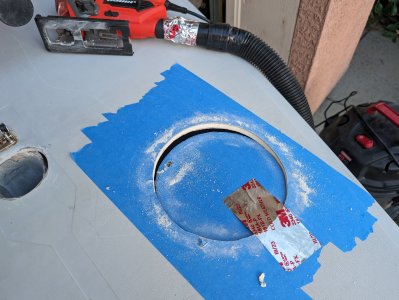
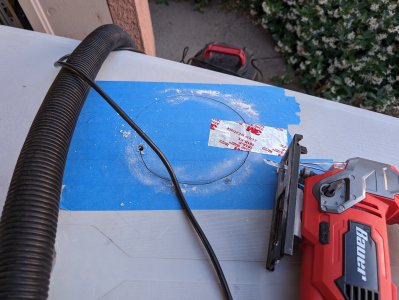
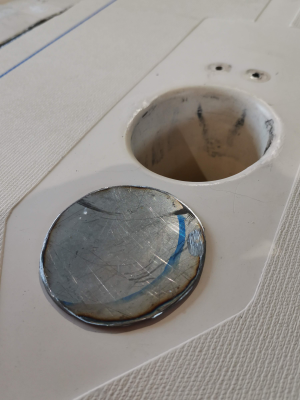
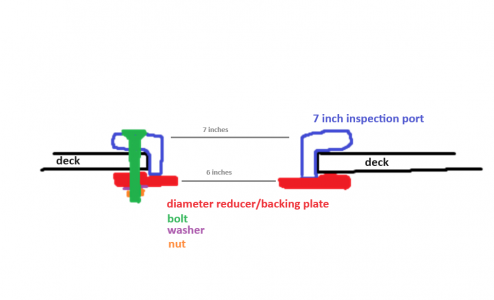
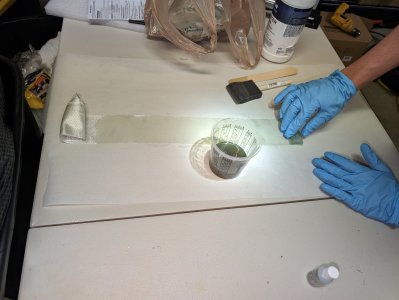
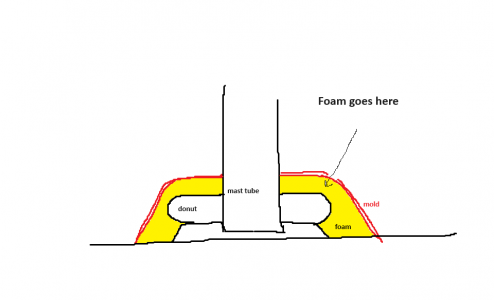
Do you think that this is worth repairing? Or should I just stick with the silicone and add more if it reopens the leak. If I were to go with a repair, I think my plan would be to cut an inspection port and apply a few layers of pre-soaked fiberglass strips around the tube, feathering up to the top deck. Is that reasonable? Also, I've not been able to find pictures of where people cut the inspection port for this type of repair, so advice on where to put it would be appreciated.
 

Attachments

  • PXL_20240520_073120255.jpg
    PXL_20240520_073120255.jpg
    1 MB · Views: 93
  • PXL_20240520_073239960.jpg
    PXL_20240520_073239960.jpg
    738.8 KB · Views: 77
  • PXL_20240520_073504918.jpg
    PXL_20240520_073504918.jpg
    1 MB · Views: 78
  • PXL_20240520_073556073.jpg
    PXL_20240520_073556073.jpg
    574.6 KB · Views: 62
  • PXL_20240520_073140968.jpg
    PXL_20240520_073140968.jpg
    639.4 KB · Views: 62
  • PXL_20240520_073124239.jpg
    PXL_20240520_073124239.jpg
    797.2 KB · Views: 66
  • PXL_20240520_073133592.jpg
    PXL_20240520_073133592.jpg
    311.8 KB · Views: 62
  • PXL_20240520_073112018.jpg
    PXL_20240520_073112018.jpg
    413.5 KB · Views: 53
  • PXL_20240520_073057033.jpg
    PXL_20240520_073057033.jpg
    503.5 KB · Views: 64
  • PXL_20240520_073117483.jpg
    PXL_20240520_073117483.jpg
    407.4 KB · Views: 53
After cleaning up the hole a bit with a razor, diamond files, and sand paper, you can see how bad it actually is. I'll go ahead and document my progress so maybe someone can gain something from my success or failure in this pursuit.
 

Attachments

  • PXL_20240521_084736703.jpg
    PXL_20240521_084736703.jpg
    712.1 KB · Views: 52
  • PXL_20240521_084733263.jpg
    PXL_20240521_084733263.jpg
    664.5 KB · Views: 64
Have repaired 2 complete broken mast holes. You better install a hatch or make a hole with a hole saw. If you turn the boat upside down, you can make a hole in the bottom, in front of the mast, on the side, no sandwich in that area, and easy to remake invisible. No deck damage. But there should always be some hathces to remove moist. Make a casting to fill out the masthole and work on the inside of the boat. Rub with sand paper 40grit and wrap arund the tube with epoxy prepeg 50mm webbing. Make some ekstra reinforcement on the upper joint. At the same time, remove the bottom plywood donut. Make a new one in grp.
 
That previous owner's assurance of structural soundness was a bit of an exaggeration!

You should be able to be very successful fixing this and have a dependable boat. You'll find descriptions of what others have done by searching this forum. Most often it's the bottom of the tube that needs attention so, as HelgeS says, be sure to make improvements at the bottom too. Most people (me included) have installed an inspection port to make these repairs. There is an area of the deck that extends from the mast hole both fore and aft that is thicker for added strength. It about 6" wide iirc. It's best to avoid putting the port in this thicker area. It's been a long time since I repaired my boat - others may be able to give better guidance on the location of this thicker strip. One nice thing about this repair is that being hidden, it won't look bad if it's not perfect looking.

We will all enjoy seeing your progress.
 
Ordered some 6oz 3in wide fiberglass cloth to wrap the tube in. I plan on having significant overlap each wrap around tube. As for the donut, I'm not too sure what I'm going to do yet. I'm not exactly sure of the exact shape or purpose this donut thing is. Maybe if someone could draw a crude sketch it could help me. My understanding is that it it sits between the hull/base and the mast tube? I've seen from other repairs that people chip it out and instead fill this gap with thickened expoxy or some other material.

If it looks like what I'm imagining in this drawing, I'm considering making a replacement donut out of 3D printing ASA. I think this could help keep the tube centered better than filling the gap with epoxy (I've seen other posts where people messed up their rake angle), and will have a higher tensile strength than the plywood while still remaining flexible enough to transfer the load from the tube to the hull without creating stress risers. Would have a slight wedge shape so it could be tapped into the gap, and be split in two parts to fit it around the tube.

Another option would be to do a combination of the 3D printed donut and epoxy, and filleting the base to the tube with strand mat. This would as strong as filling the gap with epoxy while still gauranteeing that the tube is centered.


If anyone could comment on the accuracy of my drawing I would really appreciate it!
 

Attachments

  • mast_tube_donut.png
    mast_tube_donut.png
    4.3 KB · Views: 68
If you are lucky the bottom of the mast tube is still held in the correct position by the big blob of Bondo like material. This was used to fix the mast to the hull when the hull and deck were joined. Since there was no other access to this joint during boat assembly, the recess in the hull was filled with that stuff and the hull and deck were mated and the tube (which was part of the deck) was pressed into this adhesive and thus bonded to the hull. On some boats this adhesive hasn't held up well. If the bottom of the tube breaks free while sailing the result is a sickening sight, although still repairable with much greater effort.

Since the top of the mast tube on your boat may be poorly or not held at all I would NOT chip out the adhesive at the bottom of the tube if you find the bottom held in place when you gain access. If the bottom is still well attached you can and should reinforce it as you planned with the fiberglass cloth and resin over the "Bondo". If both top and bottom of the tube are loose getting the tube aligned properly becomes much harder.

Of course be sure all areas you cover are completely dry.

I think what HelgeS meant by casting was to make a plug for the inside of the tube so that you end up with the original size and shape. Perhaps you could find someone nearby with a Laser who would let you use it to cast a plug.
 
I had a 7 inch inspection port laying around (because I realized it was way too big for what I needed for the previous project). This huge of a port will actually let me get both hands in the hull which will make wrapping the tube much much easier. Hopefully it doesn't weaken the deck too much though

Looks like the base of the step is fine, so I won't be messing with it too much. I made go over it with thickened epoxy to fillet the tube, and maybe a layer of strand mat after that. Overall everything seems no worse than expected. Will have to wait for the materials to come in to do the repair.

For the inspection port, I hadn't realized that the deck was foam core. Do people seal off the foam somehow to keep it from soaking up water?

Also, one of my flotation cubes had its cap off lol
 

Attachments

  • PXL_20240522_025527789.jpg
    PXL_20240522_025527789.jpg
    1 MB · Views: 49
  • PXL_20240522_032646404.jpg
    PXL_20240522_032646404.jpg
    1.2 MB · Views: 56
  • PXL_20240522_032415777.jpg
    PXL_20240522_032415777.jpg
    1.6 MB · Views: 60
  • PXL_20240522_032352012.jpg
    PXL_20240522_032352012.jpg
    687 KB · Views: 56
  • PXL_20240522_032235269.jpg
    PXL_20240522_032235269.jpg
    318.6 KB · Views: 55
  • PXL_20240522_025711892.jpg
    PXL_20240522_025711892.jpg
    1 MB · Views: 55
  • PXL_20240522_032148876.jpg
    PXL_20240522_032148876.jpg
    647.2 KB · Views: 59
  • PXL_20240522_031646321.jpg
    PXL_20240522_031646321.jpg
    1.7 MB · Views: 53
  • PXL_20240522_032211743.jpg
    PXL_20240522_032211743.jpg
    641.3 KB · Views: 49
  • PXL_20240522_032219286.jpg
    PXL_20240522_032219286.jpg
    1.1 MB · Views: 58
  • PXL_20240522_031456676.jpg
    PXL_20240522_031456676.jpg
    1.6 MB · Views: 58
I had a 7 inch inspection port laying around (because I realized it was way too big for what I needed for the previous project). This huge of a port will actually let me get both hands in the hull which will make wrapping the tube much much easier. Hopefully it doesn't weaken the deck too much though

Looks like the base of the step is fine, so I won't be messing with it too much. I made go over it with thickened epoxy to fillet the tube, and maybe a layer of strand mat after that. Overall everything seems no worse than expected. Will have to wait for the materials to come in to do the repair.

For the inspection port, I hadn't realized that the deck was foam core. Do people seal off the foam somehow to keep it from soaking up water?

Also, one of my flotation cubes had its cap off lol
 
Hatches should be max.153mm opening.
Make donut of olde sandwich deck.
Brown sandwich is before 1975ish. 1979 have white stiffer foam
Use glassfiber as thickening, more strenght.
The maststep is usually grinded almost through the boat
The forward side down of the tube is maybe grinded thin. Wrap around prepeg tape.
Meassure mast step (14"?) fill up with epoxy and glassfiber cutting, put a topping lid with 1mm AIS316. Align with mast bottom section.
1716360491741.png
 

Attachments

  • 1716360582302.png
    1716360582302.png
    4.4 MB · Views: 59
John, at one time you could buy a stainless steel disc that could be glued into bottom of the mast tube. It prevented the mast from wearing through the bottom of the boat, as HelgeS mentions. I think it's a very worthwhile addition especially if your boat encounters sand and is easy to add. I'm sure you could make such a a disc.
 
John, at one time you could buy a stainless steel disc that could be glued into bottom of the mast tube. It prevented the mast from wearing through the bottom of the boat, as HelgeS mentions. I think it's a very worthwhile addition especially if your boat encounters sand and is easy to add. I'm sure you could make such a a disc.

I am planning on measuring the depth of the mast tube and filling it with a small amount of epoxy if it is deep, and then putting in a PTFE disk.

For the inspection port, I decided to scallop the foam a bit and cover it in thickened epoxy. Should help prevent water damage.
 

Attachments

  • PXL_20240522_160234171.jpg
    PXL_20240522_160234171.jpg
    924.7 KB · Views: 55
I like big hatches, if you are not racing in a Laser/ILCA event it won't matter. Remember to leave it off when you leave the boat to help it dry out.
 
I like big hatches, if you are not racing in a Laser/ILCA event it won't matter. Remember to leave it off when you leave the boat to help it dry out.
Shit, I was planning on taking it some local events once I got used to the boat. I don't know why I didn't think to check the rules for maximum inspection port size...

Do you think small events like this would actually DQ me for having a 7 inch inspection port instead of a 6 inch one? Not that I will make it to that regatta, but it's an example of the types of events I would go to when I start racing.

edit: Technically, the rules say "maximum internal diameter", which could be interpretted to mean that as long as I somehow make the port diameter small enough (not the actual hole in the deck), then I should be fine.
 
In the rulebook:

20. INSPECTION PORTS Inspection ports not exceeding 153 mm internal diameter may be installed on the deck or in the cockpit to provideaccess to the hull cavity, provided that any inspectionport is fitted with watertight threaded covers (any bayonet mounted parts are deemed to be not threaded). Storage receptacles are permitted underneath hatchcovers.

Can anyone provide clarification on what "internal diameter" means here? Is it the size of the hole in the deck or is it the size of the port? I feel like if it was the size of the hole in the deck, then they wouldn't have to specify "internal" diameter, as there is only one diameter to measure. Whereas the actual port has an external diameter which extends beyond the hole in order to bolt it in, and an internal diameter which is about an inch less than the diameter of the hole.

While I understand that rules are there for a reason, I don't feel that I would be violating the spirit of the rules by adding some type of spacer or backing plate to the inspection port to turn it into a 6 inch one, as I am not gaining any sort of advantage here. In fact I'm probably losing significant rigidity with a larger port and adding weight.

Attached is a diagram of a potential "fix". I invite any rules experts to tell me how this doesn't fix the issue lol.
 

Attachments

  • diagram.png
    diagram.png
    28.9 KB · Views: 48
I'm also going to be cleaning up the cockpit inspection port. Previous owner laid a single strip of thin fiberglass over the gelcoat for some mysterious reason. At least they put a few layers on the bottom, but still probably needs beefed up as whatever fiberglass they used was very thin.
 

Attachments

  • PXL_20240523_032246483.jpg
    PXL_20240523_032246483.jpg
    534 KB · Views: 50
  • PXL_20240523_033353346.jpg
    PXL_20240523_033353346.jpg
    633 KB · Views: 48
  • PXL_20240523_034240822.jpg
    PXL_20240523_034240822.jpg
    513.2 KB · Views: 47
  • PXL_20240523_034246763.jpg
    PXL_20240523_034246763.jpg
    485 KB · Views: 46
  • PXL_20240523_034301970.jpg
    PXL_20240523_034301970.jpg
    499.1 KB · Views: 46
  • PXL_20240523_034317614.jpg
    PXL_20240523_034317614.jpg
    352.9 KB · Views: 48
  • PXL_20240523_034334795.jpg
    PXL_20240523_034334795.jpg
    597.7 KB · Views: 54
First I filled the gap between the tube and donut with some resin and chopped fiberglass. Should add some amount of strength idk? I was going to cover the donut with fiberglass too but I'm started to steer away from that idea as I think the base of the mast tube isfine.

A few days later I wetted out about 7-8 feet of 3in 6oz fiberglass and wrapped it around the mast tube (after first brushing some resin onto the mast tube). Rolled it out a bit with a fiberglass roller thingy.

Im using a balloon to apply some pressure from the exterior side of the tube.

The plan is to do the top of the mast tube next using patches of strand cloth, then come back and do another layer of this 3 inch tape.

Need better gloves, as mine broke as I was wrapping the tube. I also need to be more careful wrapping, as I had to detangle/unroll the rolled up soaked fiberglass, which then picked up a bunch of junk that I should've vacuumed out more thoroughly. Should still be fine...
 

Attachments

  • PXL_20240527_074239449.jpg
    PXL_20240527_074239449.jpg
    1.1 MB · Views: 52
  • PXL_20240529_040949144.jpg
    PXL_20240529_040949144.jpg
    1.2 MB · Views: 53
  • PXL_20240529_044727058.jpg
    PXL_20240529_044727058.jpg
    665 KB · Views: 51
  • PXL_20240529_030650504.jpg
    PXL_20240529_030650504.jpg
    362.6 KB · Views: 48
Photos like these moved me to reinforce the bottom attachment of the mast tube. There are more dramatic photos but this is what I found after a quick search.
 

Attachments

  • 04 mast step,bottom of tube.JPG
    04 mast step,bottom of tube.JPG
    420.3 KB · Views: 48
  • 01 deck.JPG
    01 deck.JPG
    231.6 KB · Views: 48
  • 03 deck closer.JPG
    03 deck closer.JPG
    242.7 KB · Views: 47
Photos like these moved me to reinforce the bottom attachment of the mast tube. There are more dramatic photos but this is what I found after a quick search.

Okay you've convinced me. I have sort of committed to leaving the donut as is, so my main hurdle is filling the space below the donut and creating a nice mound shape to glass over. Do you have any suggestions for what I should use? I could just try thickened expoy, but I feel like the space is too large for it really. I could try expanding foam, but I can't think of a good way to make a mold that it can fill in place.

I could make a really oversized mold that splits in two, and goes over the donut and clamps around the mast tube. The bottom of the mold would get taped down to the hull, and would have a few holes at the top for pouring in the expanding foam mixture. Afterwards, the foam would get sanded into its final shape (flush with the top of the donut), and then glassed over.

One of my concerned with going this route is that I'm not actually sure it helps much. The force from the mast likely get's transferred to the mast step tube at the very bottom. Adding this glass over foam reinforcement is adding strength a few inches above this. However, if I used mast chafe tape at the bottom of the mast, it may spread the load more evenly and let this reinforcement take up some of the load.
 

Attachments

  • foam mold.png
    foam mold.png
    14.2 KB · Views: 46
The previous owner of the boat I own now removed the adhesive (Bondo or donut) before adding fiberglass and resin in order to reinforce the mast to hull connection. It looks very nice to anyone who opens the inspection port and shines a light in to look at it. :)

On a boat I have since sold, I reinforced the mast tube at bottom by just adding numerous resin soaked strips of fiberglass from the tube, over the adhesive and onto the hull. The adhesive was still intact like yours so I saw no point in removing it. I just wanted to have some confidence that the boat wouldn't meet a fate like in the above photos, since I sold it to a friend and neighbor. My work looked awful but no one sees it and I'm confident I made that part of the boat stronger. I think I also wrapped a strip around the tube, over the upper parts of the other strips.

Please forgive me for perhaps pressing this issue too much, but with the work you are doing on the rest of the tube, only a bit more will eliminate a concern over the more common failure of the bottom attachment.

Concerning mast chafe tape, if you are thinking of the strips that are sold to lower friction on the mast as it rotates under load, I've had disappointing results with these. I've had sand get imbedded in these, making the situation worse. I ended up removing them. Some people like them, maybe ok where there is no sand.
 
Flipped the boat upside down to work on the top section of the tube. Stuck a webcam inside, running the cable out of the cockpit inspection port. This made it much easier to do the back side of the tube.

Just used 1.5oz chopped strand cloth. Should maybe use a higher weight so I have to do less layers, but this is what I had on hand. I guess this is the highest weight readily available? Cut rectangular strips, with a slit cut halway down the middle to make it easier to bend the strip to conform to the tube and hull. After placing the strips I put down a another sheet to the top deck, with a hole cut so it could fit around the tube. I then place one more strip on the area with the hole to try to build some more thickness in this area.

Probably going to do a few more layers like this until it feels like I've built up enough layers. Now that I have the camera in here I could tell I have a few air pockets in the fiberglass tape I wrapped around the mast. They don't seem very critical so I may just leave them.

You can see that there is a sort of pocket/dip around the mast step tube where it connects to the top deck. This is because the top deck is about a half inch thick. I'm considering filling this pocket with resin and chopped fiberglass after my next layer or two. When sandwhiched with some more fiberglass layers afterwards, this would be much stronger than just adding more fiberglass layers, and much quicker than trying to fill this pocket with layers of fiberglass. The only risk in doing this is that its possible that this was a design feature, letting the area connecting the tube to the deck flex a little bit. More likely it was just quicker and cheaper to do it this way, and "good enough" in most cases. Although, my mast tube got damaged in this exact area, so maybe this dip is actually the culprit.
 

Attachments

  • PXL_20240530_035814573.jpg
    PXL_20240530_035814573.jpg
    856.7 KB · Views: 46
  • PXL_20240530_051111966.jpg
    PXL_20240530_051111966.jpg
    1.6 MB · Views: 47
  • PXL_20240530_160751748.jpg
    PXL_20240530_160751748.jpg
    589.3 KB · Views: 50
  • PXL_20240530_035806020.jpg
    PXL_20240530_035806020.jpg
    707 KB · Views: 53
Last edited:
Did another round of strand mat last night, same strategy, with an extra layer near the damage (I also did this on the first round, just didn't mention it before.

I just pour 2oz of resin with chopped fiberglass into the divot. You can really tell how much thicker the tube is near the deck now. Probably a bit overkill but better safe than sorry!

Might layer some thickened resin to fillet the base and tube once this dries, and then cover that with a light layer of strand cloth... We'll see.

Second layer was much easier now that I have the technique down.
 

Attachments

  • PXL_20240601_021307560.jpg
    PXL_20240601_021307560.jpg
    737.9 KB · Views: 46
Did another round of strand mat last night, same strategy, with an extra layer near the damage (I also did this on the first round, just didn't mention it before.

I just pour 2oz of resin with chopped fiberglass into the divot. You can really tell how much thicker the tube is near the deck now. Probably a bit overkill but better safe than sorry!

Might layer some thickened resin to fillet the base and tube once this dries, and then cover that with a light layer of strand cloth... We'll see.

Second layer was much easier now that I have the technique down.

John, the repair is looking great. Adding some woven cloth would be my next move.
laser_tube1a.pnglaser_tube2.png
 
Last edited:

Back
Top