When Is It Time To Throw In The Towel?

I have found a few failures of sunfish repairs due to not prepping so the adhesive has something to stick to on the surface. Epoxy and poly resin need a properly ruffed up surface so it molecules can grab onto something. So the slats and the backside of the fiberglass should be sanded. The grit is technically dependent on the type of adhesive. But 80 grit seems common.
I agree and mentioned this recently: But I use 45 grit because I have a roll of about 30-inches by 25-feet of it.
:confused:
 
I had an hour today so I filled in the ripped-out splash-guard holes with a mixture of resin and shredded cloth. I didn't have on hand what I needed (thickened resin) so I made-do with what I had. Looks good, but I know nothing - will that work? I plan to standard rivot the splash guard back in place - since I don't have a rivnut tool.

(sorry no pics, ran out of time, I'll get some later)

:oops:
 
I've used the same "shredded cloth" in non-structural repairs, and it worked fine for keeping water out.

Your local hardware store may offer a riv-nut gun rental.

Standard aluminum rivets are, in my opinion, too strong for the job--stainless, even worse! They may pull the splash-guard down too hard and crack it--even before the boat gets back in the water! :oops: But more likely, lacking large backup washers (in the few locations you can reach) pop-rivets will shred your repairs from underneath. :( Regular sheet metal screws is what I've used.

If a spar, with its strong mechanical advantage, should rip one corner, it's an easy fix. If the splash-guard is ripped totally off, the holes are easily patched or caulked. The splash-guard can be positioned 3/8" further back, and new holes drilled and chamfered. The splashguard's base will cover the old holes, and the job will remain cosmetically intact. Can you tell my neighbor's Sunfish is sailed by two young brothers? :rolleyes:

I don't caulk the splash-guard because very little water gets under it anyway, and it's a pain to remove old caulking. (Or, even worse, Liquid Nails)! :eek:
 
I've used the same "shredded cloth" in non-structural repairs, and it worked fine for keeping water out.

Your local hardware store may offer a riv-nut gun rental.

Standard aluminum rivets are, in my opinion, too strong for the job--stainless, even worse! They may pull the splash-guard down too hard and crack it--even before the boat gets back in the water! :oops: But more likely, lacking large backup washers (in the few locations you can reach) pop-rivets will shred your repairs from underneath. :( Regular sheet metal screws is what I've used.

If a spar, with its strong mechanical advantage, should rip one corner, it's an easy fix. If the splash-guard is ripped totally off, the holes are easily patched or caulked. The splash-guard can be positioned 3/8" further back, and new holes drilled and chamfered. The splashguard's base will cover the old holes, and the job will remain cosmetically intact. Can you tell my neighbor's Sunfish is sailed by two young brothers? :rolleyes:

I don't caulk the splash-guard because very little water gets under it anyway, and it's a pain to remove old caulking. (Or, even worse, Liquid Nails)! :eek:
Thank you, sir. I had planned to slightly reposition the guard, so not to use the same holes, so my amateur thinking is on track! I was gonna use silicon caulk too but now, with your experienced advice, I won't. Much appreciated.

Dumb Questions:

1) What if I test-ran the boat in the water without the splash guard? It would not be an extended trip. Is that something I would instantly regret?

2) "Regular sheet metal screws" sounds WAY easier for the splash guard. Just a pilot hole and the screws go right into the deck? No underside/backing necessary? And that will sufficiently hold it?

TIA!!

:D
 
1) Take a spare life jacket (PFD) and secure it to the cleat. That will reduce the biggest waves' propensity from washing over--and into--the cockpit.

2) A force sufficient to rip the splash-guard off is unlikely; however, should that misadventure happen, replacing the screws will be easier than trying to align riv-nuts with the original screws. IMHO.

After the pilot hole, chamfer (taper) the pilot hole a bit down through the thin gelcoat to reduce "spider-cracks" peeking out from under the splash-guard.
I can do that. I have a deburring tool (pic below) that I think would accomplish that task very proficiently. Yeah?

Can you suggest a screw size and it's related drill bit size? (This doesn't sound like something I should "guess" at like I ususaally do)

Thanks!!

1686489980806.png
 
I'm unfamiliar with the deburring tool; however, its name suggests that it "sounds-like" it'll work.

For chamfering, I simply use a larger bit. Maybe turn it by hand? For such delicate work as chamfering, I sharpen broken drill bits, and where I have duplicates, glue them into plastic wire nuts or secure them into short lengths of copper tubing. (Hammer and/or glue).

As for size, you can "go small" with the screws; that is, the same size as the bow handle screws. I align the screw threads with the drill bit and make sure the screw's shank is smaller. It's the threads that do all the work.

From Google:

"This might be more than you want to know, but read on......There are several schools of thought on putting screws into fiberglass. First, you have to remember that fiberglass is a mass of glass fibers in a hardened resin matrix. The primary strength comes from the fibers, but they need to be held in place, which the resin does very well. The best fiberglass has as little resin as possible in it. When you drive something like a screw into it, you are breaking the bond between the fibers and separating them for the screw threads to pass through. Unlike wood, fiberglass does not compress, so anywhere you add volume, like the screw threads, the fiberglass has to be displaced and grows in volume. That's why you have to countersink it, since the volcano effect when you drive a screw into it will crack the gelcoat as the fiberglass is displaced. If you don't predrill the hole and just drive the screw into the glass, the local damage to the structure (breaking the fibers) is so great that the screw will have less holding strength than if it is predrilled. Fiberglass is dry and not sticky, so once the bond of the fibers is broken, they stay broken. So, when you predrill, it is better to drill slightly larger than smaller. If you can't drive the screw in without feeling like you are going to rip the head off, the hole is too small.

I prefer to drill and tap the holes and use a sealant like 4200. Tapping cuts the fibers, so they are not broken, but it also makes a "free running" hole. That's kind of like a regular hex nut as opposed to a locking hex nut. It is easy for the screw to come loose, A sheet metal screw that is driven into fiberglass is gripped tightly by the glass fibers and is resistant to backing out. But a taped hole does less damage. I think the pull out strength is about the same because the threads on a machine screw are shallower than a sheet metal screw, but it is also holding in un-broken fibers.

What kind of screws should you use? Stainless sheet metal screws or machine screws. No tapered wood screws. The taper breaks more and more fibers as it is driven in and lets the screw back out too easily."
 
Thanks for that @LVW - I'll use it all! I should have some time in the next day or 2 and I'll finally get to the leak testing. Fingers crossed!!


You can repair the coaming, essentially the same method but grind out a little depression, then fiberglass, fair, sand and paint. It will be easier if you take it off, plus you can see what is going on with the hodgepodge of incorrect fasteners.

Your coaming would have had either stainless machine screws into anchor nuts riveted to the deck (rivnuts) or 3/16th inch diameter closed end aluminum rivets. You'll need to post more pics of all the rivets or do some exploring. It looks like someone used a plastic anchor which works, but creates a leak prone area.

@signal charlie > Following your advice, I did manage to get the splash guard done, the one was broken in 3 pieces - and it came out pretty good. Definitely sturdy. I only have this one crappy pic right now, but I'll get some more, thanks again! Next up, the leak test!

1687704932173.png
 
LEAK TESTED TODAY!! And it went WAY better than I expected. I'll be hitting the water for a test ride maybe as soon as next week!!

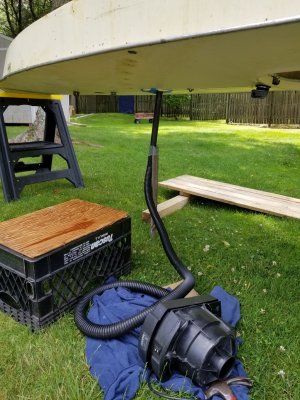
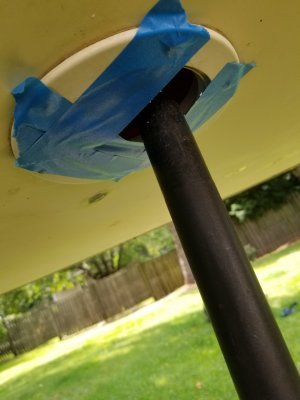
I used the motor from an old shop vac that I keep around to fill up inflatable beds and rafts and stuff. It worked well. I watched some of @signal charlie / Kent's Youtube vids so I knew I didn't need to seal off/pressurize anything -- all I had to do was blow some air inside -- and it worked great! The only tough part was leak testing the hull while trying to blow air into the underside inspection port, but I figured out a solution. :D

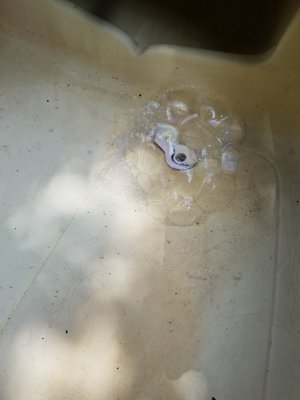
LEAKS: The main offender was the drain plug (bailer?) inside the foot tub (pic below). The ball/check-valve part on the underside showed no leaks, which was surprising to me. So, do I replace the top side new? Or pry it out and re-seal it with silicone/permatex/chaulk or whatever?

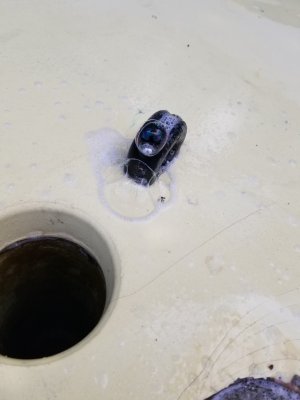
One screw of the 2 that holds a black u-bracket next to the mast hole showed a slow bubble (sorry, I don't know proper nomenclature). It was a different screw compared to the other side. Pic attached.

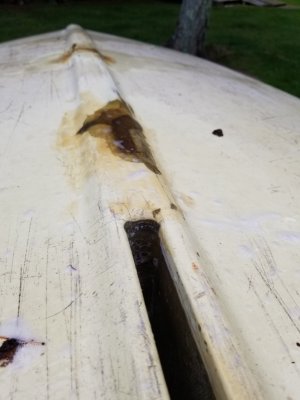
I had a small bubbler in the center board slot, just about a 1/2" below the hull. I'm thinking I just need a small amount of resin to make it seal up. Pic attached.

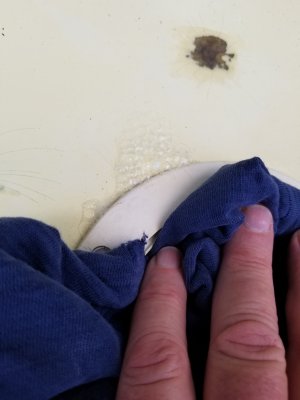
And then the seam for the inspection port bubbled, so I took it off -- it was old and brittle so a big chunk broke off with very little force. I'm going to replace it new, the hole measures 4.5" -- but I only see them in 4, 6 and 8 inches -- am I correct in assuming that a 4" inch will work? Or at one time was there 4.5" inch inspection ports?

The seams, all the way around, showed no signs of leaking. I was shocked!!
 

Attachments

  • 20230628_133129.jpg
    20230628_133129.jpg
    696.8 KB · Views: 56
  • 20230628_133124.jpg
    20230628_133124.jpg
    434.3 KB · Views: 44
  • 20230628_133143.jpg
    20230628_133143.jpg
    487.9 KB · Views: 48
  • 20230628_141309.jpg
    20230628_141309.jpg
    500.7 KB · Views: 44
  • 20230628_142128.jpg
    20230628_142128.jpg
    1.2 MB · Views: 47
  • 20230628_142138.jpg
    20230628_142138.jpg
    535.3 KB · Views: 48
LEAK TESTED TODAY!! And it went WAY better than I expected. I'll be hitting the water for a test ride maybe as soon as next week!!

I used the motor from an old shop vac that I keep around to fill up inflatable beds and rafts and stuff. It worked well. I watched some of @signal charlie / Kent's Youtube vids so I knew I didn't need to seal off/pressurize anything -- all I had to do was blow some air inside -- and it worked great! The only tough part was leak testing the hull while trying to blow air into the underside inspection port, but I figured out a solution. :D

LEAKS: The main offender was the drain plug (bailer?) inside the foot tub (pic below). The ball/check-valve part on the underside showed no leaks, which was surprising to me. So, do I replace the top side new? Or pry it out and re-seal it with silicone/permatex/chaulk or whatever?

One screw of the 2 that holds a black u-bracket next to the mast hole showed a slow bubble (sorry, I don't know proper nomenclature). It was a different screw compared to the other side. Pic attached.

I had a small bubbler in the center board slot, just about a 1/2" below the hull. I'm thinking I just need a small amount of resin to make it seal up. Pic attached.

And then the seam for the inspection port bubbled, so I took it off -- it was old and brittle so a big chunk broke off with very little force. I'm going to replace it new, the hole measures 4.5" -- but I only see them in 4, 6 and 8 inches -- am I correct in assuming that a 4" inch will work? Or at one time was there 4.5" inch inspection ports?

The seams, all the way around, showed no signs of leaking. I was shocked!!
Port sizes are proprietary, and could be a metric size. Is there a brand name visible? Maybe Holt & Allen?

I'd limit its replacement to 6-inches.
 
Nice work on the air leak testing.

The bailer hole, there is a seam there where the cockpit tub is bonded to the bottom hull with polyester resin adhesive. The bailer needs to be removed so that you can clean off that seam and try to isolate where the leaky spot is. Then we use a small plastic syringe to inject into the seam void, either polyester resin our or choice, a structurally thickened epoxy adhesive such as TotalBoat THIXO or Pettit Flexpoxy.

Syringe.jpeg


The syringes we used to buy in packs of 10 of the West System brand at West Marine, but they are about $3 each. Today we ordered some similar 12cc syringes with a curved tip from Jamestown Distributors for less than $1 each and free shipping. The narrow tapered tip is the key for us, we can cut the tip to a variety of diameters to get the right amount of epoxy into a void in a seam or for precision application in other areas. Resins are not cheap, so we try to use just the right amount.


The resin systems we bought at West Marine or now we use mostly mail order from Jamestown Distributors/TotalBoat. JD sells all of our favorite brands, and some folks use Hamilton Marine. We have a TotalBoat affiliate link to share that applies a 5% discount, and FYI TotalBoat and most JD products ship free.
 
Port sizes are proprietary, and could be a metric size. Is there a brand name visible? Maybe Holt & Allen?

I'd limit its replacement to 6-inches.

Yep, the brand name is "Sea Flo." I ordered a 4 incher from Prime - I suspect it will work and I can return it for free if it doesn't.

Quick question while I got your here:

- I think you said I should replace the (water-logged) foam I removed from the rear of the boat (use Great Stuff pond, I believe). Why is that necessary? I'd rather keep that space open for future accesss but I don't know anything - am I asking for trouble if I don't re-foam that area?

Thanks!!

:)
 
Not really. Most Sunfish decks have already "over-compressed" the Styrofoam underneath through decades of "normal abuse". :rolleyes:

See (listen) if your weight overly flexes the rear deck. If so, I'd build it up with squares of Styrofoam passed through the rear inspection port. Glue the squares together and slide them (according to height) where they're needed. "Spider cracks" are an indication of "over-flexing", but are not worth the effort to bother with a repair. IMHO.

Styrofoam has more structural strength than Pond & Stone.

My recent "otter experience" shows that otters can pick the expanded foam brand Pond & Stone out of where it's supposed to adhere to existing Styrofoam. :oops:

I probably shouldn't have installed a "bayonet mount" inspection port. They're not "otter-proof". :(
Okay, so I'm going without the foam. And I'll re-assess on my first few journeys per your advice.


PS - I musta missed the "otter" story - not sure what that is? Actual otters are attacking your sailboat?

:eek:
 
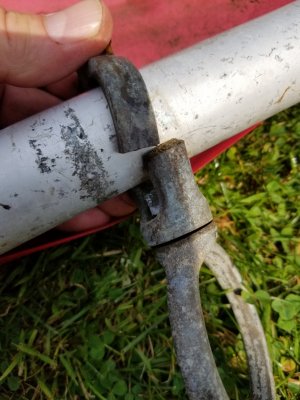
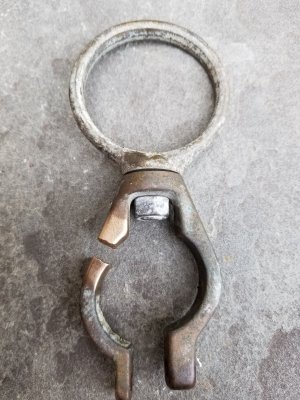
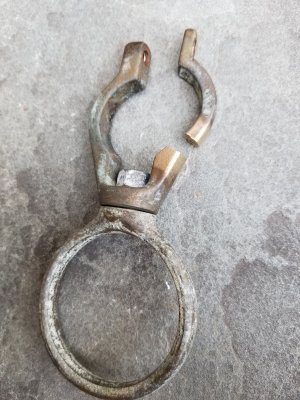
DOH! Found this as I inch closer to my maiden voyage. It's brass, or bronze, and as I suspected, ridiculously over-priced. Min $150 bucks plus tax and shipping from most of major suppliers (WTF?).

I cleaned it up and my buddy is going to attempt to mig-weld it. But this is a part that needs to flex by design so I don't have a lot of hope, we'll see.

There has to be some hacks out there to beat this grossly over-priced but fairly simple part. Anybody know of one?

Thanks!
 

Attachments

  • 20230701_150914.jpg
    20230701_150914.jpg
    741.8 KB · Views: 40
  • 20230701_163649.jpg
    20230701_163649.jpg
    1 MB · Views: 50
  • 20230701_163703.jpg
    20230701_163703.jpg
    1.1 MB · Views: 45
To "beat" this rig, the early Polynesian lateen rigs (similar to the Sunfish rig) had a coconut-fiber rope twisted into a "figure-8".

Failures such the one depicted can be traced to overtightening on a spar--that has shrunk in diameter--due to frequent overtightening. However, I suspect it already showed signs of fracture before it finally let go. I'd try to return it and get a replacement from somewhere else.

As you indicate, this will be a frequent source of repair. Maybe include outside reinforcement while brazing the bits together?

Thanks @LVW - This is the gooseneck that came with the boat - I didn't buy it or break it, I just noticed it was broken. I ain't spending $150-plus to replace it either - I'm pretty sure this boat isn't even wortth $150. :D

Never heard of a "Polynesian lateen rig" so I Google'd it with no luck. Are they available for purchase anywhere that you know of and do they work okay as a replacement for the GN? You have some really good Sunfish hacks, I figured you'd be the one to ask.

:D
 
When you don't have any coconut-fiber rope, you can use dacron, aramid, nylon, polypropylene, sisal, Manila, cotton, Dyneema or Kevlar. (Among others).
 
How to use "silver solder" to repair bronze:


While there, I'd add a band of copper or bronze on the outside of the that repair. (I've only worked with oxyacetylene and a "stick welder". MIG and TIG weling is not my specialty.

Send a "Conversation" to member "Roller". He knows some stuff!

Include me in the answer. :)
 
Sailed it today! It was about 90 degrees outside with 10-15 MPH winds. Went straight out from the launch about a 3/4 mile, turned around and came back. Total time on the water was probably less than an hour. But I'm still re-learning to sail and didn't have a ton of confidence in the boat, so I didn't wanna push it.

I put it in the back of my mid-sized pickup (Chevy Colorado) and it hung out the back quite a-ways. I used every cinch strap and ratchet strap that I own to secure it and about 8 industrial-type bungees for the various accoutrements. It's a LOT of work to transport a Sunfish, way more than what I'm used to with a 12-foot kayak.

I didn't get 10 feet from the ramp when the mainsheet block broke right off. That didn't stop me, I just held the rope directly in my hand. It worked fine.

The boat took-on a little more than a 1/2 gallon of water during the trip, not sure where how it got in? I drained it out when I got home.

I got this boat (a basket-case) for free and have since put about $125 bucks into it, so I'm thinking about selling it just to break even and spending what it takes to buy one that is in better shape. With the boat came an extra rudder, vintage brass and the good people here on this forum advised that it had value. I think I have a deal with a Craigslist user on that so it'll be gravy that I can use it towards the new sailboat.

A big THANK YOU to @LVW @signal charlie @beldar boathead @Sailflow @Wavedancer @Beekeeper @tag and everyone else here that advised, encouraged and educated me in this process - you told me I would be sailing it "in July "and indeed I have!! I never could have accomplished this without you fine people!


:D:D:D
 
Last edited:
Congratulations! You're 90% of the way there, fix the block and look for the leak with an air leak test, or just bail the water til the season is over.

We'd suggest sailing that boat for the season then deciding what to do when it's snowing later.
 

Back
Top