Padeye and Camcleat versus 'the Hook' versus Ratchet Block?

Tops

Mildly Thixotropic
Rigging up my brand newest oldest boat, pre-AMF in styling. Boat has a block instead of halyard fairlead and eye bolts instead of eyes molded in the caps.

-I am wondering if the padeye/fairlead and camcleat shown are useful as-is, or if I'd be better off using 'the hook' or work on getting a standing block.
-Also curious about the added wooden bits, looks like something was de-mounted there. ..? No evidence of a hiking strap attempt in the rear of the footwell.
-Last but not least, is there a preferred way to safety line a 'Barrington' style daggerboard w/o holes somewhere to the boat?

I have the gooseneck and halyard more or less in the Signal Charlie 'geezer' configuration (which would be 22" gooseneck to lower boom co-joined end (tack) and 60" halyard to upper boom loose end (head).
Thanks!
tops_ghost_rigging0.jpgtops_ghost_rigging1.jpgtops_ghost_rigging2.jpgtops_ghost_rigging3.jpg
 
Too late :) !
Ended up using the padeye, no hook no cleat. Tied a small rope to the spring of the daggerboard to the mast. Winds were 14 -17 MPH. The non-motorized launch was not busy and a kayayker offered to hold the boat while I boarded. About 50 feet out from the launch I caught a nice puff and the boat got moving. and all of the efforts into getting the boat and rigging it were 110% worth it! Back home, everything is rinsed off and drying. I did not have a camera or phone on board so you'll have to take my word for it ;) Pic is after landing and backing the trailer into the recovery position. Thanks for all of the posts and collected wisdom, I appreciate being here.

tops_ghost_rigging4.jpg
!
 
I would be very reluctant to use a small deck eye and clam cleat to secure the mainsheet. There would be a lot of friction in this rig making it very difficult to ease the mainsheet quickly in a strong gust, and a capsize would be likely. A small block with or without a cleat would be better/safer.

Alan Glos
Cazenovia, NY
 
I would have to agree that you'll be much happier with a block of a proper fair lead with cleat situation. My guess at the wooden piece in the cockpit is either
1. It had a main sheet block mounted on it (unlikely that wood would have held that much load though
2. It could've been a sort of toehold to make it easier to hike out without a strap, maybe the idea was to tuck you're forward foot under the bottom of the wood allowing you to get a little more leverage? Still a little sketchy, looks like the perfect invitation for splinters, stubbing your toe, or taking a surprise swim.
 
Is that padeye just screwed in the deck? The glass is about 1/8 inch thick. It will make it for a bit. That is why normal padeye and rachets are on the lip of the cockpit where it can be through bolted with washers or flat stock to spresd the load.
 
Too late :) !
Ended up using the padeye, no hook no cleat. Tied a small rope to the spring of the daggerboard to the mast. Winds were 14 -17 MPH. The non-motorized launch was not busy and a kayayker offered to hold the boat while I boarded. About 50 feet out from the launch I caught a nice puff and the boat got moving. and all of the efforts into getting the boat and rigging it were 110% worth it! Back home, everything is rinsed off and drying. I did not have a camera or phone on board so you'll have to take my word for it ;) Pic is after landing and backing the trailer into the recovery position. Thanks for all of the posts and collected wisdom, I appreciate being here.

View attachment 57862!
She sailed with you! My soul is happy :)
 
Alan, JC, Charles-
Thanks for the comments. I had not even thought that some of the 'extra' bits would be screwed onto/into the boat and be suspect to failure and/or causing injury. I will take a look and report back.

Holly-
Thanks for setting me up with the boat, I am so glad to have sailed this last weekend.
 
Get rid of the eyestrap and the Clamcleat ASAP. That combination spells ”capsize”. Use the hook while considering a ratchet block. Keep the eyestrap (it has no pad so it’s no ”padeye” really) for that, and throw the Clamcleat away.

The wooden piece might have been intended as a compass mount.

_
 
Last edited:
highly recommend a ratcheting block (and maybe a cam cleat, mounted on the cockpit lip if you really want a cleat).
img_4563.jpg


Here are the relevant part numbers (shown on a Minifish, same concept applies, and it is actually easier to install on the cockpit lip of a Sunfish):

mainsheet-cleat-parts-list.png
 
The deck bits were mounted with screws.
How thick of a backer is needed to mount a block to the lip? I have 1/4" (6.4mm) FR4/G10 board and I can get aluminum or stainless.
 
The deck bits were mounted with screws.
How thick of a backer is needed to mount a block to the lip? I have 1/4" (6.4mm) FR4/G10 board and I can get aluminum or stainless.
I used 4 bolts with the thickest and biggest diameter fender washers I had laying around (probably and inch in diameter) and haven't had any signs of cracking or other issues in that spot. I used a chainplate from a cal20 (I think) to mount the ratchet and spring on. Just happened to have it laying around. I used the other chainplate as a halyard fairlead when that pulled out, same thing 4 bolts and a backing block so far no issues. And now I know for sure that those won't be the failure points on my boat! :) :rolleyes: 
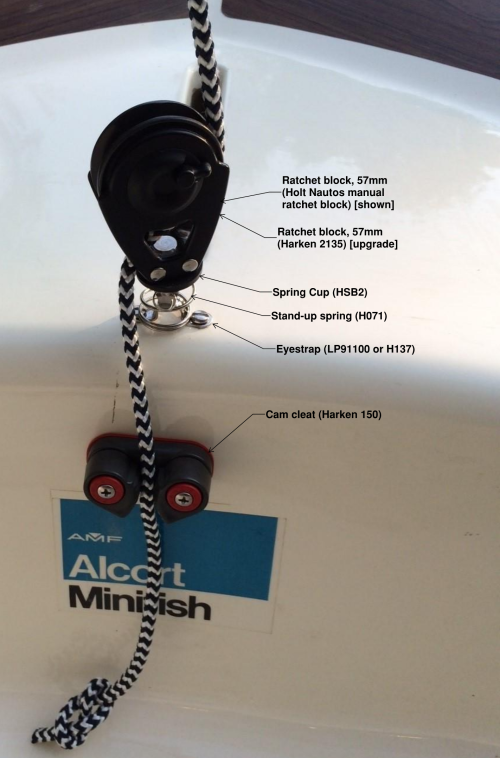
Now this obviously isn't class legal but it's on my beater/beach/practice boat anyway.
*make sure to round off the bottom of any bolts you put through that lip with a file or dremel after you put the nuts and washers on, you'll probably inadvertently bump them with your feet hiking out sooner or later.
 
.
*make sure to round off the bottom of any bolts you put through that lip with a file or dremel after you put the nuts and washers on, you'll probably inadvertently bump them with your feet hiking out sooner or later.
I've got (totally) nylon nuts holding my block and cam-cleat. They're about two inches long, so access/snugging is easier. For a socket or wrench, they've got (guessing) 5/16" ends, but "finger-tight" is tight enough.

(I remove the block/cam-cleat every winter).

When i had one, I liked the old, superceded, halyard block, but examine for wear and gently "snug" the screws every season.
 
Thanks. I went back and looked and felt under the lip. The white boat did have holes for something installed above the hook. The back of the clamcleat could have been bolted but featured exposed screw threads under the lip. I have not tried undoing the wood to see what is there for hardware.

So... ratchet block … I am uninitiated in that regard: what it the advantage of having one of those? Is a plain block better than no block at all? Asking as I have a few plain ones, about the right size, from another boat, laying in wait.
Plain block will work fine, definetly better than no block. The ratchet block simply adds friction to the line going out, but not when you're pulling it in; it just takes some of the load off your hand.
 
Hoping to stop at West Marine on the way to a family event and look at the ratchet blocks and the swivel fairlead and camcleat combos. I think there is a Labor Day sale...
 
I picked up a ratchet block, (Ronstan RF56100), a fairlead/camcleat combo (Ronstan RF58) and a couple springs (Harken 097) on sale.
The springs seem one size too small/too weak to keep the block standing up, they did not have the one size larger. I also don't have the rightt machine screws/washers/lock nuts to installl anything (at least where II can find them readily).

Old hardware is removed. The hull at the second screw on the eye strap was near failure and it looked like it had been 'gooped' once before as a fix.

-Does one set both side of the Ronstan block to look like the picture above?

Part of me wants to solve the mystery of the wooden blocks, patch the old screw holes, and install some new hardware.
The other part wants to tape up the holes and go sailing right now and may settle for the hook...where's my PFD?
:)
 
Do you have the plastic tube that goes on the vertical bolt on your rudder? If you find your rudder pops out the plastic tube helps that.
I don't have the plastic one, I tried a couple on hand options last week and came up with a piece of black rubber fuel line. The spring is homemade too (want to say it's 1/16" or 1.6mm stainless steel, the joys of having a machine shop with scraps at work ;) ).
tops_ghost_rigging6.jpg
 
It seems you peeled off all the extra junk except the open fairlead aka sheet hook. Good

The eyestrap could be riveted in and be useful as a place to attach the daggerboard retainer line. Many of the AMF boats had an eyestrap just forward of the daggerboard trunck for this purpose. You can drill a 1/4 inch hole into the daggerboard cleat (handle) to tie the other end, many daggerboards came from the manufacturer with this hole already drilled. Your board may have one, probably filled with dirt. Or add and eyestrap and stainless ring to the top of the handle. If you want a daggerboard bungee, buy 10 feet of 1/4 inch bungee and run it all the way to the bow handle and back.

If you're just out messing about, forget about cleats and use you arms and hands like Skipper does. Our boats have the older style AMF swivel cam cleats, she doesn't use them. I do use them.

"I have the gooseneck and halyard more or less in the Signal Charlie 'geezer' configuration (which would be 22" gooseneck to lower boom co-joined end (tack) and 60" halyard to upper boom loose end (head)." Works every time for us!

IMG_2359.jpeg
 
It seems you peeled off all the extra junk except the open fairlead aka sheet hook. Good

The eyestrap could be riveted in and be useful as a place to attach the daggerboard retainer line. Many of the AMF boats had an eyestrap just forward of the daggerboard trunck for this purpose. You can drill a 1/4 inch hole into the daggerboard cleat (handle) to tie the other end, many daggerboards came from the manufacturer with this hole already drilled. Your board may have one, probably filled with dirt. Or add and eyestrap and stainless ring to the top of the handle. If you want a daggerboard bungee, buy 10 feet of 1/4 inch bungee and run it all the way to the bow handle and back.

If you're just out messing about, forget about cleats and use you arms and hands like Skipper does. Our boats have the older style AMF swivel cam cleats, she doesn't use them. I do use them.

"I have the gooseneck and halyard more or less in the Signal Charlie 'geezer' configuration (which would be 22" gooseneck to lower boom co-joined end (tack) and 60" halyard to upper boom loose end (head)." Works every time for us!

Thanks for the fun pictures and video. Yes, I cleared the deck so to speak. Got out today, no issues with the open fairlead or just holding the mainsheet. I had to cut it short when I saw the upper gudgeon had lifted to the point where it would not keep the pintel assembly in the lower gudgeon. Seems like the butyl that I put around the 3 screws to seal them acted as a lubricant to a previous owner's repair to the upper gudgeon screw holes using blue drywall anchors. There is also water weeping from a crack rounding the corner of keel to transom. I drilled a couple small holes along the crack and some more came out.
 
If your rudder pops out with the soft tube.

The vertical tube was hard plastic to keep the upper and lower parts in line.

PTFE tube is 8547K31
You have to drill the tube out a little for the bolt
from Breeze Bender
 
Thanks SC, thanks Charles!

My screws holding the upper gudgeon to the deck backed out of the plastic inserts, so the whole piece was 1/4" off the deck.
Wondering if drilling out the inserts and holes and filling with epoxy and re-drilling would be a good fix and a quick way to determine if the blocking is OK versus adding an inspection hatch or splitting the hull.
 
Did you put in the plastic inserts? Normally the screws go into a wood backing block. I would not undo all the screws as if the block is there it could drop. If the block is there i would fill and redrill. If you poke in hole you can confirm if the block is there. If you flip your boat and here a noise it would be a block.
 
The inserts were already there, guessing two owners ago. There is also glass and resin from a previous repair. I will poke around some more tonight.
 
After a thorough 25-minute analysis: involving screws, crowbar, drill bits, phone, and a hole saw:
1. Boat has been repaired in this area before.
2. Anchors were not in wood, confirmed with bent nail before using hole saw.
3. Fiberglass surrounding block location is partially in place along with a small piece of wood starboard outside the screw locations against surround.
4. Rest of wood block is missing, sounds like it's up near the tub.

If I open it up just enough to do the upper block, should I plan on remove/dry out area/replace the lower block?
Holes are sealed with packing tape until the next working session.

tops_ghost_gudgy0.jpgtops_ghost_gudgy1.jpg tops_ghost_gudgy2.jpgtops_ghost_gudgy3.jpg
 
In case the makeup of the hull at the hole is of interest...one can see the mat used to attach the wooden block below the woven roving and the added resin, lightweight cloth, and trace of color above the medium blue gelcoat.
tops_ghost_xsection1.jpg
 
highly recommend a ratcheting block (and maybe a cam cleat, mounted on the cockpit lip if you really want a cleat).
View attachment 57884

Here are the relevant part numbers (shown on a Minifish, same concept applies, and it is actually easier to install on the cockpit lip of a Sunfish):

Where'd you get the cool Great Lakes graphic. Me want one!
 
"If I open it up just enough to do the upper block, should I plan on remove/dry out area/replace the lower block?"

Most of the time yes. It's going to be interesting to see how you go about doing that.

There are wooden backer blocks inside the hull for the bridle eyestraps also. We check those by gently lifting the stern by the bridle. They usually last a little longer than the rudder releasing mechanism blocks.

I decided to go in from the top, current hole is about as big as the original upper rudder backer block with room fore and aft to catch a new block. It seemed like I would have better access to the lower block and to get rid of the initial bore hole and some of the heaped resin on the deck.

The wood block shown was under the deck starboard of the upper gudgeon and is saturated with water. Some of the upper block fiberglass strapping was also quite wet. The PU foam I have removed is wet on the surface and very dry in the middle. I am able to lift the boat by the bridle without incident. The lower rudder release block and fiberglass strap are mush. I pushed a plastic-tubed cotton swab into the screw hole and it came out into the hull. I am not sure what to make of the wet/dry patterns I am seeing.

I got a busted hardwood pallet from work to up-cycle into blocks and I have all of the glass fiber, resins, and powdered accoutrements for fiberglass work. I just need to work the problem and not the emotions related to another boat not in the water. It's looking better this morning than last night.

Laser Performance replied to my earlier email about the 1987 (first cross section on another thread) and recommended using a layer of 300 GSM (1oz per sqft) mat between the roving and gelcoat for cosmetics during repairs. I have this in the epoxy-compatible binder version.

I was thinking of removing a bit more of the white house paint on the deck to see how far the old repair went and sand the keel/transom area in preparations to address the crack that was weeping water.

Any reason(s) why the lower rudder block could not be shorter and/or more encapsulated? The exposed end grain seems like a liability.

tops_ghost_gudgy5.jpgtops_ghost_gudgy6.jpg
 
@Weston the Great Lakes sticker was from a clothing brand called Gybe Ho Boatwear, which was created by a guy here in Michigan. The website is no longer around… so maybe he stopped selling stuff?
 
You have a pre 71 sunfish so having the blocks rot would not be uncommon. I would replace the wood since you have it open i would not worry about open grain and get out on the water. I do wonder how you are going to replace the top block and deck and carry the load from the rudder in big winds. It would be the time to upgrade to the newstyle rudder. You could skip the wood blocks as the load is carried by stern with and internal bacher and external rudder bracket. Your glass work would be easier as you could install a port
 
You have a pre 71 sunfish so having the blocks rot would not be uncommon. I would replace the wood since you have it open i would not worry about open grain and get out on the water. I do wonder how you are going to replace the top block and deck and carry the load from the rudder in big winds. It would be the time to upgrade to the newstyle rudder. You could skip the wood blocks as the load is carried by stern with and internal bacher and external rudder bracket. Your glass work would be easier as you could install a port

Thanks Charles. I thought about the new rudder hardware too. If I swapped it in, then my 2 more complete boats would be the same system. I like the way the old system looks but as not thrilled by how it works on this boat.
 

Back
Top