Vang Setup

Lorenzo

Member
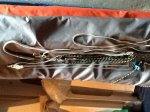
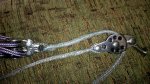
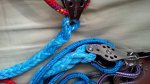
So I just got my new Harken vang for Christmas and my main question is do any of you have a bobble at the top and if so, why? Also, do you splice the rope to the top block or just tie a bowline?
 
I got a question. You guys keep referring to a "bobble". What's a "bobble"? Dang foreigners. :)

- Andy
 
Hey Lorenzo,
I've found this to be very sweet and a cinch to rig / de-rig ..... See pic.
The control purchase spliced rather than ugly knotted to the kicker, the top block also neatly spliced.
Note the fat vectran spliced - that's the down haul primary....merely pass the soft loop splice through the clew cringle and slip that hooked block on, the line through the block goes back down and through the deck plates....takes seconds to set up and no poxy knots to mess with cold fingers
 

Attachments

  • image.jpg
    image.jpg
    289.2 KB · Views: 119
Wow, but how did you end the splice, i cant find any fid small enough to run through the rope, i ended up ending it with a half hitch. P.S That a really cool system, I think ill try it out.
 
Thanks man....
I got a piece of old rigging - think it was 7x 19 shroud ! Can't remember.... Undone about a 15 inch length of a single strand and doubled it up ( bent it in half ), the sharp ends I wrapped around a small bit of oak and bent them back up on themselves twisting it all up neat n tight, taped it up ! Presto...
One fine dyneema fid, cost nothing but the scraps lying about...

It's a permanent part of the rigging kit now !
 

Attachments

  • image.jpg
    image.jpg
    195.5 KB · Views: 117
Ill have to stick with the half hitch till i make something to finish it. But one last thing, how did you splice both ends?
 
On the kicker primary ? Simple eye splice, they take about five minutes.
The tails only go back through the rope for a few inches, four maybe ?
Do one, then the other on the other end there's no need for them to pass through each other or anything..you can do it mate, YouTube it if you get stuck, it's a simple ' eye splice '.
 
Cause the way i do it is, I pass the tail through the long end and then the long end back through the tail then the tail goes through the rope and tapers off. But what i think you're saying is to just use the tail alone?
 
That's the same.....where you are planning on making a loop at each end around fixed anchor points, you plan ahead....merely make the snake eat itself at one end ( where you turn the line inside itself to make a hole in the weave ) and before you commit to bending the tail around the kicker, go to the other end and make the snake itself there....
Now you'll have a single bit of line with a ' hole ' in the weave at each end..
Now you can carry on with the rest of the eye splice around the top block or kicker, whichever you fancy...do one at a time.
Go for it !
 
Ok,
Follow the picture story
image.jpg
This is the same gear as what's on your kicker primary, stripped of its outer...this is an old used bit which isn't as easy to manipulate
image.jpg
Note the small size of the eye, the marks are only 40mm apart.
image.jpg

Now the fid goes straight through the innermost mark, right up until the hollow nearly falls through, then insert your tail
image.jpg

image.jpg

Now pull it through like in that video...but..
image.jpg

Keep pulling...
image.jpg

And keep pulling....
image.jpg

Until the rope inverts through itself....now , see the tiny hole ? Use the fid to enlarge it..
image.jpg

Now go through the hole with the fid in the same direction as before....
image.jpg

This time more or less mark to mark...then flip the fid to the other side three rows below the hole...
image.jpg

Back through....
image.jpg


image.jpg


Nice n tight.........I've just used a pair of scissors to emulate your kicker / top block..
Now just gotta bury the tail, be sure to insert your fid beyond the length of the tail.....this is where that wire fid wins out
image.jpg


Pull through, I've seen vids where people just cut the dyneema at an angle and declare it great....the company that makes the stuff says to pull one strand in a vertical line, per horizontal row...for six lines and trim them...it's a much neater taper.
image.jpg


Brush the outer down over the taper with your thumb a few times...


To put an eye in both ends where you're gonna have fixed objects in each, do up to pic 9 on both ends before you do anything else, then just crack on one end at a time no probs....
Hope this helps.
 
Scrub the last comments, it doesn't matter if you want to do both ends they are independant of each other....
( Xmas whiskey causing issues here, sorry ).
 
image.jpg
Heh. Dunno 'bout that man but cool beans...enjoy yourself

Ahh yeh, forgot..again...lolz.
See the working purchase coming off the lower block - I found it's smoother with the outer left on and when the eyes are full of spray on the deep reaches it's easier to identify. But if it ain't whipped it'll ride down, so I buried the splice taper back inside the outer and spliced it up tight, that was back in June ? It ain't budged so..
 
Last edited:
Well I couldn't find any wire so I ended up using an ice pick and tape and many hours later here's the result, the fingers are red and sore but its done. Now to just clean it up a bit, any idea how to fix the pulled strands?
 

Attachments

  • IMG_00000028.jpg
    IMG_00000028.jpg
    2 MB · Views: 69
I'm not adventurous enough to try the control line cause i darn well near destroyed the primary doing that splice.
 
Pulled strands....find some decent tunes, a pair of fine long nose pliers or similar... Tweak n tuck. Or take your time and do it again....
Nothing wrong with that what you've done there tho'....put some pressure on it, it will settle. Good work L.
Do some more...
 
I would have done it with the outhaul/cunni but sadly i cut the ropes already. But i think i may get new primary lines.
 
I did some calculations and I managed to get it to work :) Splices on vang, outhaul, cunningham and traveller.
 

Attachments

  • IMG_00000031.jpg
    IMG_00000031.jpg
    1.8 MB · Views: 62

Back
Top