WILD BILL
Member
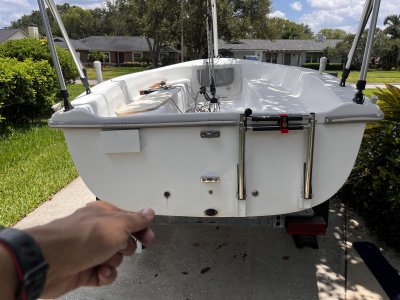
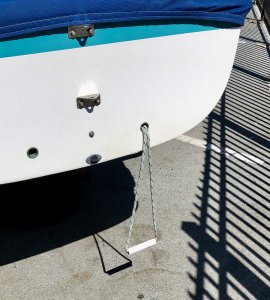
I recently installed the Garelick 19615 boarding ladder to the starboard side of the transom of my boat, and used the Beckson 4 inch storeaway deckplate in the aft end of the starboard bench area. The deckplate allows you access to the internal area of the boat transom.
First let me say a big thank you to Greg Coats. His idea was posted some time ago and I copied all the information and pictures he posted for reference for installation to my boat later. This was an excellent and well thought out post and was very helpful. Greg also posted his phone number and I called him a couple times for questions and information on some details of the ladder installation. This forum is very useful and thanks to people like Greg who are willing to help out when needed. When you are drilling holes in your boat, the last thing in the world, is you don't want to make any major mistakes. Greg's idea is right on, but I also wanted to add a couple of comments and pictures.

My sailboat was not sitting on the trailer level and was slightly low on the port side. So I put a level across the aft end of the boat and a friend of mine and I lifted the boat and repositioned it on the trailer.

This enabled me to use level pencil lines for drilling holes and positioning the ladder. Also it made it easier to put vertical reference lines for the brackets that hold the ladder.
Using Greg's measurements, I I established a vertical reference line for the left side ladder bracket 4 1/2 inches from the center line of the lower rudder Gudgeon. Also looking at Greg's pictures, I made a level line even with the bolt holes that attach the Gudgeon bracket.

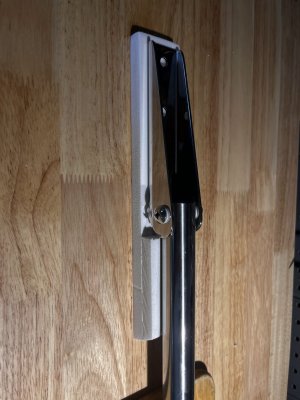
I then position the ladder against the transom, and marked and drilled the four 1/4 inch holes.
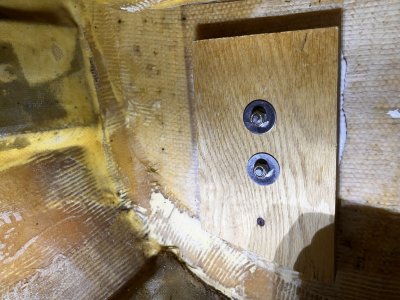
Now to the inside for positioning and attaching the additional teak wood blocks for reinforcing the area of the transom where the ladder brackets will be installed.

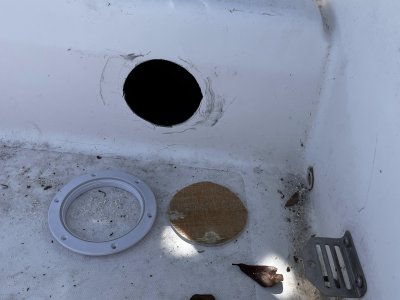
This is a 4 1/2 hole and I used a sabre saw that had a scrolling feature. I first wanted to use a hole saw, but after checking prices, the 4 1/2 hole saw and mandrel would cost around 45.00. So opted to use the sabre saw and worked the scroll knob to cut the hole. The space in this area is limited, so maneuvering the saw is a bit tricky.

I strongly recommend taping the edges of the hole to protect you from scratches and getting fiberglass on your skin. Otherwise you will itch for days. This allows you access to the transom area but also is limited for movement of your arm in this area. A word of caution, do not drop hardware or tools down inside the boat when working in this area. Because of the curvature of the hull, it is almost impossible to retrieve anything your should drop. I dropped a small flashlight and it rolled to the center of the boat, after 30 minutes of fishing, I retrieved the light.


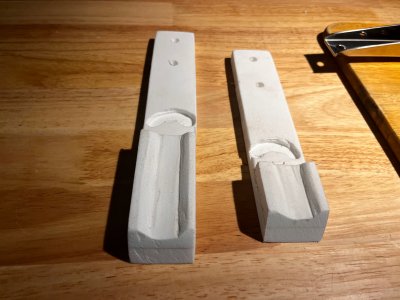
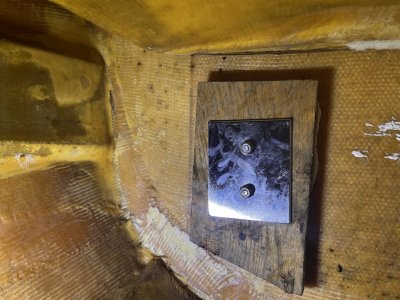
The top picture is the 3/4 inch teak block for extra backing for the right side of the ladder bracket. The lower picture is the teak block for the left side ladder bracket. The left side piece is wedged in horizontally and is a tight fit, but this is necessary to fill the space between the two transom walls. Also I used Gorilla glue to attach wood blocks. Greg used an epoxy which is probably better. I already had this expensive glue that bonds to anything, and it appears to have worked well.

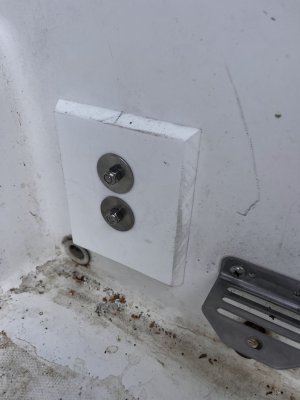
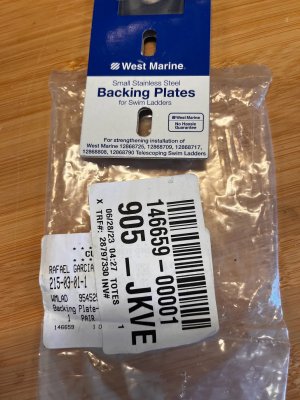
I elected to remove the brackets from the ladder for easier installation. Also I backed up the brackets with Polypropylene pieces for extra strength to the transom. In the first picture with the level, you will notice the Polypropylene cutting board I purchased at Wal Mart. This stuff is tough and will not require further maintenance. I additionally used clear silicone for all the holes drilled in the transom.


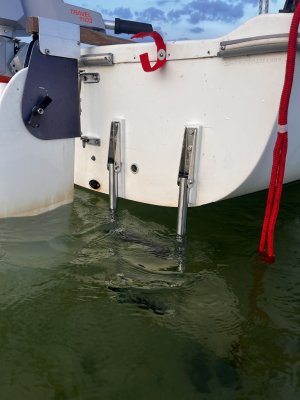
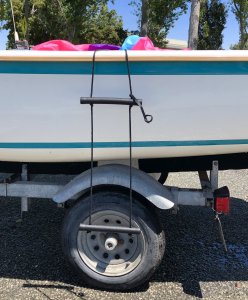
Final installation. The ladder is rated for 275 lbs. The yellow strap can be purchased at West Marine.

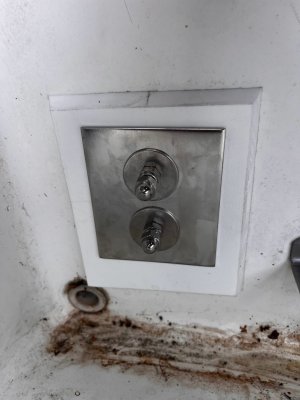
The storeaway deckplate is installed with 1 1/4 inch 10-32 panhead screws with nylon lock nuts. Silicone was again used for the screw holes and around the bottom between the deckplate and bench seating area.
First let me say a big thank you to Greg Coats. His idea was posted some time ago and I copied all the information and pictures he posted for reference for installation to my boat later. This was an excellent and well thought out post and was very helpful. Greg also posted his phone number and I called him a couple times for questions and information on some details of the ladder installation. This forum is very useful and thanks to people like Greg who are willing to help out when needed. When you are drilling holes in your boat, the last thing in the world, is you don't want to make any major mistakes. Greg's idea is right on, but I also wanted to add a couple of comments and pictures.
My sailboat was not sitting on the trailer level and was slightly low on the port side. So I put a level across the aft end of the boat and a friend of mine and I lifted the boat and repositioned it on the trailer.
This enabled me to use level pencil lines for drilling holes and positioning the ladder. Also it made it easier to put vertical reference lines for the brackets that hold the ladder.
Using Greg's measurements, I I established a vertical reference line for the left side ladder bracket 4 1/2 inches from the center line of the lower rudder Gudgeon. Also looking at Greg's pictures, I made a level line even with the bolt holes that attach the Gudgeon bracket.
I then position the ladder against the transom, and marked and drilled the four 1/4 inch holes.
Now to the inside for positioning and attaching the additional teak wood blocks for reinforcing the area of the transom where the ladder brackets will be installed.
This is a 4 1/2 hole and I used a sabre saw that had a scrolling feature. I first wanted to use a hole saw, but after checking prices, the 4 1/2 hole saw and mandrel would cost around 45.00. So opted to use the sabre saw and worked the scroll knob to cut the hole. The space in this area is limited, so maneuvering the saw is a bit tricky.
I strongly recommend taping the edges of the hole to protect you from scratches and getting fiberglass on your skin. Otherwise you will itch for days. This allows you access to the transom area but also is limited for movement of your arm in this area. A word of caution, do not drop hardware or tools down inside the boat when working in this area. Because of the curvature of the hull, it is almost impossible to retrieve anything your should drop. I dropped a small flashlight and it rolled to the center of the boat, after 30 minutes of fishing, I retrieved the light.
The top picture is the 3/4 inch teak block for extra backing for the right side of the ladder bracket. The lower picture is the teak block for the left side ladder bracket. The left side piece is wedged in horizontally and is a tight fit, but this is necessary to fill the space between the two transom walls. Also I used Gorilla glue to attach wood blocks. Greg used an epoxy which is probably better. I already had this expensive glue that bonds to anything, and it appears to have worked well.
I elected to remove the brackets from the ladder for easier installation. Also I backed up the brackets with Polypropylene pieces for extra strength to the transom. In the first picture with the level, you will notice the Polypropylene cutting board I purchased at Wal Mart. This stuff is tough and will not require further maintenance. I additionally used clear silicone for all the holes drilled in the transom.
Final installation. The ladder is rated for 275 lbs. The yellow strap can be purchased at West Marine.
The storeaway deckplate is installed with 1 1/4 inch 10-32 panhead screws with nylon lock nuts. Silicone was again used for the screw holes and around the bottom between the deckplate and bench seating area.


 To be honest, I didn't think it through enough to realize it would be required when the mounts are that low. Originally I figured I'd get a ladder that mounts up high on the transom, but I didn't stop to consider that it would stick up too high when folded up, and get in the way.
")