Repairing Older Sunfish?

acs026

Member
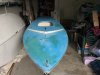
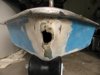
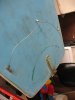
So I have been looking for a sunfish that is a little worse for wear so I can fix it up myself. The only one I have been able to find is a mid 1960s model. I was wondering if this would be in anyway more difficult then say one of the later models. From my knowledge the only real difference is that the rudder assembly is different and you do not have the storage in the cockpit? I would be patching a couple of holes and drying it out and redoing the entire gelcoat. Please let me know any advice that would be helpful.

Thanks
 
I'm working on a late 60's boat (1969 or 1970), my first big repair project. I can't compare it to other years, but a couple of thoughts from someone new to this level of maintenance;
- start with a couple of inspection ports. I was really nervous about taking a saw and cutting a great big hole in my boat, but you're going to have to do it. I put a 6" port aft, where I could get to the backing plate for the rudder assembly and a 4" port forward, where I could get to the handle on the bow. A third one, behind the splash guard may follow if I determine that my leak is there.
- Beckson makes a ditty bag for their 6" inspection port. It seems like a great idea, but you have to glue a retaining ring to teh port BEFORE you install it. So, if you get the beckson port, and you think you might want the bag, get that at teh start too.
- don't glue/bold the port covers in right away, the holes are slightly bigger, so it's easier to reach in before you put the port assembly in place permanently.
- then, get a cheap 6" fan, pull the front off the cage, and tape it to the 6" hole, and let it run. Wet clammy air will start exhausting from the hole at the bow. Let it run, and run. It took months for that foam to soak up all that water, it's not going away instantly.
- My thinking is, lose the water weight first, because you will probably want to be able to flip the boat over to work on top and bottom as you restore it, why try to lift a 200# boat, if you could lift a 130# boat.
- the newer rudder is certainly better, but you can get parts for the old ones - I found this guy's address in the yahoo sunfish group, and he was great to deal with: Herb Baker: [email protected] (Herb, I hope it's OK I reposted your address, I found it in a public forum, so I'm thinking it is). You can put the old rudder into shape for a season or two for a lot less. They still work, as well as they ever did.

Good luck, I may post further thoughts as I get further through my project.
 
Thanks for the help. I have found that the boat is a 62. I hope to get started soon.

Thanks
Alex
 
Sure I just needed to resize them. I am certainly going to need a little luck. :) The person who had it before me already started the sanding. It is definately heavey. I have not weighed it yet though. so my plan of action was!?

1. Ports
2. Patch Holes
3. Remove Hardware
4. Sand
5. Prime and Paint
6. Attach New Hardware

Does this seem like the right order to go about things?
Any one has any advice on types of paint or the right way to patch the holes that would most appreciated. Already ordered a couple of books on fiberglass repair, but any tips are certainly welcome.

Thanks In Advance.
Alex
 

Attachments

  • 4.jpg
    4.jpg
    295.1 KB · Views: 66
  • 5.jpg
    5.jpg
    145.1 KB · Views: 63
  • 3.jpg
    3.jpg
    224.2 KB · Views: 62
  • 2.jpg
    2.jpg
    142.7 KB · Views: 63
  • 1.jpg
    1.jpg
    587.3 KB · Views: 67
I'd remove the hardware before you patch. You might want to reinforce, or repair the mounting points while patching.

Also, I have a 4" access port just behind my bow handle, for drying and for getting at the back side of the handle mount. It's just big enough. If I had to get my hand in there far enough to repair that hole in the nose, I'd put in a 5" or even 6" port.

I put my aft inspection port about 6" forward of the line between the two bridle attachments. I did that because putting a big hole in the boat close to the edge was just too scary for me. But, if I had followed the advice of others and put it right between the bridle attachments, I would have missed the big block of foam back there entirely. No guarantee that your foam blocks are exactly where mine are - but that was my experience.

At some point, when you've patched and repaired and sanded, but before your final coat of paint, you are going to want to do a pressure test. Close everything up tight, except the little drain hole. Use that hole to pressurize the inside of the boat. I have an air pump with a conic nozzle that fits tightly, but a method I have seen others reccomend is to put a piece of duct tape over that hole, and push the inflation needle from one of those pumps used for balls (basket ball, soccer balls, etc) through it. When the hull is pressurized, paint soapy water over it, and see where it bubbles up. That will indicate air escaping - and a little more patching needed.

Here's the problem, that I have yet to resolve well for myself. You need to have the inspection ports on, and sealed tight to do this well, but you want them off for the final coat of paint.
 

Back
Top