musechaser
New Member
This may be a little too involved for a simple answer. I've searched the messages on this board but couldn't find any mention of the repair issue I have. I WOULD like to repair my boat and make it lake-worthy again, and your company seems to have the materials I'd need.
Here's the deal; I picked up an ancient Sunfish maybe 8 years ago, and used it to learn to sail, at least at a rudimentary level. At the time it had a few cracks in it and the lines were all rotted, but those simple things I fixed no problem and got a few good years out of her. Then.. my kids got older, life got busier, and the boat sat under a tree for three years. I just got her out and cleaned her up.. and... bummer...
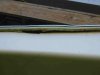
I had it resting on it's side up against a young apple tree, and the tree grew over the boat, exerting downward pressure on the side resting against the tree. It bent the metal molding in towards the cockpit enough to crack the fibreglass immediately below the molding where the side comes up to form a lip that enters the molding and mates w/ the deck. The crack is a good 10" long. The deck seems to be intact; it's just the side where the fibreglass has torn and parted company w/ the lip. A ton of water came out when I opened the drain plug, of course.
Here's my undeducated game plan; please correct or add to it.
1. Install two deck plates, per numerous suggestions on this message board. One 6" between the daggerboard and splash rail, and one 5" behind the cockpit, 1/2 way towards the rear. Perhaps an additional third port ahead of the mast? These would be used to aid in drying out the foam inside, resecuring it if necessary (I'm sure it is), and in accessing the interior of the crack to aid in the repair.
2. Drill out the rivets of the moulding to a distance of about 12" to either side of the crack, then cut out and remove that section of moulding.
3. One the area is cleaned and dried using acetone, somehow use some type of fibreglass cloth and resin to repair/rebuild the side w/ a new lip from the inside out, which would probably require lifting up at least a portion of the deck. Is it flexible enough to do that? I'm fuzzy here... I've never done any work w/ those materials, and am unsure how to "rebuild" the side and lip to get the correct shape and rigidity.
4. Once the area has been patched from the inside, then fibreglass over the outside to get a smooth result.
5. Drill new holes for the moulding, seal w/ silicone, and pop-rivet it back on through the top of the moulding, deck, and side lip only.
Sooo... sound like plan? Any advice for the actual forming and use of the fibreglass materials? WHICH materials should I use? I confess I'm not sure which tape width or construction would be best.
I was going to just chuck the whole thing, but the mast, sail, rudder assembly, daggerboard, etc., are all in good shape and a new Sunfish is.. well... insanely priced, so I might as well see if I can resurrect this one w/ a little elbow grease.
I'd LOVE some help. Thanks for any advice you can give.
Best wishes... Barry
Here's the deal; I picked up an ancient Sunfish maybe 8 years ago, and used it to learn to sail, at least at a rudimentary level. At the time it had a few cracks in it and the lines were all rotted, but those simple things I fixed no problem and got a few good years out of her. Then.. my kids got older, life got busier, and the boat sat under a tree for three years. I just got her out and cleaned her up.. and... bummer...
I had it resting on it's side up against a young apple tree, and the tree grew over the boat, exerting downward pressure on the side resting against the tree. It bent the metal molding in towards the cockpit enough to crack the fibreglass immediately below the molding where the side comes up to form a lip that enters the molding and mates w/ the deck. The crack is a good 10" long. The deck seems to be intact; it's just the side where the fibreglass has torn and parted company w/ the lip. A ton of water came out when I opened the drain plug, of course.
Here's my undeducated game plan; please correct or add to it.
1. Install two deck plates, per numerous suggestions on this message board. One 6" between the daggerboard and splash rail, and one 5" behind the cockpit, 1/2 way towards the rear. Perhaps an additional third port ahead of the mast? These would be used to aid in drying out the foam inside, resecuring it if necessary (I'm sure it is), and in accessing the interior of the crack to aid in the repair.
2. Drill out the rivets of the moulding to a distance of about 12" to either side of the crack, then cut out and remove that section of moulding.
3. One the area is cleaned and dried using acetone, somehow use some type of fibreglass cloth and resin to repair/rebuild the side w/ a new lip from the inside out, which would probably require lifting up at least a portion of the deck. Is it flexible enough to do that? I'm fuzzy here... I've never done any work w/ those materials, and am unsure how to "rebuild" the side and lip to get the correct shape and rigidity.
4. Once the area has been patched from the inside, then fibreglass over the outside to get a smooth result.
5. Drill new holes for the moulding, seal w/ silicone, and pop-rivet it back on through the top of the moulding, deck, and side lip only.
Sooo... sound like plan? Any advice for the actual forming and use of the fibreglass materials? WHICH materials should I use? I confess I'm not sure which tape width or construction would be best.
I was going to just chuck the whole thing, but the mast, sail, rudder assembly, daggerboard, etc., are all in good shape and a new Sunfish is.. well... insanely priced, so I might as well see if I can resurrect this one w/ a little elbow grease.
I'd LOVE some help. Thanks for any advice you can give.
Best wishes... Barry