Real Newbie on Boom setup Huge Help Laser Std!!

mamaoi

New Member
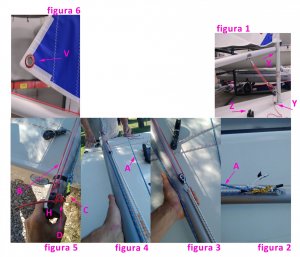
Hi, i'm a newbie in sailing a Laser, i bought my laser days ago (second hand), and on my boom i got the set-up as i listed on the photo attacched to this message, this setup is advanced for my knowledge, i could set for a classic laser setup as mentioned in the manual, but i like the previous one of my seller, i just need to understand how it's works!! Sounds like a tricky game, but i really ask you a huge help on how to solve my issue, and i'm sure there is someone who will soon recognize this kind of setup and i really appreciate for an explaination !!!

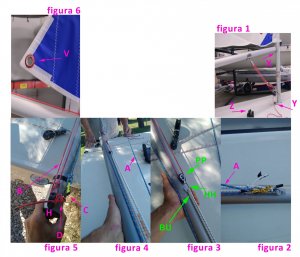
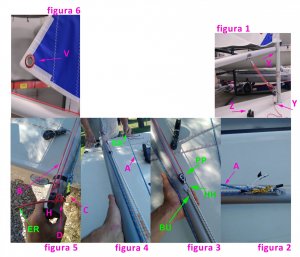
My questions concerned to the picture are :

1) where is going to finish the end of rope named A ???
2) the end of rope B, is going through H, and then it rolls to the pulley C, but in reality, which is the function of end rope B and where is going to finish ???
3) Who is going to tighten the hole V on the sail???
4) the pulley C, how is it tighten ??? (and who is going to block the pulley C ?) ... on point D ???
5) no one of the ropes A-B is going to pass trought the points X - Y - Z ???

Thanks alot, i know, its a little bit tricky, but i would like to learn all by myself, i have experience, by climbing, of some amount of knots and hoists, and some experience in surf and windsurf, nothing about sail, but i am a good learner !!! (self-learner)

Hope someone can help, that wouls be really appreciate !

Thanks

Manuel
 

Attachments

  • PARANCO1.jpg
    PARANCO1.jpg
    294.6 KB · Views: 124
Hallo!

My take:

1) If You release the hook on the red line B, from the bungee you can thread the blue line through the block C then all the way forward to the block X then down to block Y and back through the cleat at Z then You tie a handle on the rope end to create Your control.

2) The "end" of line B is the hook wich connects to the sail clew V.

3,4,5) see above
 
Mmmm maybe I forgot a thing, and about the Bungee, but first let me retry :

1) release the bungee from the pulley/hook on the red line B
2) take (on red rope B) the pulley PP and on its hook HH connect the pulley C of the blue rope A
3) then take blue rope A at the end-point and let it pass through pulley C and then back trough X - Y - Z
4) take red rope B and its end-point, let it pass trough H and then block the sail in V
5) where is now going to do the bungee BU ??? where is it going to be connect ???
6) is that all I wrote correct ???

thanks, I updated the photo, below ...
Best regards
Manuel
 

Attachments

  • PARANCO1.jpg
    PARANCO1.jpg
    797.9 KB · Views: 89
All you have to do is don't take Bungey BU off Hook HH (leave where it is) - Hook HH onto Clew V - Run free end of Blue rope A through pulley C and forward and through pulley at X down through pulley Y and through fairlead and cleat Z
You should also have a cord or clew strap through clew hole V round the boom to hold clew tight to boom but still allow clew to pull back when blue cord A is pulled through Z & cleated but when released still allow Bungey BU to pull clew of sail forward.
 
Ok, I really thank for the last post, but this new post sounds different than previous one posted by inlandfreddy, so I just try now to realize if there is something incorrect or if some particulars are missed.

Ok, what is certain now is that end-rope A (blue) is going to Pulley C and back to Y-Y-Z, that's fine !!!
What is not being understood is about now the 2 Pulley, PU and C :

> PU : inside pulley PU is going thread the rope B (red) ???

> PU : in the hook HH is connected to bungee BU ???

> PU : how can be connected PU with point V (clew) ???

> V : point V (clew) is connected to the boom with a clew-strap in velcro with a RING, something is going to be inserted through this
RING ???

> C : pulley C where is it fixed/blocked on left side ??? (righ side is fixed/blocked by yellow rope and then to A (blue rope))

> END-ROPE B (red) : this cord pass trhough H and then is going to :

* be blocked to point V (clew) with a knot ???

* going through V (clew) and then rolled for 2-3 times and then back to point H and blocked with a knot ???

* going to be blocked on the clew-strap's RING situated at point V ???


I know that for most of you this post it's a kind of joke, i guess that, but, i really tried many videos before to take disturb here and i really didn't find solution, so i apologize for my insistence, but i really want to understand .
I guess to take double visit to my Psychiatric next week while this post will gonna end.

Thanks to all
 
I would really like to help you, but I have a hard time understanding all the letters, some of which aren't in the pictures...

I think something that is fundamentally misleading you is that the red rope B appears to be tied to block C (at point D) in a way that is meant only for storage/transportation. Untie B from C and tie it again, so that there is no "extra" rope B at or after the knot at block C. Then B is effectively longer, which should clear up things. Don't do anything else to B!

The hook block that B runs through hooks directly to the sail (at point V). The bungee/elastic rope can stay attached the way it is. But if the bungee is confusing you, leave it out. It is not absolutely necessary for sailing. (This is what I usually do when getting to a new class... I take out everything I don't understand!)
> V : point V (clew) is connected to the boom with a clew-strap in velcro with a RING, something is going to be inserted through this RING ???
Yes, the other end of the same strap, so it turns 180 degrees at the ring and attaches to itself. Nothing else!

All in all, looking at the pictures, you have a nicely rigged boat - you just need to add a turning block at point X, tie it around the mast above the gooseneck fitting or attach it with a shackle to the hole in the same fitting.

Aren't there other Lasers in your club that you could look at, or more experienced sailors that you could ask?
 
I think something that is fundamentally misleading you is that the red rope B appears to be tied to block C (at point D) in a way that is meant only for storage/transportation. Untie B from C and tie it again, so that there is no "extra" rope B at or after the knot at block C. Then B is effectively longer, which should clear up things. Don't do anything else to B!

I don't even think that block C is attached to the fairled (H), rope B is just to long and the previous owner has wrapped up the tail, it's only the tension from the bungee that keeps the block at the fairlead. So yes, the block (C) is or should be "floating" and move forward when line A is lead all the way to the cleat. (Z).
 
Last edited:
I don't think even that it's tied there, rope B is just to long and the previous owner has wrapped up the tail, it's only the tension from the bungee that keeps the block at the fairlead (H).
Right, B is not tied to the fairlead, but it appears to be very short (if you look at figura 4), and the tail wrap-up doesn't look like it's there for sailing purposes. I may be completely wrong of course...

Mamaoi, could the previous owner help you out with this?
 
Right, B is not tied to the fairlead, but it appears to be very short (if you look at figura 4), and the tail wrap-up doesn't look like it's there for sailing purposes.
(I sometimes have a long tail there to be able to use the same line with the 4.7 sail)

Yes, but doesn't the red line look short just because the clew hook is pulled so far forward by the bungee?

And help on site would clear this out much easier.
 
Last edited:
I think something that is fundamentally misleading you is that the red rope B appears to be tied to block C (at point D) in a way that is meant only for storage/transportation. Untie B from C and tie it again, so that there is no "extra" rope B at or after the knot at block C. Then B is effectively longer, which should clear up things. Don't do anything else to B!

Sorry, I miss read You, and after a new look I agree about Figura 4, it's a good idea to do what You suggest.

When the outhal is fully set on, most sailors using this system, want's block C to be nearly all the way forward to the block at the boom cleat.
 
Hei thanks thanks to all, i think i'm going to be close to the solution, so please, give just a little bit more time again, that's worthy for me.
Unfortunately in my club all Laser have default laser set-up, and not this complicated one (but more attactive !!!).
I updated the photo with 2 more points (the end ropes ER and EB).
I just want to say that YES, rope B (red) is rolled at poind D just for storage/transportation, and don't have any set-up intention.


So, as i understood, i don't have to touch anything as it is, bungee BU, pulley HH, but i only have to :

> take rope A in the EB (end-blu-rope) point and let it pass through pulley C and back to X-Y-Z.
> fix point V to the boom with a clew-strap or with a rope rolled on the boom

BUT .... but :

> if i unite rope B (red) to pulley C (as you suggested), using the end-rope B (red) at point ER with a knot on C, WHO is then going to block point V (clew) on the sail ??? (wich rope ???)

The final views is : release B, that means release ER at point D, take ER and block it on C with a knot, so, rope B then is fully engaged (no more end-ropes), and rope A is also fully engaged (1 end rope and 1 handle at point Z), but, .... who is going to fix-block the clew point V ??? wich ropes and how ???

yes i contacted the owner, but it seems to be too busy at the moment, and i thought it would be more easy to understand this set-up, but i was wrong!

Many greetings
 

Attachments

  • PARANCO3.jpg
    PARANCO3.jpg
    815.1 KB · Views: 71
Last edited:
The schematic from the Outhal setup section on LaserXD:s homepage at this address:

http://laserxd.com/how-to-rig-a-laser-sailboat-outhaul-inhaul-clew.php

might be helpful.

Laser-Rigging-Outhaul-Diagram-Lg.jpg

This is how Your system should work when it's in place. The single becket block on this picture represents Your block C. The red line here is your line A and the green line is Your line B.

Then just put the bungee back on to help the clew to move forward when you let the outhal off. And a clew tiedown to stop the clew from rising up from the boom when the outhal is let off.
 
Last edited:
i thought it would be more easy to understand this set-up, but i was wrong!
It's not that complicated, maybe a language issue the words are not fully understood.

But a last try to demonstrate how the setup works: If everything is as on your picture, one man is standing in the back of the boat holding line A. If he pulls that line then the bungee is stretched more, the pulley C moves forward and the hook moves backwards, that the how line B works and is supposed to work.

Nothing in principle should be changed. Maybe pulley C should be tied closer to the end of rope B to effectivly make rope B longer, thats all.

Best Wishes!
 
Thanks, really appreciate, in conclusion, yes, i clearly understand your solutions, also the schematic from the Outhal setup on LaserXD, clear, but one only point is not clear, at the moment, and about the clew (point V) :

* who is going to fix-block the clew point V ??? wich ropes and how ???

I can't resolve this point !
 
The hook on the block in figura 3. With or without the bungee. (As I suggested, you can remove the bungee completely, if that clarifies things) The hook is there exactly to make this attachment as easy as possible.

When the hook is in the hole in the sail (point V), then you pull the velcro strap through that same hole, wrap it around the boom (inside all ropes) and make it as tight as possible.
Then go sailing. (Assuming you've rigged everything else!)
 
Thankssssss !!! that's all, i don't have words as enough to say you all thanksss!!!!! Appreciated that !!!
 

Back
Top