Recently, as my late father used to say, I fell into the outhouse and came out with a new suit on. Actually I did it twice within a week.
I'll get to my Sunfish questions in a second but I have to tell you how I got to getting my Sunfish. About a week ago I was watching Craigslist and saw an ad for a 1955 Thompson wooden boat..best offer. I went and looked at it and after realizing that this little 14' beauty had been sitting in a barn for over 40 years and got it for a
$300 song. I borrow a friends trailer and brought it home. A friend of mine who is an antique wooden boat expert and collector with over a dozen himself told me it is worth at least a few thousand and maybe more.....but anyways.
So now I need trailer for it so I am again watching Craigslist as I do constantly in the boat catagory this time of year ...looking for a trailer. I checked it one more time before I went to bed at 10:30 and saw an ad just posted 5 minutes ago for a Sunfish Sailboat with Trailer, and a windsurfer for $50. YES $50 dollars. As fast as I could type I responded and got a call the next day. Net-net I bought the package(she said she had over 100 replies).
Now about the Sunfish....it is a classic 1965(came with documentation and a bag from Alcort to the original owner with a
spare drain plug and a rudder pin...and there is a plate on the deck but I have it flipped over now working on the bottom so I don't know what it says..I think I saw a number on it)
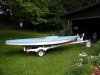
The boat itself is complete and is in pretty good shape. The original blue and white striped sail is a bit blown out but besides a couple of pin holes and a 1 inch slit that has maybe some duct tape on it, it is serviceable. The rigging is good and the nice original mahogany dagger board and rudder are good also. I found out the that the hull was full of water when I went to lift the trailer tongue to hook it on the ball. When I got it home and off the trailer it took a long time to drain out with the two baby-finger sized drains on the deck.
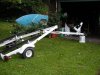
Ok now to my questions finally...sorry but I am excited about my find...btw the trailer is a small ez-loader Sprint and fits my wooden boat also perfectly.
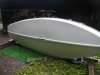
The bottom is basically in very good shape but for a crappy white paint job after a crappy patch job on the starboard side with fiberglass matt. I turned it over and started on the sanding to prepare for restoring and the fiberglass matt started to seperate so I ended up pulling it all off( about a foot long and 7 inches wide wrapped around the side and bottom.) Under it was some much better work that when all sanded down now is sound and I should only need to fair it up a bit before painting.
As I sand off the crappy white paint job I am coming down to the
original creamy white gell coat and would love to just leave it at that with some fine wet sanding and a sealer but for that fiberglass patch that the person did not use a coloring agent..therefore I have to paint. Now finally my question....what type of paint and color to use? I restored a Ray Green Rebel day sailer a few years ago and used a very expensive 2-part Polyurethane paint and it turned out great and still does after two year. But as expensive as it is per quart ( and I certainly don't need a whole one), is there any other ideas out there for the type of paint I should use for the bottom?
As for the top...it looked like it was in pretty good shape(original classic blue) and I was hoping to just wet sand and buff up...trying to keep at least that original. Thoughs?
Any comments about restoring this old beauty will be greatly appreciated. Also if anyone has any source for original Alcort decals and or a really decent sail for a reasonable price, I would greatly appreciate it.
Happy Father's day to the dads out there.
Thanks,
Timmy
ps..sorry for the long diatribe.
I'll get to my Sunfish questions in a second but I have to tell you how I got to getting my Sunfish. About a week ago I was watching Craigslist and saw an ad for a 1955 Thompson wooden boat..best offer. I went and looked at it and after realizing that this little 14' beauty had been sitting in a barn for over 40 years and got it for a
$300 song. I borrow a friends trailer and brought it home. A friend of mine who is an antique wooden boat expert and collector with over a dozen himself told me it is worth at least a few thousand and maybe more.....but anyways.
So now I need trailer for it so I am again watching Craigslist as I do constantly in the boat catagory this time of year ...looking for a trailer. I checked it one more time before I went to bed at 10:30 and saw an ad just posted 5 minutes ago for a Sunfish Sailboat with Trailer, and a windsurfer for $50. YES $50 dollars. As fast as I could type I responded and got a call the next day. Net-net I bought the package(she said she had over 100 replies).
Now about the Sunfish....it is a classic 1965(came with documentation and a bag from Alcort to the original owner with a
spare drain plug and a rudder pin...and there is a plate on the deck but I have it flipped over now working on the bottom so I don't know what it says..I think I saw a number on it)
The boat itself is complete and is in pretty good shape. The original blue and white striped sail is a bit blown out but besides a couple of pin holes and a 1 inch slit that has maybe some duct tape on it, it is serviceable. The rigging is good and the nice original mahogany dagger board and rudder are good also. I found out the that the hull was full of water when I went to lift the trailer tongue to hook it on the ball. When I got it home and off the trailer it took a long time to drain out with the two baby-finger sized drains on the deck.
Ok now to my questions finally...sorry but I am excited about my find...btw the trailer is a small ez-loader Sprint and fits my wooden boat also perfectly.
The bottom is basically in very good shape but for a crappy white paint job after a crappy patch job on the starboard side with fiberglass matt. I turned it over and started on the sanding to prepare for restoring and the fiberglass matt started to seperate so I ended up pulling it all off( about a foot long and 7 inches wide wrapped around the side and bottom.) Under it was some much better work that when all sanded down now is sound and I should only need to fair it up a bit before painting.
As I sand off the crappy white paint job I am coming down to the
original creamy white gell coat and would love to just leave it at that with some fine wet sanding and a sealer but for that fiberglass patch that the person did not use a coloring agent..therefore I have to paint. Now finally my question....what type of paint and color to use? I restored a Ray Green Rebel day sailer a few years ago and used a very expensive 2-part Polyurethane paint and it turned out great and still does after two year. But as expensive as it is per quart ( and I certainly don't need a whole one), is there any other ideas out there for the type of paint I should use for the bottom?
As for the top...it looked like it was in pretty good shape(original classic blue) and I was hoping to just wet sand and buff up...trying to keep at least that original. Thoughs?
Any comments about restoring this old beauty will be greatly appreciated. Also if anyone has any source for original Alcort decals and or a really decent sail for a reasonable price, I would greatly appreciate it.
Happy Father's day to the dads out there.
Thanks,
Timmy
ps..sorry for the long diatribe.
 just touch it up often ??
")