Need help with traveler eyestraps

tobackpack

New Member
I recently purchased a 1974 sunfish with the old style three loop traveler. Both of the eyestraps have pulled through the deck. The prior owner tried to fill with a silicone gel. After clearing away the silicone, it is apparent that eyestraps must been leaking for a while due to the amount of delamination. I can't tell yet if there are any backing blocks attached which should have prevented the screws from pulling out.
Do you have any suggestions as to repair methods? I have done both fiberglass and gel coat repairs in the past on other boats. I am thinking of installing an inspection port but I am uncertain where to locate it in the stern. Several posts seem to suggest that 6-8" from the transom is the proper location. I don't want to damage the integrity of any supports in that section of the hull
Thanks
 
Tobackpack,

Sounds like your wood backing blocks have also failed or striped out causing the eye straps to be loose, leak and the fiberglass to delaminate. Repair the fiberglass and then work on the on the blocks. If the blocks haven't fallen in :( you could try filling the holes in the blocks with thickened epoxy and re-drilling to see if that works. See Sailing Texas bow handle repair,
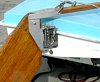
 http://www.sailingtexas.com/chowtoresetboweye.html for more info.

If that does not work, the inspection port is about the only way to go to replace or repair those blocks. Cut your hole for a 5'' port about 6.5" from the stern to the center of the port but hold off installing the port. You may find a layer of dense foam (about 1 to 1.5" thick) under the deck, no worry. If you hit a little white Styrofoam, don't worry about it, just remove what is in the way. On each side are more Styrofoam blocks that will have to be cut to allow access to the underside of the eye straps. A drywall saw or hacksaw blade can cut the block. Cut it in a wedge shape so you can remove it (hopefully in one piece) and later replace it. Once you can reach the blocks you have two choices.

1-If the blocks are loose or rotted, remove them and make new ones and reinstall after any fiberglass is repaired. Originally the blocks were glassed in place with a layer of glass over them.

2- If the blocks are tight, drill though the blocks in order to though bolt the eye straps with stainless steel bolts, nylock nuts and fender washers. If you use a little 3M 4200/5200 to "glue" the washer and nut to the block, they hopefully won't fall off should you need to replace the bridle in the future. Reset the eye straps (with the new bridle) with a little silicon around the bolts and under the straps.

Replace the cut out pieces of foam with a little "foam in a can", it fills the gaps and holds the pieces in place very firmly.

Install the port and you should be good to go once every thing sets up. Good luck.
 
Just to build on what Supercub has detailed. Sunfish Sailor http://groups.yahoo.com/group/sunfish_sailor has factory diagrams of where the float blocks are positioned and where ports can be installed.

You can replace rotted blocks with pieces of aluminum bar stock. That's what the new boats all have instead of the old wood backing.
 
Dan said:
Just to build on what Supercub has detailed. Sunfish Sailor http://groups.yahoo.com/group/sunfish_sailor has factory diagrams of where the float blocks are positioned and where ports can be installed.

You can replace rotted blocks with pieces of aluminum bar stock. That's what the new boats all have instead of the old wood backing.

Another diagram to show the internal foam supports (or maybe it's the same one as on the Yahoo site) can be found at http://www.windline.net/project3.htm
 
tobackpack said:
"...I am thinking of installing an inspection port but I am uncertain where to locate it in the stern. Several posts seem to suggest that 6-8" from the transom is the proper location. I don't want to damage the integrity of any supports in that section of the hull
Thanks
I've just installed two 6" inspection ports ($8 each, diagonally fore and aft) to see why my boat is so heavy, and to repair the traveler. (Ports are available with a non-skid surface, which is what I should have used.)

The foam inside was a giant water-filled sponge. You could squeeze the water out of it, and refill it with water—just like a sponge. REALLY! So I removed all the foam that I could reach. It was structurally weak and wasn't supporting all that much topside deck anyway. I'm going to remove the inspection port frames (previously siliconed) and epoxy them in place. They do lend some strength to the topside, even with just the silicone sealer.

When it stops raining today I'll fix my traveler—which has the same problem as yours: I'm missing the eyestraps and the spacing doesn't match anything in my West catalog, so
I'm just filling in one hole on each side, and enlarging the other slightly.

What I've gathered together so far is 30" of thin (1/8"?) stainless steel cable, aluminum swages to squish on the ends, two 2-inch plastic bottlecaps, and two small squares of fiberglass cloth. I plan to swage the furthest fitting first, then daub resin on the cloth.

(The cloth gets supported by the flat side of the bottlecap against the inside of the deck: It goes in this order when viewing the upright Sunfish:
underside of deck,
resin-soaked cloth,
bottlecap support,
swage).

The swage can be a stainless steel nut, too, but they're harder to squish. Clamp the traveler taut so that there's tension on the entire assembly while the epoxy cures.

I don't see making my repair all that strong. The Sunfish could have a "dock incident" where a whole lot more damage could occur than what happened to you recently.
 
Porpoise2

If you have a Sunfish, removing the foam was not a good idea. It would have been better to leave the foam in place and dry it following the instruction at Wind Line Sails or Yahoo Sunfish Sailor. It might take time, but drying is the way to go. The foam IS part of the structure and does support both the hull and deck. If the blocks are loose after drying, they can be reset with 2 part foam (not foam in a can).

If you have a Sunfish, get the 2 loop taveler, all the work is done and it is plastic coated as well. And get eye straps. I do not understand the swage, except as a clamp? under your repair. Running your traveler thru the deck and swaging it inside is asking for trouble (pull through or deck being cut or ripped) and then you are in worse shape than you are now. There is a lot of pull there, the attachment point must be strong enough to withstand the pull of the sail.

Use a block of hardwood ( 3 to 4" x 5 to 6" by 3/4") or aluminum plate instead of the bottle cap to give your eye strap scews something to screw into. The SF blocks were attached to the underside with plenty of resin, the block and then glassed over with cloth to the underside. The eye straps screwed into the blocks will give you plenty of clamping while everything sets up.
 
Can you provide additional information on "2 part foam". I thought that was the kind that came in a can and is also used to close up gaps in your home. thanks
 
supercub said:
"...Porpoise2: If you have a Sunfish, removing the foam was not a good idea. It would have been better to leave the foam in place and dry it following the instruction at Wind Line Sails or Yahoo Sunfish Sailor. It might take time, but drying is the way to go. The foam IS part of the structure.."
Except for the cockpit (which is ½ the depth, and much wider than the Sunfish's), the Porpoise II seems a lot like the Sunfish. The large cockpit size discourages hiking and may have been intended for children.

I've reconsidered my traveler redesign/fix, and will wait to find something suitable for eyestrap replacements. (When the rain stopped—I went sailing!)

But you're right...it would be better to refit pulled traveler eyestraps than make it TOO strong. The intended redesign would have had just the wire exposed (and no swages, eyestraps, or screws showing).

The aft foam blocks were beige in color, like natural sponge-color. The foam is so good at absorbing water, that it had to go. It appears that the aft foam blocks are placed differently than Sunfish, and the rear deck had already cracked under the previous owner where the foam should have been supporting her. The forward deck seems much stronger, and the foam forward has been left in place.

Moveable block floation was added inside (aft) until I figure out how to buttress the aft decking. But may not—ever: At 240 pounds, I climbed aboard the aft deck without inflicting further damage (when my halyard pulley broke Monday).

To tobackpack's question about inspection ports, I should have placed my 6" aft port further forward than I did, and a 5" port would be better. There is a hollow 4" fiberglass reinforcement web located down the center of my aft deck, which I wish I hadn't cut into. (The remains of a cardboard tube were inside, used as a form for the reinforcement web).

My forward port should have been placed closer to the cockpit (meaning aft), so reaching mid-deck hardware and the hiking strap screws would be easier.

In my case, cutting the inspection port aft was necessary as the previous owner had torn off the metal rudder plate mountings—twice.
 
Porpoise2,

Ouch, ripping the rudder mount out twice. You might be interested in the next for your rear deck reinforcement.

Tobackpack,

The two part Urethane foam I used to Reset the Foam Blocks (see Yahoo SF Sailor ) was obtained from US Composites (www.uscomposites.com ). It comes in different densities (2,3,4 and 8 lbs per cubic ft expanded), I used the 4 lb to reset the blocks (used to hold fuel tanks in place). 2 cans, Part A & B, mix equal amounts, stir for 20-25 seconds, pour in place and the stuff starts to expand in 45 seconds. Multiple pours (layerers) stick to each other. The 4 lb stuff expands to about 15 times the original liquid volume and drys hard (can't dent with thumb nail). About $29 for two 1 qt cans (smallest quantity that can be ordered) delivered.

Canned foam by comparison, is one part, is soft (you can squeeze it between thumb and fore finger), dosen't stick to the fiberglass hull well (I know, I tried it first to reset the blocks) and will disintegrate or compress over time with repeated pounding. Works well in "glueing" foam to foam like when cutting the foam for access to the bridle/traveler eye strap blocks, where the pieces can't move.
 
The Porpoise photos and flyers we have don't show a bridle at all. The mainsheet clips into a bail that's attached to the rudder head.
 

Attachments

  • Porpoise_Main.jpg
    Porpoise_Main.jpg
    39.6 KB · Views: 54
That was going to be my next question.

I used that location, and it definitely helps return the tiller to center when sheeting in after a tack.

I like the idea of having a traveler though—and apparently so did somebody else. (There are two small holes on either side, corresponding to a SF traveler location points.)

Interesting rudder frame. (Scabbard?). Mine is immense by comparison, and I doubt the rudder/tiller assembly will even float! There's no drain plug on my boat. (My boat has several other places to let water in).

:)

'Consider a Porpoise II a SF?
 
I follow that you prefer a bridle. It seems a previous owner did too, but lacked the knowledge of fittings being reinforced from beneath. Dispense with all the Red Green jury-rigging and just do it right the first time. Add two eye straps backed by wood blocks or aluminum plates. Use a piece of line or buy a Sunfish wire bridle and go sailing,,,, or is it more fun to go fixing :confused:

My boat has several other places to let water in

There is a leak test procedure that will help you find and fix the holes. You can find it and instruction for drying out at Wind Line Sails, Sunfish Sailor, or the Sunfish Class home page.

http://www.sunfishclass.org/frequent/index.htm

http://www.windline.net/project1.htm

http://groups.yahoo.com/group/sunfish_sailor

Lots O Luck
 

Back
Top