andyatos
Well-Known Member
So, I going to start up the process of re-enforcing my mast step. But I've got some more questions. Here goes.
I'm going to follow Voodoo's process of cutting a precise hole in the deck, doing the work then putting the deck piece back. Here's what I'd like to know.
- How big a hole, in diameter, should I make that's going to give me enough room to get my arm in there and do the work?
- Where exactly should I cut the hole relative the mast step? People talk about ridges of re-enforcement that run under the deck. How do I avoid having to cut through those?
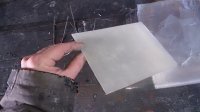
- Voodoo, you created a 6 layers of glass and epoxy sheet as a base to put the piece of the deck you cut out back on. What grade or weight or whatever name it's given of glass did you use? I'll be using West Marine as my source.
- I'd imagine the weave is fairly fine so that you can… bend it to get it through the hole? And that's my next question. Does your 6 sheets with glass and epoxy make the final product just flexible enough to bend it so you can get it through the hole?
- For re-enforcing the mast step, what weight or weave of glass cloth do you use there? And what kind of epoxy resin do you use? Again, West Marine is my best, closest source.
- How far out from the mast step base did you come with your glass onto the floor of the hull? How far up the mast tube did you go with that glass? Did you do just one or two lay ups of glass?
I think that's all the questions I have. For now.")
Thanks,
- Andy
I'm going to follow Voodoo's process of cutting a precise hole in the deck, doing the work then putting the deck piece back. Here's what I'd like to know.
- How big a hole, in diameter, should I make that's going to give me enough room to get my arm in there and do the work?
- Where exactly should I cut the hole relative the mast step? People talk about ridges of re-enforcement that run under the deck. How do I avoid having to cut through those?
- Voodoo, you created a 6 layers of glass and epoxy sheet as a base to put the piece of the deck you cut out back on. What grade or weight or whatever name it's given of glass did you use? I'll be using West Marine as my source.
- I'd imagine the weave is fairly fine so that you can… bend it to get it through the hole? And that's my next question. Does your 6 sheets with glass and epoxy make the final product just flexible enough to bend it so you can get it through the hole?
- For re-enforcing the mast step, what weight or weave of glass cloth do you use there? And what kind of epoxy resin do you use? Again, West Marine is my best, closest source.
- How far out from the mast step base did you come with your glass onto the floor of the hull? How far up the mast tube did you go with that glass? Did you do just one or two lay ups of glass?
I think that's all the questions I have. For now.
Thanks,
- Andy