Ladder install and mast head float

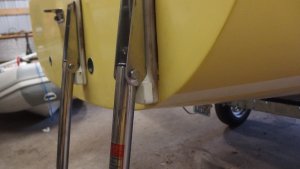
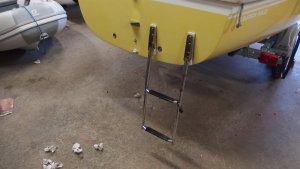
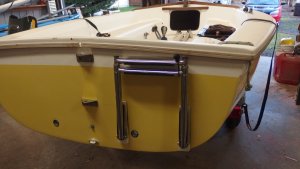
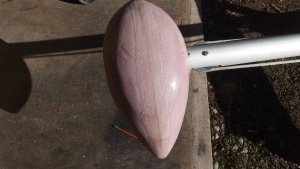
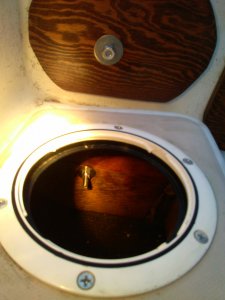
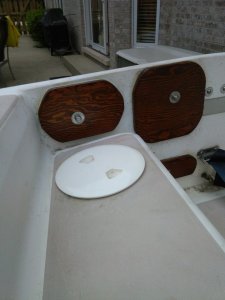
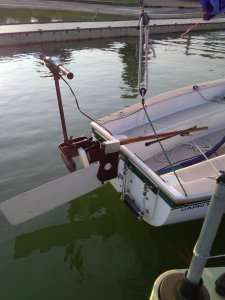
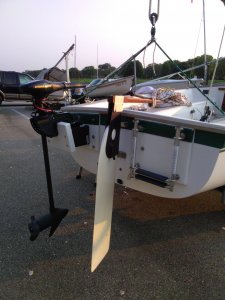
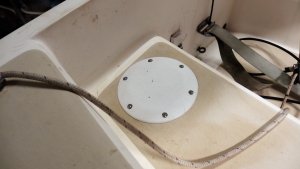
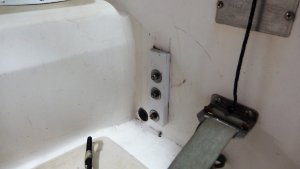
Looking at the various methods of installing ladders on this forum, I liked the Greg Coats method, but like others I didn't like that the ladder didn't end up at the proper angle. I used the Hoffen telescoping 2 step ladder from Amazon at $34.99 and am impressed with the quality. The differences in the installation from Mr. Coats set up and mine are that I ground off the lip on the mounting brackets so they can mount on a flat surface, and I extended the Starboard backer past the end of the brackets so an additional block of Starboard could be added (Attached with a counter sunk screw from the back). The block gives the ladder its proper angle and keeps it from hitting the gelcoat like it can with the Coats method. The ladder extends farther below the bottom of the boat than ladders mounted with eye bolts too. Don't use both holes in the mounting brackets but drill a new hole closer to where the ladder pivots. All other parts of the installation are the same-access hole in seat, reinforcements etc. I also finished my hollow pink foam and fiberglass mast float and it is at least a pound lighter than the Baby bob.
 

Attachments

  • P1310007.JPG
    P1310007.JPG
    2.2 MB · Views: 160
  • P1310008.JPG
    P1310008.JPG
    2 MB · Views: 163
  • P1310005.JPG
    P1310005.JPG
    2.1 MB · Views: 170
  • P1310001.JPG
    P1310001.JPG
    2.1 MB · Views: 179
OK check out how I did my ladder. Mod 1 had a flimsy transom, I beefed it up as shown. What year is your's, did you have to reinforce? Access holes for feeding 5" wide plywood strips inside, through bolted to the fiber or plywood outside. Deckson plates have bag inserts, they're real handy.
The motor is super light and doesn't put out a ton of thrust so don't think that mount gets too much stress. But my ladder is pretty shallow when extended (maybe about as deep as your first rung), so I must yank and flip my 190 lb butt into the cockpit, like a giant tuna! I'll bet that mount gets a workout!
 

Attachments

  • Inside Backer.jpeg
    Inside Backer.jpeg
    499.8 KB · Views: 155
  • Deckson Plate.jpeg
    Deckson Plate.jpeg
    502.6 KB · Views: 149
  • Transom 2.JPG
    Transom 2.JPG
    815.7 KB · Views: 145
  • Stern of Capri.JPG
    Stern of Capri.JPG
    836 KB · Views: 149
OK check out how I did my ladder. Mod 1 had a flimsy transom, I beefed it up as shown. What year is your's, did you have to reinforce? Access holes for feeding 5" wide plywood strips inside, through bolted to the fiber or plywood outside. Deckson plates have bag inserts, they're real handy.
The motor is super light and doesn't put out a ton of thrust so don't think that mount gets too much stress. But my ladder is pretty shallow when extended (maybe about as deep as your first rung), so I must yank and flip my 190 lb butt into the cockpit, like a giant tuna! I'll bet that mount gets a workout!
My boat is a Mod 1 also and I did reinforce the transom with plywood epoxied inside between the inner and outer hull and some maple hardwood doublers on the inside. I used TH screw on deck plates to cover the holes in the seats, because I don't expect to need access again, and I have a dry bag for my valuables. I saw your posts before I did this and wanted the ladder to extend further into the water.
 
Hey megigharbor, do you have any pics of the access you made on the seat? Would love to put a swim ladder on my mod 1 and accessing and reinforcing the transom is my concern. I also like the price point of the ladder you found. I have seen the previous posts from the work aquaman has put on his, and until now didn’t realize he had those access ports. I don’t imagine you were able to make your way to the transom from the cuddy.
 
Hey megigharbor, do you have any pics of the access you made on the seat? Would love to put a swim ladder on my mod 1 and accessing and reinforcing the transom is my concern. I also like the price point of the ladder you found. I have seen the previous posts from the work aquaman has put on his, and until now didn’t realize he had those access ports. I don’t imagine you were able to make your way to the transom from the cuddy.
I just cut a 4.5" round hole centered at the back edge of the non skid surface of the seat and covered the holes with 6" TH screw down covers.
 

Attachments

  • P2050001 (1).JPG
    P2050001 (1).JPG
    1.6 MB · Views: 138
  • P2050002.JPG
    P2050002.JPG
    1.5 MB · Views: 130
Different way to mount the Hoffen 2step ladder. I also ordered the Hoffen telescoping two step ladder and it is economical, well made, and easy to adapt for the stern of my 2016 model 14.2K. Instead of installing an inspection port, reinforcing the transom, etc. I used two one inch square bright aluminum tubing "legs" and cut them to about thirteen or fourteen inch length. I through bolted the top six inches (about) through the transom and used a one inch wide length of flat aluminum stock as a backing plate in the transom area above the seat for each leg. Three 1/4 -20 stainless pan head screws bolted through the tubing and into the cockpit then held in place with locknuts. The backing plates are about 5.5 inches long. The ladder's mounting brackets were bolted to the lower portion (about 5.5 inches) of the square tubing legs with two 1/4-20 stainless pan head screws on each leg, locknuts are affixed inside of the tubing. Everything was bedded with 3M 5200 sealant/adhesive which I have used for years on all of my boats to bed and make any fittings water tight; the stuff says flexible and needs two days to skim fully and about a week to reach full cure, the adhesion is permanent after cure. The finished project results in the ladder being in about the same position as the megigharbor method, and the ladder is offset from the hull by the one inch depth provided by the square tubing. The length of the square tubing is sufficient to eliminate any flex in the transom and using a continuous backing plate inside of the cockpit also helps. Final step was to inject expanding foam into the legs to further ensure sealing from moisture. This season will show me if any problems show up, but I don't expect any.
 
Different way to mount the Hoffen 2step ladder. I also ordered the Hoffen telescoping two step ladder and it is economical, well made, and easy to adapt for the stern of my 2016 model 14.2K. Instead of installing an inspection port, reinforcing the transom, etc. I used two one inch square bright aluminum tubing "legs" and cut them to about thirteen or fourteen inch length. I through bolted the top six inches (about) through the transom and used a one inch wide length of flat aluminum stock as a backing plate in the transom area above the seat for each leg. Three 1/4 -20 stainless pan head screws bolted through the tubing and into the cockpit then held in place with locknuts. The backing plates are about 5.5 inches long. The ladder's mounting brackets were bolted to the lower portion (about 5.5 inches) of the square tubing legs with two 1/4-20 stainless pan head screws on each leg, locknuts are affixed inside of the tubing. Everything was bedded with 3M 5200 sealant/adhesive which I have used for years on all of my boats to bed and make any fittings water tight; the stuff says flexible and needs two days to skim fully and about a week to reach full cure, the adhesion is permanent after cure. The finished project results in the ladder being in about the same position as the megigharbor method, and the ladder is offset from the hull by the one inch depth provided by the square tubing. The length of the square tubing is sufficient to eliminate any flex in the transom and using a continuous backing plate inside of the cockpit also helps. Final step was to inject expanding foam into the legs to further ensure sealing from moisture. This season will show me if any problems show up, but I don't expect any.
That will work on a mod 3 hull which has a stronger transom than the mod 1 boat in my post. The mod 1 boats need the interior reinforcement.
 
Agreed. The Mod 3 version has a stiffer hull and deck construction among other improvements/modifications which were made during the boat's evolution. Although being a small dinghy, it has many of the characteristics of the larger sailboats which I have owned over 50 years plus of "messing around with boats".
 
Yet another variation on the 14.2 ladder. Wife 73yo so needed a good angle away from transom. Looked at the White Water (google "B00364") but was worried about the physics with only 1.7 in vertical spacing on mounting screws. Also very tight fit with rudder. Decided to go with 'sport ladder' which means its designed for swimmers with fins. Got the Mojiate 4 step on Amazon. I like the angle that tucks it against the transom when up and away from the transom when down. Apparently these ladders use interchangeable mounts so you can buy another ladder of the same type without further hull modification. Did have to use a small spacer under the mount to stop it from touching the hull when up. Really like the idea that its easily removable when transporting or storing or on calm days.
The ladder didn't slide smoothly but a little time with the Dremel grinder and a small sledge hammer made it work great. Local lumber did not have wanted in teak but gave me a deal on a scrap of Ipe (ask for "ee-pay"). Cut to width to fit through access hole and used G-flex to epoxy in place. Used short 1/4" self-tapping screws to hold it in place. Use plenty of newspaper and masking tape if working with epoxy. Was suprised to find the cube water container and removed it thinking someone had left it in the hull. Turns out the hull is packet with them for flotation so I stuff it back and reinflated and resealed it. Had I known I would have just shoved it forward out of the way. Have not had it out on the water yet. Will report later in the year. If you are in Tidewater Area let me know and you can try it out.


IMG_20220730_153419977_HDR.jpgIMG_20220730_172155888_HDR.jpgIMG_20220805_155548132_HDR.jpgIMG_20220805_155603011.jpgIMG_20220807_113445214_HDR.jpgIMG_20220807_111751206_HDR.jpgIMG_20220807_113613509.jpgIMG_20220807_113656272_HDR.jpg
 

Back
Top