Help with Deck Repair

hbrett29

New Member
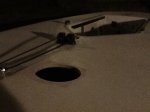
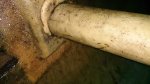
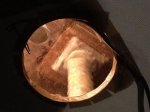
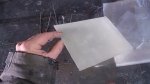
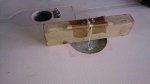
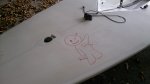
My late 70's early 80's laser has some small dings from the last owner, I'm thinking stepping the mast went horribly wrong... But this winter I'm going to have some time to put into it. I'm wondering if anyone has some experience with a similar repair and could help me out with some advice!

thanks!
 

Attachments

  • 20130803_100916.jpg
    20130803_100916.jpg
    2.4 MB · Views: 178
I don't have any good tips on repairing the dings in your deck, but I'd recommend putting an inspection port in the deck so that you can re-inforce the mast tube connection at the bottom. As you can see from many other posts about this, if this connection fails while sailing, the deck will be ripped to bits and you will have a very difficult repair to do.

Re-inforcement before the connection fails is an easy repair and you may be able to put the inspection port where one or more of your deck dings are, thus simplifying that repair.
 
I'm one of those very unlucky guys whose mast fell over cuz I did not reinforce my mast tube attachment inside. It tore the deck up pretty badly. Live and learn but ouch what a hard way to learn. Another painful example of 'the lessons you learn hardest are the ones you remember easiest.'
03 deck closer.JPG
The deck is a sandwich of fiberglass over a foam core. I sanded the old fiberglass off the foam core, and feathered the edge of the old fiberglass. I put 2-3 layers of new fiberglass on, and sanded them in to fair them with the old part. To get some texture in the new surface, I pressed some window screen into the surface of the new fiberglass before it was fully hardened, then peeled it up before it was stuck for good. Then I spraypainted it all with just plain auto touchup spray paint that "sorta" matched the color.
fixed- deck closeup.JPG

Hope it helps.
 
To re-in force the step, should I do this to only the bottom of the mast tube? So reach through the inspection port and sand down the old fiberglass and then lay more down where the tube meets the bottom of the hull, to make it stronger that way?
 
To re-in force the step, should I do this to only the bottom of the mast tube? So reach through the inspection port and sand down the old fiberglass and then lay more down where the tube meets the bottom of the hull, to make it stronger that way?

Yup that's pretty much it. It's the bottom joint which has let go in so many old boats, like mine. The force is "shearing" the mast tube "sideways" across the bottom of the boat, and the joint between the mast tube and the inside bottom of the hull has to hold up against that shear. Here's what was left of mine after it broke:
04 mast step, bottom of tube.JPG
It wasn't really brilliantly designed to begin with. 20-30-40 years later, that plywood "donut" usually rots, goes soft; and if the boat was ever outside in winter, water got down the mast tube, and sits in the wet rotten donut, and freeze-thaw expansion further cracks and weakens the fiberglass, and bam there goes the mast tube let go from the bottom.

Here's a pic of my fix + reinforcement at the bottom in mine:
fixed- inside bottom.JPG
It's not clear from the pic, but I ran a couple strips of cloth down from around the mast tube, spreading them out at the bottom, out onto the inside of the hull bottom. I think I did a layer of 4 strips at 90* intervals, then another layer of 4 more offset by 45* on top of the first, and then a 3rd layer of 4 offset by another 45*. So 12 strips in 3 layers. The strips were like 3-4 inches wide by maybe 12 inches long.

Then I ran a longer piece around the mast tube on top of those strips, to kind of hold everything together. I used West System epoxy + glass which is way more expensive than something you get at an auto or hardware store, but it's much stronger too, and to my way of thinking, if I'm gonna do this, I want to do it just once, and make very sure that mast is gonna stay upright.

The upper joint isn't so much of a risk. It bears an equal+opposite force, but because the mast goes THRU the deck, this top force bears sideways directly against the deck, rather than "shearing" the mast tube away from the deck. So it's less important to reinforce the top. I had to fix mine at the top because the top broke off too, but only because it let go at the bottom. But still, if I was just reinforcing (vs fixing), I'll still throw a couple strips from the top of the tube to the underside of the deck, just cuz it's an old boat and I'm in there anyway. It's not easy to work on the underside of the deck- think about brushing the epoxy up underneath the deck, and getting glass to stay put up into the epoxy til it sets. So for this part, I turned the boat upside down on sawhorses, sat underneath it, and worked UP thru the port, so gravity was working with my work, not against- that is, brushing down, and laying glass down, onto the underside of the deck.

Hope it's not more than you wanted but holler if there's something else and good luck with it.
 
That's exactly what I was looking for. I have some left over materials from another project, so I'm going to give it a try. I'll let you know how it goes!

Thanks for the help
 
I ran a couple strips of cloth down from around the mast tube, spreading them out at the bottom, out onto the inside of the hull bottom. I think I did a layer of 4 strips at 90* intervals, then another layer of 4 more offset by 45* on top of the first, and then a 3rd layer of 4 offset by another 45*. So 12 strips in 3 layers. The strips were like 3-4 inches wide by maybe 12 inches long.

Hi cskudder,

Would you describe in a bit more detail what you mean by the above description? I think I'm getting a mental picture of what you did but I want to be sure I'm getting the right one because I plan on re-enforcing the mast step on my boat.

Then I ran a longer piece around the mast tube on top of those strips, to kind of hold everything together.

By "around", do you mean in a circular way while descending... like the coloring on a candy cane?

Thanks,

- Andy
 
Hi cskudder,
By "around", do you mean in a circular way while descending... like the coloring on a candy cane?
Sorry, I can see how that word "around" would lead you off the track, not the best ... picture's prolly better - here's the way I did it -
IMG286.jpg IMG287.jpg IMG288.jpg
4 strips like this in each "layer."
1st layer of 4 was "N - E - S - W" if you get what I'm saying - 90* between each strip.
2nd layer of 4 more was "NE - SE - SW - NW" -- 45* offset from 1st layer.
3rd layer of 4 was back to N-E-S-W -- 45* offset from 2nd layer.
Then a last strip like a belt around the mast tube, over these 3 layers of "descending" strips.

I didn't get this from anywhere, just made it up. But mine went down in 2003, so it's been good for 10 yrs now, and I typically wait for 10 kts+ before I'll go out, and I'll often get out in 15-25-30 just cuz it's such a fun ride ... just "cuz I can." So by now I'm thinking if it was gonna come down again, it woulda done it by now, but I s'pose "YMMV" as they say.

Oh, and now I ALWAYS keep my ole' girl in the garage, and if it's cold enuf to risk a freeze I ALWAYS sponge out the mast step hole and the inside of the hull. No way I'm gonna stand by for anything freezing in there again.

Hopefully this gets it across, but holler if we can help before you cut stuff. Measure twice, cut once as my uncle the carpenter said.
Good luck with it. Post a pic when you get her back on the water if you're inclined. Good to see old boats doing their stuff.
 
Last edited:
1st layer of 4 was "N - E - S - W" if you get what I'm saying - 90* between each strip.
2nd layer of 4 more was "NE - SE - SW - NW" -- 45* offset from 1st layer.
3rd layer of 4 was back to N-E-S-W -- 45* offset from 2nd layer.

Ok, got it. With the idea of the 3rd layer of 4, back to the N-E-S-W position, being simply to cover up any remaining strips of the original mast tube that haven't been covered yet by your new glass and resin?

Then a last strip like a belt around the mast tube, over these 3 layers of "descending" strips.

Still not completely clear about this description. Do you mean a strip that wraps in a circular, descending pattern around the mast tube from top to bottom? Like a barber pole or candy cane? Here's a barber pole image that comes to mind.

Or do you mean a belt of glass that is as wide as the mast tube is tall that wraps, say, one and a half times around the mast tube?

Nice job on the bandana and bottle of soda by the way. ;>)

- Andy
 
Ok, got it. With the idea of the 3rd layer of 4, back to the N-E-S-W position, being simply to cover up any remaining strips of the original mast tube that haven't been covered yet by your new glass and resin?
I simply wanted more material holding the bottom of the mast tube to the bottom of the boat - bearing that shearing force. I wasn't so much interested in covering up the original mast tube, or going UP the mast tube, cuz the tube part of mine looked real strong still and I don't think the middle part of the tube bears a great deal of force.

Do you mean a strip that wraps in a circular, descending pattern around the mast tube from top to bottom? Like a barber pole or candy cane?
Or do you mean a belt of glass that is as wide as the mast tube is tall that wraps, say, one and a half times around the mast tube?
The "belt" strip- I wrapped this one straight around the mast tube- just like a belt straight around, not like a barber pole. It was only 3-4 inches wide, not the full height of the tube. I put it only around the bottom part of the tube. It didn't cover the whole length of the mast tube, it just covered the lower part just over the part where the up-down strips reached up the tube. The goal with this one was to get some real strength around the OUTSIDE, around the CIRCUMFERENCE, of all those up-down strips. I was thinking if the bond between the up/down strips and the mast started to fail, I wanted this "belt" to have another layer of strength resisting the shearing, resisting if those up-down strips started separating from the tube. I think I put it around like 2 or 3 times.

Nice job on the bandana and bottle of soda by the way. ;>)
haha it was the first thing I could lay my hands on. No, the 2nd- the 1st was a bottle of bourbon that was too big around for me to hold the bandana with 1 hand and take the pic with the other. The vermouth bottle worked. Put 'em together = a Manhattan, which is one of my favorite ways to keep warm this time of year. :D

Hope that helps - holler with more!
C
 
No hatch, just fun..
 

Attachments

  • image.jpg
    image.jpg
    191.9 KB · Views: 143
  • image.jpg
    image.jpg
    1.6 MB · Views: 156
  • image.jpg
    image.jpg
    183.6 KB · Views: 147
  • image.jpg
    image.jpg
    2.1 MB · Views: 165
  • image.jpg
    image.jpg
    2 MB · Views: 154
  • image.jpg
    image.jpg
    2.6 MB · Views: 172
  • image.jpg
    image.jpg
    1.9 MB · Views: 160
  • image.jpg
    image.jpg
    2 MB · Views: 169
Oh, deck repair...
If it's in the non slip - best thing I've found is to use plasticene to make a mould then put it in the fridge to firm up, regular car wax around the repair to inhibit gel sticking, apply correct colour gel, place cold firm plasticene on top. Leave it well alone for several hours.

"Oh, and now I ALWAYS keep my ole' girl in the garage, and if it's cold enuf to risk a freeze I ALWAYS sponge out the mast step hole and the inside of the hull. No way I'm gonna stand by for anything freezing in there again."
--- With regard to this, we get a lot of frozen nights ( and days ) here.
I've made a syphon of sorts, a giant syringe with a 15 inch rubber tube attached, using this forms part of the putting her to bed ritual, the boat not the wife.
 
Last edited:
Lolz skudder....
Andy - it's six layers of that cloth that's in the background, west epoxied, clamped cured flat, trimmed
 
it's six layers of that cloth that's in the background, west epoxied, clamped cured flat, trimmed

So, is that 6 layers of flat, cured glass what I see in another photo as the bed for the round piece of deck you cut out? See (your) attached photo with the red arrow pointed at said mystery item.

- Andy

voodoo-glass.jpg
 
Ok, got it. I'm glad you showed up with your photos cause I was thinking about putting the deck section I cut out to do the mast step reinforcement back in place after I was done.

Thanks,

- Andy
 

Back
Top