Eye Splice the Mainsheet !

NightSailor

Captain
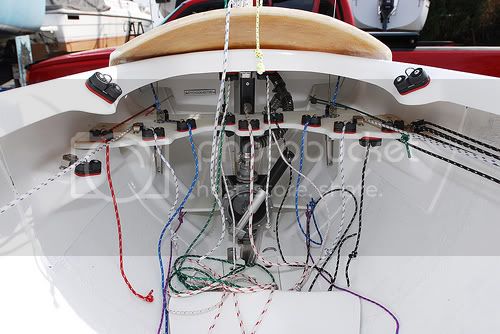
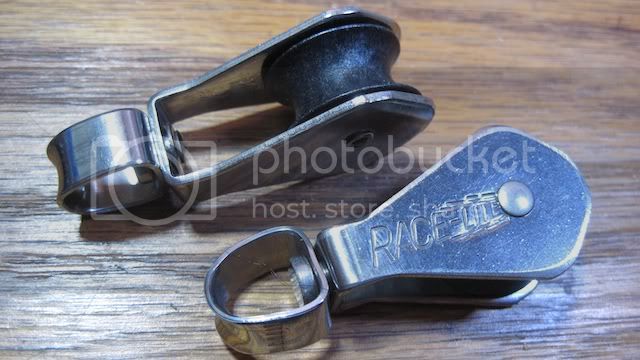
I ordered two new blocks and a nice low-stretch V100 black 3/8 inch line for the mainsheet I'm building for my racing rig. Unfortunately they sent me 7/16" line. Rather than return it, I thought I'd give it a try. I also ordered two Race-Lite swivel block--not the best blocks, but the best available for racing the Sunfish--correct me if I'm wrong. I'd much prefer some 40 or 57mm Harken carbo blocks.

Here are my new Race-Lite Swivel blocks:

Race-Lite419.jpg


The V-100 line was overkill for a Sunfish. I found a 29' length of line that was a "line tail"--the left overs from a big spool. So it didn't cost that much, but they were not very careful to list the correct size on the web site. This came from Layline.

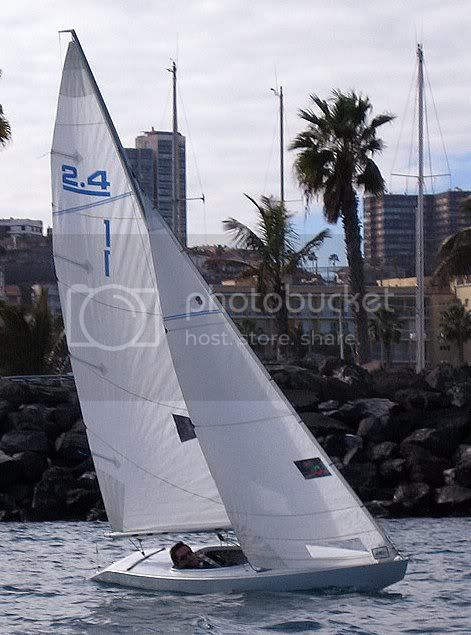
I found a used rig from a guy locally. I'm moving my hornet sail over to that rig. I purchased two Race-Lite Sunfish blocks that will go on my best rig. All I need now is a Racing sail, outhaul and Cunningham line, and I'll be ready to do some racing. When I have $400 to blow, I'll put it towards a new sail. In the mean time, I'm making forward progress.

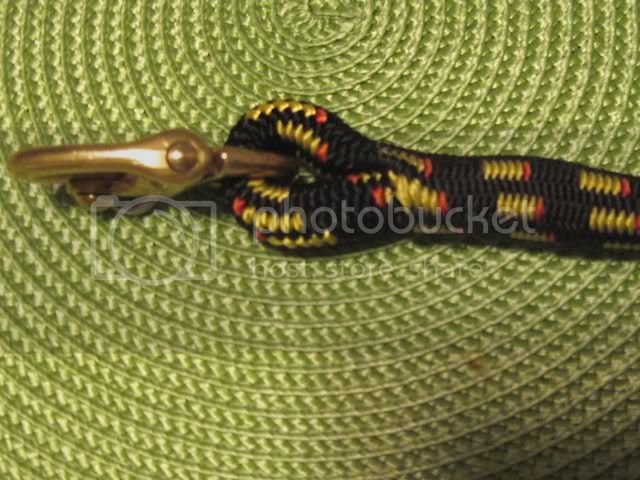
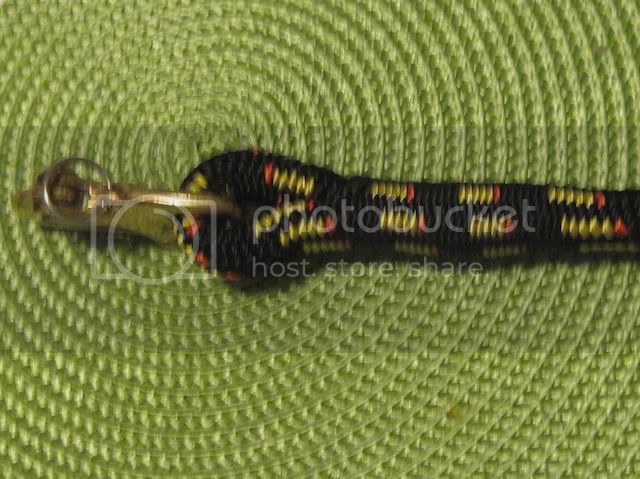
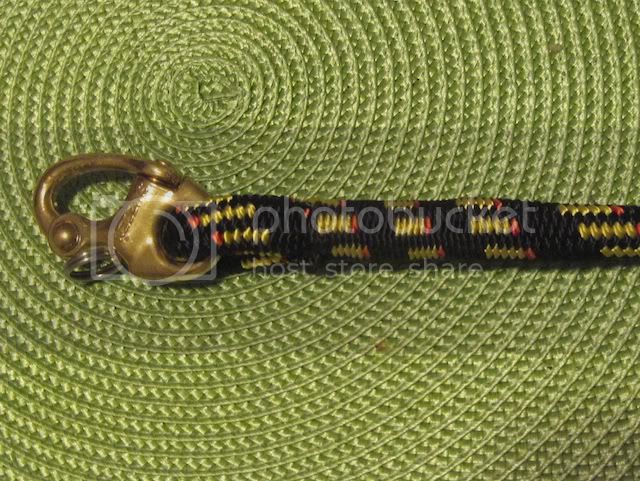
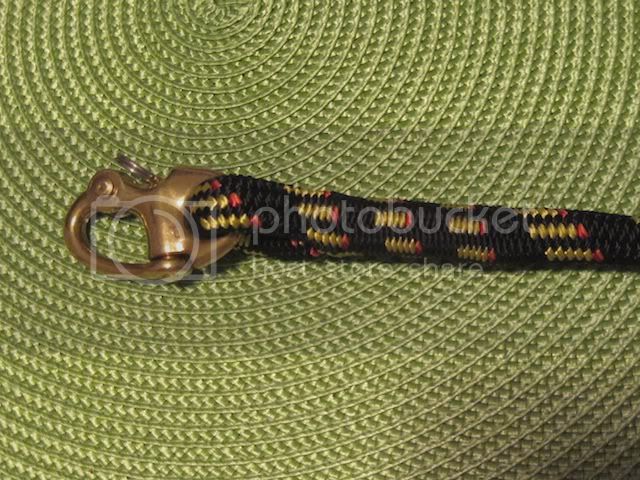
I decided to keep the line and go ahead and eye-splice the termination. I'm not sure if this sort of traveller shackle is legal. But if anyone wants to give me a hard time about it, I'll probably blow a fuse because I would hate to cut off a nice eye-splice like this one-I spent at least 20 minutes making it up, maybe 30 minutes.

Here are my eye-splice photos. I think every boat should use eye splices rather than ugly looking bowlines.

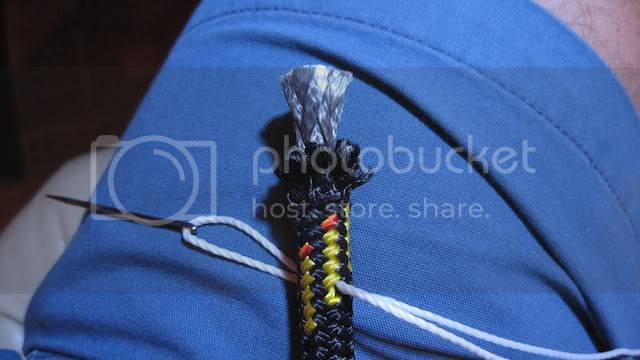
If you have never done an eye-splice Samson sells a nice kit for doing it. I keep it in my seabag for something to do on long voyages, albeit it is impossible to do on older lines. Soak the line in fabric softener if you want to try to splice old line--a good thing to do to all your line every year. Samson's instructions are not quite right, but if you do a few eye-splices, I think you will agree it is better to taper the core and cover before inserting it back in. Remember to put the shackle on, and be aware of where it needs to be while doing the splice, or you may end up with a nice splice and no shackle attached--I did that a few times when I was learning to splice years ago.

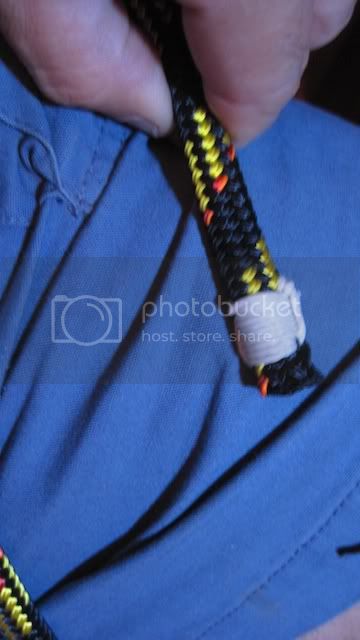
In any event, here is my latest splice job. It came out ok. And the line does fit into my Race-Lite blocks. Perhaps the larger diameter line will be a bit easier on the hands. I can always strip the cover off where it goes through the blocks.

EyeSplice413.jpg

EyeSplice414.jpg

EyeSplice415.jpg

EyeSplice416.jpg


Here is the other end. My whipping line was a bit large, but it was all I had available. It is a better size for larger line like on my 46. In any event, it will fit through my race lite blocks.


EyeSplice417.jpg

EyeSplice418.jpg


Splicing the Mainbrace was the largest line in a tallship. It was a hard job and was rewarded by a tot of rum. So today, splice the mainbrace, means to have a drink. I think I'll reward myself with a Corona for my work today. Ciao!
 
Under the racing rules you may change the location and mounts for the boom blocks, but the blocks must be supplied by the builder. The Racelite blocks may be a little cheap, but they seem to hold up really well and I have never seem them fail. They get the job done just fine.
 
Wish I could see the pictures, I'm guessing you're using Wipping or a Phid for your splice. Perhaps you could comment on the I-Splice where the line is layed back against itself and Seizing is applied. The way I understand it, this was often used on old ships and was quite strong using only friction to hold the I-Splice together.
Thanks

Next time I need to make up a splice I'll document it with pictures or a video. I do not use whipping for the splice. I know that some people do, but my splices have never come apart--I see no need for whipping except for the bitter end of lines.

Basically the core goes around the eye-splice one way and the cover goes around the other way--each are tapered inside the junction--even so the Y where it joins gets thick. It is like locking your fingers together. Fibers are going both ways around--core one hand the cover the other hand.

The compression of the fibers holds the whole thing together. It is stronger than any knot. If you have not spliced, try splicing with three strand rope first and then move on to double braided line.

Here are my steps: (I'll see if I can take some pictures for you and update this later)

1) Tie the rope to door knob about 6 feet away from me. So I have about 6-8 feet of line.
2) Pull the cover from the door knob to the bitter end--this makes sure the cover and core are even (equal lengths).
3) I measure in one fid length and mark the cover with a sharpie.
4) I make a loop about the size of the eye splice. (In the past I tried to make these very small sometimes--resist the temptation, because these are harder to do.
5) I extract the core from the cover at this point. I use the push rod from my Samson kit for this. Sometime I use a sailor needle or fisherman's forceps to pull it out.
6) Repeat step (2) To make it even again.
7) Mark the core where it was extracted. Mark with one band all the way around. I call it #I.
8) Pull the cover back to expose more core.
9) I make two more marks. The first, # II (two bands), 1/3 of a fid length section (the fid is chosen such that it will fit inside the cover). The second, #III, is 1 and 1/3 closer to the tie point on the door. This portion is where the cover is later inserted inside the core from band II to III--more on this later.

Here is where I diverge from the Samson method.

10. Next I perform a taper on the cover. I start fairly close to the first mark I made on the cover. If you have double bands of dacron I remove one of the two. If you have single bands you pick one to remove. Then I pick one going the opposite direction. I move a few millimeters and repeat. For double threaded weaves, I keep on removing one half of the threads in each direction until the line is tapered to about 1/2 the size it was. Cut off the threads you have pull out. I tape the end and cut off half the tape to make a neat end. With single threaded weaves, you might find the whole things becomes very loose. That is ok, but don't let it all fall apart.
11) Insert the shackle over the cover and tape it close to the split where the cover is extracted.
12) I now stuff the fid inside the core from II to III, using the push rod to stuff the whole thing through, and leave the tail sticking out at III. I put a needle through the end to keep it from going entirely inside the cover or I use tape to hold it from going back inside. The reason I taper before hand, is I've found a full size core or cover will not fit when trying to put too much core inside the cover or vice versa. It makes things easier later on.
13) I taper the core. Similar process to tapering the cover. Cores can be looser weaves, so be careful. Trim off the parts you extract.
14) Now you make the crossover (where the extracted core goes inside the cover). I stuff the fid in the cover and push it to the junction and try to get it 1/3 of a fid length past the junction. This can be hard sometimes, it is tight because it is fitting next to the core and basically you are putting two cores in the cover. This is the hardest part. Be patient. It is important to get it down that far. I use some small flat end pliers to twist the fid on axis and slide it through.
15) I pull a bit of excess through and do a final taper so that when I pull on the cover the part sticking out goes inside the cover.
16) Now there is still some cover sticking out where we left off at (12). I pull on the crossover to try and smooth this out and this will pull the exposed bit of cover back in. If not, pull it out cut it at a diangonal so that it will pull inside when you pull on the crossover.
17) Now the whole thing is an eye splice with the shackle attached, but we see exposed core and the eye splice is too big. The next step is the pull on the cover back where it is tied to the door, and slide the cover towards the eye splice by pulling towards the cover--sliding the loose spots on the cover towards the eye splice. I find I sometimes have to do this 10 or more times. Each time the cover will hide more of the exposed core. The idea is to keep working it until the crossover closes the gap at the junction. It is a milking motion. The last few millimeters are the hardest. You make hear some noises as the last bit slides over. If for some reason you cannot get the core to close the gap, untie the rope at the door knob, give and retie it with another couple feet of rope and repeat.
18) If you want to put lock stitching, it should be across the joint in the plane of the eye splice. Samson recommends three or four lockstitches terminated with a small reef knot stuffed back under the cover. I typically skip this step.

 
I'll admit - never tried this or even thought about it. I'm struggling to even follow your step-by-step instructions, so I'll love it when you're able to post pictures.

All that said - the end result is beautiful. You've done amazing work.

tag
 
I am a pretty crafty gal, but that it is intimidating. I think the rabbit will have to keep coming out of the hole, around the tree, and back in the hole on my mainsheet for now. Besides, the bowline has always been a personal favorite. :)
 
I am a pretty crafty gal, but that it is intimidating. I think the rabbit will have to keep coming out of the hole, around the tree, and back in the hole on my mainsheet for now. Besides, the bowline has always been a personal favorite. :)

Don't tell me you use that rabbit method to tie a bowline! I can tie two bowllnes in the time it takes to use that method! PM me and I'll email you a video how to tie a faster bowline.

My method is so fast that people can't believe I tied a bowline. A few years back, we had an instructor from England come work at our club. I asked his girlfriend, 5'0" 95 pounds if she would go up my mast and fix something. I tied the bowline to her harness so fast he didn't believe I tied it properly--he had a look of dumb amazement on his fast, but not enough guts to ask me to demonstrate method.

I use knot tying as a way to put cocky sailors in their place. I'm often on boats with crews I've never met before. Of course when that happens, as the new guy, they try to put me at the bottom of the pecking order. I use knot's and rope tricks to change that.

The eye splice is a bit tricky, but I'm sure you could do it with a little practice. I set a goal of learning everything there is to know about sailing--when I'm 75 years old I might reach that point.

Start with knots, then try three strand splicing, box splicing (bending rope and whipping it together), then double braid splicing. Next comes single braid splicing--which is rather easy, followed by wire to rope splicing. I need to learn wire to rope splicing, although I understand it too is easy. It just takes instructions, a few pictures and practice.
 
I am a pretty crafty gal, but that it is intimidating. I think the rabbit will have to keep coming out of the hole, around the tree, and back in the hole on my mainsheet for now. Besides, the bowline has always been a personal favorite. :)

A splice is awesome, but I agree with Fun Fish that a bowline works just fine. Many racers do away with the clip and tie the sheet directly to the traveler.

 
A splice is awesome, but I agree with Fun Fish that a bowline works just fine. Many racers do away with the clip and tie the sheet directly to the traveler.


A bowline works, and saves some weight also-eliminating the shackle. I like the look of nice eye splices--always my preference. But many people go the bowline route.

I sailed with the Millimeter guys in Darien last year.

http://www.us24meter.org/

24_meter_photo.jpg


They spend $13,000-14,000 for a boat the size of a Sunfish, but don't splice their many lines--I think it makes the boat look like crap. This is not one line like a Sunfish--where it is hardly noticeable, the 2.4M boats have nearly as many lines as my Etchells! Bowlines everywhere! I didn't have the heart to tell these guys their boats looked like crap.

I don't have any good photo's of all the bowlines--mostly deck terminations--where they show. For an idea of how many lines there are on this boat--check out this picture.

millimetercockpit.jpg


As much as I love these boats--you can fit two on one trailer, or put a couple in the bed of a pickup truck, I can't see spending this kind of money on a boat this small. I'd rather spend $20,000 on a used Melges 24. Now if I could get a couple of $3,000 each, I'd grab them.

Considering that some places, like Layline, charge $17.50 per eye-splice, and multiply that times 16 or more eye-splices--it is simply not affordable. So my alternative for those that sail in that fleet? Buy a set of Samson fids, and learn how to splice in the winter when things are slow, and then take great pride in having a perfect looking boat in the spring.

For a Sunfish, it is not be worth buying a set of fids, but perhaps someone near you can loan you a set. If anyone is in Fairfield County, I'd be glad to splice a line for you.

Spicing is part of seamanship, and it is good to know how to do it--it is part of being a sailor.
 
Start with knots, then try three strand splicing, box splicing (bending rope and whipping it together), then double braid splicing. Next comes single braid splicing--which is rather easy...
Dude, how do your get your pad to do that...?
4716.gif


...must be a Wii thing
:eek:
 

Back
Top