Does the mast step base need repair?

MrBrycimus

Member
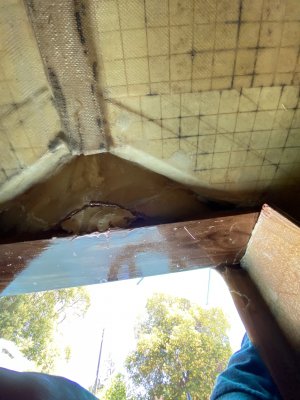
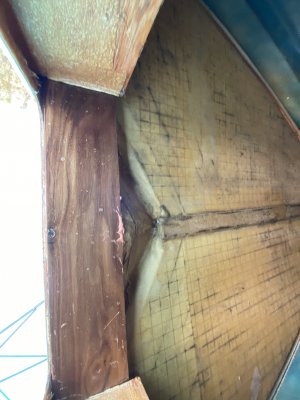
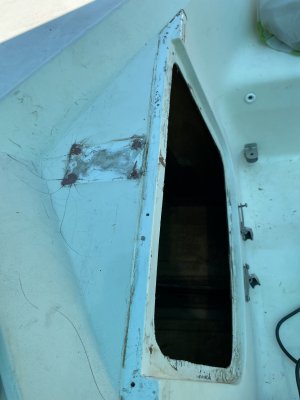
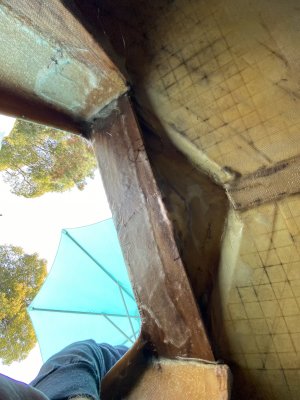
I had a capsize that turned into a turtle and then stuck in the mud on the port side. We kept sailing after getting pulled out of the mud by a power boat.

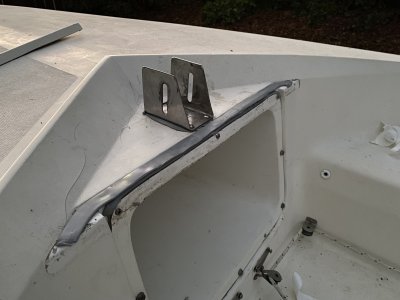
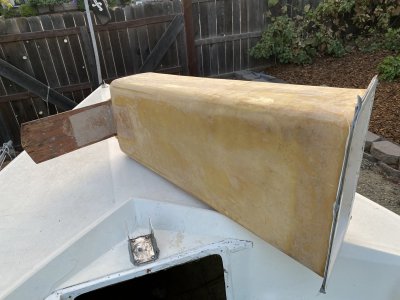
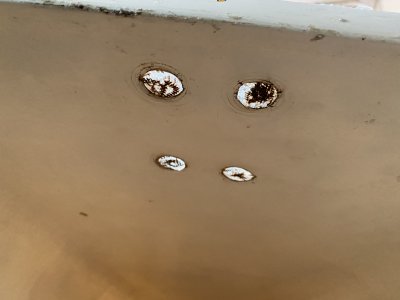
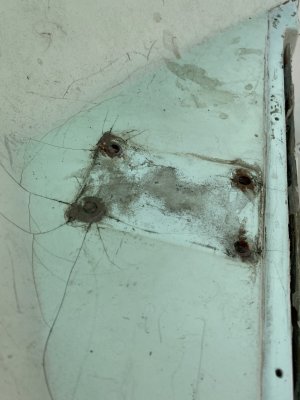
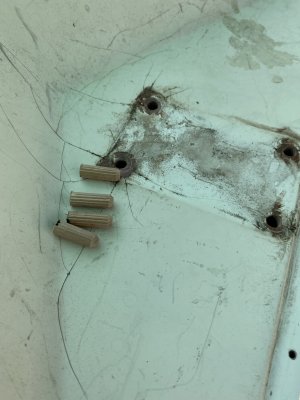
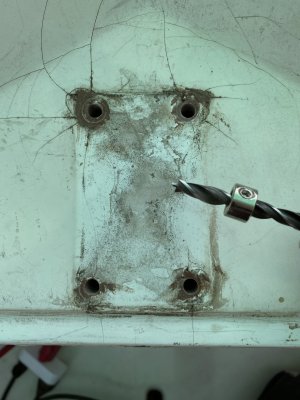
The mast step was loose after, on the port side. It looks like the washers got pulled through the plastic of the cubby in the bottom side. 1994 14.2

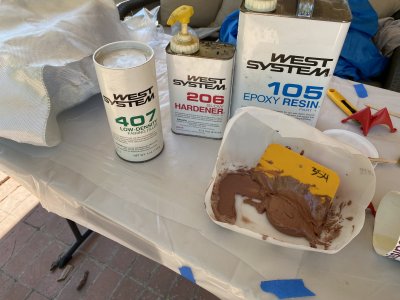
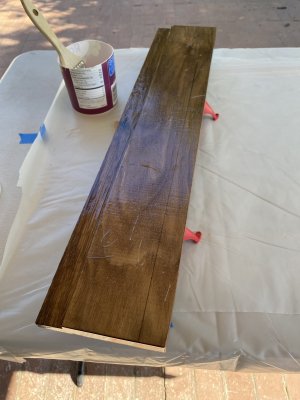
Questions: Does the base of the mast step need to be repaired? If so, how? If not, can I just tighten the bolts down all of the way again? Do I need to do anything on the inside of the cubby? Should there be any sealant in those holes (I saw another thread with an older model with the mast base broken/rotted)?

Previously, when I first got the boat, it had rusty bolts in those holes which I replaced with stainless hardware. However the forward side seemed to be thicker than the aft side and the nuts didn’t tighten down as far.
Thanks in advance.

51DAB15C-71A5-44FB-83BF-D3A2504C30C9.jpeg
D4590CFD-026E-4684-81CC-D2B312553D7E.jpeg
6F477833-E897-4222-8FB6-E5526698A10A.jpeg
2A234EFC-4ECA-41F8-BE37-BAE385DD18C7.jpeg
1994 14.2
 
Since you have the bolts removed, and that model probably has the "plastic box" inside the cuddy, can you probe around the bolt holes to determine if the surrounding material within the bolt holes is soft. If there is minor softness you can try to investigate the extent of the area of softness, maybe by drilling some shallow pilot holes through the plastic inside of the cuddy. On a soft deck I was one time able to drill small pilot holes through the skin, inject West System resin into the holes, which soaked into the soft areas, then glass or just resin over the pilot holes. Also fill the original bolt holes with resin and then drill the holes back out for the bolts. I would add a backing plate of stock flat aluminum (or stainless plate) at least the size of the mast step, preferably a little larger for extra support within the cubby. Caulk and seal from the outside and inside the cuddy with a good bedding compound like 3M 4200 (which is removable if needed). You might get lucky and have solved the problem. BUT, from the pix there is significant gel coat cracking on the deck which would make me suspicious of excess flex in the mast step area; meaning maybe more damage and needing to repair the mast step support in the deck. Good luck and hopefully some folks will chime in who have faced and dealt with the problem.
 
When I did a similar repair on a larger boat with a cored deck, I over-drilled from the bottom with a spade bit, leaving the top layer of glass in tact. I then filled the holes with epoxy resin and glass filler. After that cured, I drilled through the original bolt holes from the top. I caulked the holes when I installed the hardware. I also added large fender washers on the bottom to cover the repair and distribute the load to the surrounding glass.
 
@Kerrcat14.2K @FreeRide thanks for the feedback. My Brother agreed with you and recommended removing the cuddy to get a closer look at the board.

I found that the board is pretty saturated and rotted. The lower layer of glass does not fully cover the board.

He suggested using an oscillating saw to cut through the lower glass and remove the board and replace it with foam core or plywood and then coat it with resin and fiberglass. After that, if using plywood, over drill the holes and fill them with resin and redrill.

Any other recommendations?

In this photo the screwdriver is sticking through the bolt hole and my finger is pressed into the wood.
BDB81304-FE21-40DF-AB95-4E9FD83E382C.jpeg
50A88E16-0E7B-4AC1-8BA8-B8D39462EC5B.jpeg
 
First response is to try to locate the old (5 years or more) threads on this site which deal with this topic and are dealing with the Mod 2s. I remember some pretty explicit threads with lots of detail and pix. For deck core delamination and replacement projects I have used West Systems (Geougen) and Allan Vaitses reference materials, books. Especially the Vaitses book for core replacement.
There is so much downward compression force on the mast base, even on a fourteen foot dinghy, that I would be trying to replace the rotten board with solid material, oak, teak, treated pine if necessary. For replacement core I have used exterior grade marine plywood which closely matched the core's thickness and coated it with epoxy resin along with fiber where needed. I suppose that you could laminate plywood and treat it similarly but that seems questionable when going to the trouble to repair the problem one time. From the pix of the deck I also wonder if removing the top fiberglass layer and recoring it might be worthwhile at the same time. I have cut (thin blade circular saw and Dremel tool) through decking just deep enough to cut the top fiberglass layer, lifted off the layer like taking off the top piece of bread on a sandwich, removed rotten balsa core and then glassed in replacement plywood, glassed and re-resined the top layer back onto the new core, filled in the cut marks with resin, and painted the replacement deck section. On an old Cape Dory Typhoon I was able to fabricate a compression post under the mast support, landing it on the solid bottom of the boat. But, the post was within a cabin; on the Catalina it would restrict access to the cubby.
Hopefully someone familiar with the construction of the Mod 2 mast step support will chime in. Good luck.
 
I removed the mast base. It is held in with just fiberglass on top of the two vertical pieces of wood. The wood has a notch cut out of it; about 1/4” deep by 1” wide. The board is 3/4” thick.
I made the replacement using a piece of walnut hard wood from Home Depot. I don’t have a table saw, so I used a circular saw set at 1/4” to rip it away.
I plan to post more after the next step.
F7BDB051-B783-4635-A8A2-4D9F9E0F6A7A.jpeg1950396B-9939-41D9-BA3E-4D8826988E5D.jpeg970C939D-FC80-432F-B04F-397A6B0DC251.jpeg499DCB32-C67A-4A66-A8A2-71CCA5B7E4F1.jpegC8BF150C-BC85-42F7-85D5-4E06397DAE19.jpeg65121F1E-6445-4272-9BE5-69A9D51D5751.jpeg
 
When my base support snapped due to rotting wood I consulted an expert boat repair guy. He came up with the plan to re-engineer the support by cantilevering with pipes/fittings. Also needed to do this because of my custom battery setup directly below. The unit is bolted to melamine boards that are secured.
By doing this he avoided all the labor time it would have taken to remove/replace the rotting wood. I will drive this boat hard when there's sporty conditions and the assembly is solid. The only thing I wonder about is how much more will the wood disentigrate over time, will it compress some more?
See how the melamine plate (on top) has sagged down through compression, hopefully as far as it would go.
Check out my earlier posts if you want to see pics of the many improvements I've made to Capri throughout the years. Put a lot of time and $$ into her.
Cheers!
 

Attachments

  • Brace .pdf
    751.1 KB · Views: 112
I saw this thread and have the same problem. Did you finish making the repairs and have additional photos to share? Did you make the repairs with the boat upright or turn it over? Also would like to ask how you got the cuddy out? Look forward to hearing back from you, want to get her back on the water this year. Thanks for your help.
 
Yep it's a really big deal! If you go back to my earlier posts of 10/12/21 (Save the Mistress!) and 01/16/23 (Save the Mistress Phase 2!) you'll see the approach I took. I did not have the time to do repairs myself, so hired a pricey professional boatswain to do the work. It's really a shame Catalina didn't use a better (rot resistant) material for the mast support. Any questions, feel free to give a shout.
Good Luck!
 
You have to first remove the top fiberglass flashing. Screws in the front and maybe some glue on top. I pulled it off slowly and scraped at the same time. It got a little cracked, but repaired it later with the rest. The cuddy was screwed on and had butyl tape between for the seal. I just pried it carefully off, then tilted it out.

I did the repairs upright, on the trailer. I am slender and was able to crawl through the hole into the hull, which made the clean up work easier.

The board has epoxy filler in the gap between the top fiberglass surface where the mast foot mounts. There was a triangular piece of filler that i saved and glued back in place in the middle above the board.

I traced the entire area onto a sheet of fiberglass and cut it into pieces.

I made the mistake of trying to use too large of a piece of fiberglass on the top (working upside down); it kept sagging down and only stuck well in one area. I let it dry and cut off the parts that didn’t adhere well. I then used smaller pieces.

The mast was incorrectly bolted all the way through the cuddy. I had to repair the holes in the cuddy too.

Once the inside was all in place I drilled the mast foot holes and filled them with resin, then put dowels in the holes and covered them with resin then screwed the mast foot into the dowels. This was recommended by someone previously in a broken mast post. I’m not sure if I would do it again. One of the screws seemed like it stripped a bit, but overall the mast foot is secure.

I closed up everything with butyl tape, for a not very pretty finish. The butyl tape on the top flashing made it a bit too high. I have to tilt the boat a bit more to keep water from pooling in storage.

There’s some minor gel coat cracks. I didn’t do any gel coat work.

@Movingmen1
 

Attachments

  • BE4B7DBD-A808-4BC5-AC09-6CA86A888853.jpeg
    BE4B7DBD-A808-4BC5-AC09-6CA86A888853.jpeg
    1.3 MB · Views: 54
  • BC68A75A-A166-40EA-B8D5-5ECA45E27456.jpeg
    BC68A75A-A166-40EA-B8D5-5ECA45E27456.jpeg
    1.4 MB · Views: 53
  • 0616D377-36E6-4FD7-8DD6-4C587730CC08.jpeg
    0616D377-36E6-4FD7-8DD6-4C587730CC08.jpeg
    1.5 MB · Views: 59
  • D5FD66D5-22EC-4DF3-B458-1BC0B721491E.jpeg
    D5FD66D5-22EC-4DF3-B458-1BC0B721491E.jpeg
    1.3 MB · Views: 59
  • 94023ABB-A4A4-49D0-BEA0-C41DE786120B.jpeg
    94023ABB-A4A4-49D0-BEA0-C41DE786120B.jpeg
    625.1 KB · Views: 60
  • 337FCCA5-7C69-4BDD-8710-1D8988647A69.jpeg
    337FCCA5-7C69-4BDD-8710-1D8988647A69.jpeg
    1.2 MB · Views: 57
  • 178CD14A-6701-45DA-BAD3-78C711D608BE.jpeg
    178CD14A-6701-45DA-BAD3-78C711D608BE.jpeg
    889.2 KB · Views: 54
  • E1956D20-4C0A-41EC-87D9-469934F60C3C.jpeg
    E1956D20-4C0A-41EC-87D9-469934F60C3C.jpeg
    730.1 KB · Views: 55
  • 33A0A2F3-89CD-4213-8015-86F3398A6853.jpeg
    33A0A2F3-89CD-4213-8015-86F3398A6853.jpeg
    636.5 KB · Views: 67
  • 7952B877-BFE6-4DE5-8BB7-5A994C600289.jpeg
    7952B877-BFE6-4DE5-8BB7-5A994C600289.jpeg
    488.1 KB · Views: 52
  • 54D63C0B-8FE0-4C0E-A9E2-3BB764D794AA.jpeg
    54D63C0B-8FE0-4C0E-A9E2-3BB764D794AA.jpeg
    1.4 MB · Views: 55
  • 4E7D7F71-5370-412D-A0C2-E17BB9CDB96A.jpeg
    4E7D7F71-5370-412D-A0C2-E17BB9CDB96A.jpeg
    633.2 KB · Views: 52
  • 3EF08B31-DC65-45F5-AF43-F7747B756677.jpeg
    3EF08B31-DC65-45F5-AF43-F7747B756677.jpeg
    637.9 KB · Views: 54
  • D81C4965-0056-48E4-864F-F62D840E1DB8.jpeg
    D81C4965-0056-48E4-864F-F62D840E1DB8.jpeg
    1 MB · Views: 53
  • 0B7F9C22-A658-44FD-B839-76E31D644577.jpeg
    0B7F9C22-A658-44FD-B839-76E31D644577.jpeg
    884 KB · Views: 66
Last edited:
Just curious if you have a rough idea about how many labor hours you invested in this project. Don't know if you saw my posts, but the guy I hired took a different approach for repairs. It's too bad Catalina didn't build these older Capris with a rot proof material for the mast base, but they probably assumed (correctly) that most of the old Capris wouldn't be around long enough to matter!
 
@aquaman It took me about a month. Typically only working on it on weekends and learning what to do every step of the way plus I wasn't familiar with how things were connected inside. My gel coat didn't break, which saved time in learning that too. If I had to do it again, then it would take 2-3 days with the drying time.
 

Back
Top