Deck and Daggerboard Repairs

Rob E

Member
I have a 1992 vintage laser that could use some repairs.

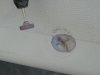
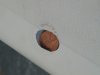
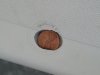
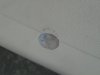
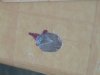
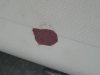
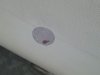
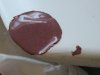
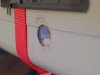
There is a hole in the deck which, when I bought it, had been repaired with
some household caulking. Since I am planning to do some work on another
boat, I already have some bondo-fiberglass that will be mixed anyway.

So in preparation for this I used a dremel tool and removed all the caulk
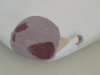
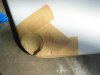
and some of the broken gelcoat. I was surprised that the surface was so
thin. No sign of any fiberglass matting. Hmm. Quite a bit of foam was
missing. The hole is now a 2" diameter crater, about 1.5" deep.

Any issues with using the Bondo-Fiberglass to fill the hole? Or should I
wait and use WEST? (I would need to buy some. I'm willing to do so,
if there is a good reason to use that rather than the Bondo-glass.) Is
there something better to use to fill the hole?

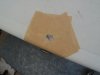
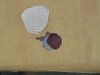
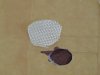
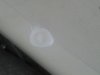
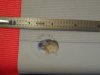
I also plan to use the Bondo-glass to fill another crater in the daggerboard.
It's not very deep, maybe 3" in diameter.
 
I read on another thread that some have used spray on foam insulation
to fill this type of hole. What are the long term results like? Is it strong?

Is it normal to have an eggshell thin layer of epoxy over the foam? How
do I bond to this? Should I put the bondo (or other type of epoxy) over
the top of the existing gelcoat? (The hole is in the deck near the side
gunwale.)

One strategy is to fill the hole most of the way with foam and put bondo-
glass over the foam. I am concerned that the foam will not be a stable
platform to support the glass and that it will not be a permanent fix. It
might easily break away from the rest of the deck.
 
I'd start with fiberglass to get the repair going and a solid fill for the hole. Then I'd finish the surface off with a layer of marine gelcoat, (marine resin in a tube with some matching coloring mixed in with the hardner). Sand it out smooth and you're done. I think the gelcoat should not excced 1/16" in thickness so it will not crack in the future. So, build the glass foundation up a bit. Maybe 1/2" to 3/4" solid galss in the spot.
 
Rob B wrote:
I'd start with fiberglass to get the repair going and a solid fill for the hole. Then I'd finish the surface off with a layer of marine gelcoat, (marine resin in a tube with some matching coloring mixed in with the hardner). Sand it out smooth and you're done.
That sounds like the best way to fix it.

I've never done fiberglass repair before. There should be overlap between the
old glass and the new, correct? How much is required? (If I don't have overlap,
then all I have is a fiberglass plug filling my hole, and not a strong continuous
fiberglass deck.)

Also how do I get that overlap on the deck? Do I need to dremel out foam
underneath the deck glass and put the glass underneath? Or do I just overlap
the glass on top and have a non-flush surface?

One more thing, I didn't see more than just a very thin hard layer over the
foam. How thick is the glass surface on the deck? Perhaps the glass was
removed when the original repair was made? Do I need to make the hole
even larger to get to real fiberglass?

I've been studying the WEST System website. Lots of options there. Are any
of the additives recommended?
 
Hi,

I'd find someone who has a deck "hole" leftover from putting in an inspection port. Make sure the colors matches, I'd think any deck from '78 to '95 would match yours. Use a piece of this to make a nice patch that fits nicely. I'd use the dremel to make the very top layer larger than the foam plug that is going to fill the hole. Fill the hole with glass or whatever you think is strong and seals well, but leave the patch an 1/8" low. Then place the patch on. I'd WEST it to the boat, but might use nice white 5200 to seal the joint around the patch.

Mask off the rest of the deck because any spilled epoxy, even if wiped up, will turn ugly brown in 6 months.

Send me a private message if you can't find a "hole"

Al Russell 182797
 
I like Al's idea best. An actual deck plug is the way to go if at all possible. Otherwise I'd rugh up the underside edges of the existing hole then I'd take a piece of cardboard that is a little larger than the hole, lay a piece of wax paper on top of it, attach a string to the middle of the piece of card board, put resin on that, lay a layer of 2 of glass on the resin, put more resin on the glass, put the whole thing into the hole and use something to hold pressure against the string that will hold the first layer of the patch in place until it cures. Once cured I'd put in a thin layer of balsa and then glass over the top of that until you're about 1/16" away from level. Finish with marine resin with the best color match you can mix. That patch will not go anywhere. I don't like the West products. I've not had success with them and thought they were difficult to work with.
 
Rob B said:
I don't like the West products. I've not had success with them and thought they were difficult to work with.

What do you use then? I've been using it to coat wood before the spar varnish goes on, and I keep getting an orange peel effect. I'm wondering if I'm putting it on too thick or if it's something else.
 
I was referring to glass repair type of work. I've never had ANY talent in the wood work area. Sorry to mislead.
 
Here are a few photos of the deck. The hole is smaller than I remembered.

Does it still make sense to apply a patch? Or should I just fill this and epoxy?

I tested the spray-on foam insullation. It is somewhat compressable, so it is
not suitable. I am leaning towards using the Bondo-glass that I have as a filler.
It should be firm and the WEST should stick to it. Then use a layer of glass
fiber and WEST. Final layer of white gelcoat. Comments?

One of the photos shows a side angle. I guess I need to bond to the
underside of the dark fiberglass, removing the foam directly underneath
it first. Somehow I need to sand the underside of it then.
 

Attachments

  • IMG_0665a.jpg
    IMG_0665a.jpg
    294.4 KB · Views: 94
  • IMG_0661a.jpg
    IMG_0661a.jpg
    256.3 KB · Views: 94
Merrily said:
What do you use then? I've been using it to coat wood before the spar varnish goes on, and I keep getting an orange peel effect. I'm wondering if I'm putting it on too thick or if it's something else.

Hey, I found out the answer to my question about orange peel epoxy. It turns out that after the epoxy dries, it can get a waxy bloom. You have to clean it off with detergent before sanding and putting on the next layer. If you sand with the wax there, it gets ground into the finish, giving you a lumpy finish. I'm glad I found that out before starting on the Thistle!

I'm done hijacking the thread!
 
Given the size of the hole, you could probably just fill it up with
any old gunk and go sailing... ;) (heck, duct-tape might even work!)

If it were on my boat, I would probably fill in the hole and put a
couple of layers of glass over it. Nothing fancy, just a basic fiberglass hole repair. I remember there were some good descriptions on the web of how to feather the edges, fill things in, and apply the patch, but I can't for the life of me find any of them. :confused:

If you can find a piece of Laser deck like vtgent49 suggests that would make the repair even easier and cleaner, but I'm guessing that a couple of layers of 6 oz glass cloth over something light filling the void would be enough.

I'd use WEST epoxy myself; it's designed for bonding stuff together. The Gougeon's have a great site: http://westsystem.com/index.htm

Since the void in the core is pretty small and irregular, I'd personally fill it with a really thick mixture of WEST and Microlight 410 filler (more filler = lighter). You can work that into all the little cracks and crevices.

Cheers,

Geoff S.
DN US-5156/Laser 145234
 
GeoffS wrote:
Given the size of the hole, you could probably just fill it up with
any old gunk and go sailing... ;) (heck, duct-tape might even work!)
Tempting. I'm getting tired of not being able to sail the laser. But, I think I'll
attempt a proper repair.

If it were on my boat, I would probably fill in the hole and put a
couple of layers of glass over it. Nothing fancy, just a basic fiberglass hole repair.
I am with you. vtgent49's suggestion of including a patch piece of deck is
an excellent one, but for my purposes and timeframe, applying a straightforward
patch is adequate.

I recently bought a WEST repair kit, 101-6 Maxi Repair Pack. It probably has
enough to cover the hole, but does it have enough to fill the hole?

It has a lightweight and a heavyweight filler. Which filler is the lightweight?
I'm guessing it's 407. Does anyone know?
 
I just completed repairing several holes very similar to this. Here is what I did with good results:

1. Taped the area off and applied spray paint to the foam. I did this because the foam is very porous.
2. Filled the hole with resin with finely cut up fiberglass cloth mixed in.
a. The cut up cloth might not be necessary.
b. I did not completely fill the hole because I did not want the gel coat I would apply next to be too thin.
c. If I had not painted the foam it would have required a second application of the resin because the first application would have absorbed into the foam.
3. Taped an area off roughly 1 inch larger than the whole and sanded down into the surrounding gel coat with 60 grit paper.
4. Mixed gel coat paste to (almost) match the color.
a. I used clear past gel coat and added white and black color agent to match the grey color as best I could.
b. I placed wax paper over the gel coat repair and let dry for several days.
5. With tape still in place I sanded the repair down (150 grit) to remove most of the excess gel coat.
6. Remove tape and wet sand with 600 grit paper until smooth.

I am not aware of a way to match the texture of the deck. If you don’t use gel coat the resin will yellow and crack over time. The gel coat provides much needed UV protection.

The hardest part was the sanding. It took a lot of patience. I practiced the process on an old boat and learned that you really have to let the gel coat dry well. In my first attempt it was not 100% dry. I tried to rush the process and started sanding too early.

On my next repair (trailing edge of the stern) I am going to use a non past gel coat, thin it with acetone, and spray it on with a Pre-Val sprayer. I have tried this on my practice boat and have not perfected the process yet.
 
jimmy's suggestions are spot on!

A couple of comments/suggestions:

jimmy correctly points out the foam is porus and will soak up resin. The best way I know to deal with this is to paint a layer of neat (unthickened) epoxy everywhere inside the hole; some of the resign will be absorbed, but it will also bond to all the surfaces and seal anything that's porus. Let that layer cure until it's just tacky and then mix up a really thickened batch of epoxy to fill the hole. Because the first layer hasn't fully cured (technical term: gel state), the filler will chemically bond to it. Because the first layer is semi-solid, it prevents the resin in the filler from soaking into the foam.

Since the hole is small, almost any filler will work. You definately want to use something (unfilled epoxy is heavy, brittle, and might exotherm during curing). If you were going to put a structural layer on top, I'd suggest the lightest filler you could find. If you're just going to paint/gelcoat over the top, I'd use something slightly structural.. Any of the WEST fillers 403-406 would work. Note that collodial silica (WEST 406) is very hard to sand.

westsystem.com doesn't say exactly what fillers are in the maxi repair kit, but one is a "low-density filler for fairing" and the other is a "high-density filler for bonding". I'm guessing either would be OK, but I'd probably lean towards the higher-density. If you wanted to get slightly fancy, you could fill most of the hole with low-density, and apply a thin'ish (ca. 1/4") layer of the high-density at the surface.

Cheers,

Geoff S.
 
Here's my (current, subject to change!) plan, based on the input I've received so far:
  1. Dremel-out about 1/8-1/4" of foam under the glass. Sand the underneath side of the glass. (Seems tricky.)
  2. Mask the area with masking tape.
  3. Spray paint over the foam to seal it. Let dry.
  4. Fill most of the hole with either WEST+low density filler -or- bondo-glass (since I have some laying around and it's cheap). Leave some space.
  5. Cut some glass cloth/tape to fit in the hole overlapping the edges.
  6. Apply epoxy. Insert glass patch. The patch sits under the edge of the exposed deck glass. Apply more epoxy.
  7. Wait a week to harden. (Is this necessary, or can I skip this and gelcoat right away?)
  8. Remove masking tape.
  9. Sand the surface of the deck 1" around the hole.
  10. Apply gelcoat to top. Cover with wax paper.
  11. Return after 1 week. Remove wax paper and sand.
  12. Go sailing!
I'm pretty confident about that last step! The rest is open for discussion. :)

I'm leaning towards returning the kit and buying the A-size stuff. The kit makes
about 3oz total, according to the website. If I use the bondo, the kit would
probably suffice, but there is less choice about fillers etc.

Assuming an all-WEST-based approach, I was thinking of using 407 as the filler
throughout. Or I could use either 407 or 410 for step 4 and 406 (Colloidal Silica) for
step 6. According to the website, 407 is a "fair" choice for "general bonding".

I don't think sanding WEST is an issue since I will cover all with gelcoat.

I should be able to start this project on Saturday. Thanks for the responses so far!
 
Sounds like a pretty good plan.

Here are some minor suggestions, although I suspect that almost anything you do will "do the job" just fine, so don't get too hung up on the precise details.

I'd go with the all WEST approach. Bondo typically has a filler that can absorb water.

Buying a small can of WEST is a tremendously useful thing. The shelf life is almost indefinate. Read over the "Users Manual" (online->"Using WEST System Epoxy" tab, or you should be able to pick one up at the store when you get the glue).

Step 1: You probaby don't need to anything as dramatic as a Dremel to remove the foam (it's foam! :rolleyes: ). A bent nail will probably do. You don't even want a smooth edge, a bit of ragged stuff will give more to bond to.

Step 3: Personally, I'd seal the foam with WEST - I think it will be easier to work a small paintbrush into the hole than trying to spray down in there.

If you're going to put a fiberglass patch on top (step 5 and 6), I'd apply it from above instead of working it underneath the opening. Just feather the edges of the hole (the existing fiberglass skin) with some sandpaper from full-thickness down to almost nothing so the new glass has some surface area to bond to (really just a scarf joint, if that makes sense). I'd suggest two or three pieces of glass (depending on how heavy they are). The largest should be just larger (ca. 1/8") than the outside of the feathered area, and the smallest no smaller than the inside edge of the exisiting fiberglass. None of this is terribly critical for a hole the size youre're fixing, but it will help keep the patch from making too much of a bump on your deck.

With glass on the surface you should certainly be able to use 407 for the filler.

Step 9 and 10: No need to wait a week! :)
Depending on what the temperature is (above 50F at least!), even the "Slow" (206) hardener will cure in 24 hours.
The gelcoat should cure fast, too (check the instructions that come with it).

Given the size of the repair, you could probably just point a lamp at it to keep it warm enough. Watch out you don't get it too hot (above 80F) or else you may have problems with the epoxy curing too fast and bubbling. At 80F the slow resign will cure in 8 hours or so.

I'm not sure why you're putting wax-paper over the gelcoat (some gelcoat does need to have air eliminated to cure, but most gelcoat for repairs has a wax mixed in that migrates to the surface and seals out the air automatically - again check the instructions). If you're using the waxpaper for a surface finish, let me know how it works. I've always just applied it at smoothly as possible and sanded out any big bumps. ;)

You will need to sand or scrub the epoxy before applying the gelcoat. There is almost always a waxy "Amine Blush" that forms on the surface that you need to get rid of for the gelcoat to stick. Also, you probably want a slightly rough (150 grit?) surface for the gelcoat to bond to anyway.

Cheers,

Geoff S.
 
The gel coat I used would not cure in the air. That is why I used the wax paper. This is probably why I had to wait a week for the gel coat to cure.

I think all of Geoff's suggestions are very good. I am cheap and use polyester resin and not West System. West is better.
 
jimmy said:
The gel coat I used would not cure in the air. That is why I used the wax paper. This is probably why I had to wait a week for the gel coat to cure.
That makes sense. You probably got some "real" gelcoat (the stuff designed to be sprayed into a mold as opposed to the stuff for repairs). I just checked the West Marine catalog (no recomendation, I just knew their URL...) and noticed that they sell both kinds of gelcoat ("Non-waxed" and "Waxed") - you learn something new everyday...

Wax paper is a good idea, but the usual way to seal out oxygen is to spray a thin layer of PVA over the surface (no need for fancy spray-guns, a hand spray-bottle works OK). PVA is water soluble, so it washes right off when the gelcoat has cured.

Post some photos of the process!

Cheers,

Geoff S.
 
GeoffS said:
Wax paper is a good idea, but the usual way to seal out oxygen is to spray a thin layer of PVA over the surface (no need for fancy spray-guns, a hand spray-bottle works OK). PVA is water soluble, so it washes right off when the gelcoat has cured.

What is PVA and where do I buy some?
 
Merrily said:
What is PVA and where do I buy some?

PVA = "Poly-Vinyl Alcohol"

You can get it almost any fiberglass supply place. Most often, a thin layer is sprayed into the mold before laying in the first layers of fiberglass. For that reason it's often called "mold release agent" (or something like that).

My favorite supplier, Fiberglast:
http://www.fibreglast.com/showproducts-category-category-23.html

West Marine:
http://www.westmarine.com/webapp/wc...50195&storeId=10001&langId=-1&catalogId=10001
(I have no idea if the link above will even work, but search for "PVA" on the West Marine site and it's obvious)

Cheers,

Geoff S.
 
Thanks for the helpful responses. Unfortunately, I did not get some of
them before I did the work. I decided to try the kit first. It worked
out great. I had plenty to work with. It comes with 406 and 407 fillers.

I repaired both the deck and daggerboard.

Deck Repair

I used the dremel with this bit to sand the underside of the fiberglas
shell. It also removed foam around the area as an added bonus. :)
Images 1 and 2.

I also used a seperate tool, carbide cutter, to square up the edge of
the glas.

Images 3 and 4 show the amount of underlap.

Taped off the area. Photo 5.

Sprayed white paint in to seal. Photo 6 after removing tape.

Re-taped.

I mixed up some epoxy with the 407 filler to a fairly runny consistency.
Drizzled it into the hole, and let it sit. Photos 7 and 8. The photos
also show one of the fiberglass patches. Allowed to cure.

Applied 406-filled epoxy and patches. Photo 9.

Applied more 407-filled epoxy. Photo 10.

Sanded. Photo 11.

Applied gel coat. Photo 12. After this I did apply wax paper. No photo.

Daggerboard

I used extra 407-filled epoxy for the daggerboard repair.

Photo 15 shows the taped and cleaned daggerboard.

Photo 13 shows the epoxied board. The epoxy was too thin. Not enough
filler. I added quite a bit, but not enough to get to "peanut butter". It may
be that the epoxy warmed and became less viscous. Drip. Drip. I went
after it with a heat gun, and that stopped it. Unfortunately a few bubbles
resulted, but that's very minor.

Photo 14 shows after most of the sanding was done. I did some more
after this photo was taken.

Thanks again for everyone's help! I'm looking forward to getting this
boat back on the water before it gets cold. (The weather, not the boat.)
 

Attachments

  • IMG_0673.JPG
    IMG_0673.JPG
    381 KB · Views: 43
  • IMG_0672.JPG
    IMG_0672.JPG
    360.2 KB · Views: 44
  • IMG_0675.JPG
    IMG_0675.JPG
    376.2 KB · Views: 40
  • IMG_0679.JPG
    IMG_0679.JPG
    379.8 KB · Views: 33
  • IMG_0680.JPG
    IMG_0680.JPG
    395.2 KB · Views: 58
  • IMG_0683.JPG
    IMG_0683.JPG
    386.8 KB · Views: 27
  • IMG_0688.JPG
    IMG_0688.JPG
    397.5 KB · Views: 36
  • IMG_0686.JPG
    IMG_0686.JPG
    412.7 KB · Views: 58
  • IMG_0691.JPG
    IMG_0691.JPG
    395.3 KB · Views: 68
  • IMG_0692.JPG
    IMG_0692.JPG
    389.8 KB · Views: 56
  • IMG_0695.JPG
    IMG_0695.JPG
    385 KB · Views: 61
  • IMG_0697.JPG
    IMG_0697.JPG
    378.2 KB · Views: 54
  • IMG_0693.JPG
    IMG_0693.JPG
    396.4 KB · Views: 44
  • IMG_0696.JPG
    IMG_0696.JPG
    403.7 KB · Views: 52
  • IMG_0690.JPG
    IMG_0690.JPG
    373.6 KB · Views: 51

Back
Top