mange
Member
Hi,
My new inspection hole continues to reveal the inner secrets of my Laser.
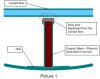
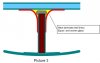
I have discovered that the cockpit floor has separated from the center beam on the hull aft of centreboard trunk.
The problem is the "putty" which is used to bond the beam and the cockpit floor together - it has cracked/separated all way from front back to the bailer hull joint.
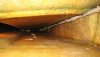
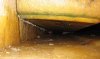
I've taken 2 pic's from starboard/port sides which shows how it looks.
Its hard to see on the pic's that the putty has cracked or separated from the cockpit, the separation is about 2 millimeter towards centreboard trunk.
The putty joint around the bailer seems to be ok, also the "putty" which bonds the aft cockpit corners to the foam stringers in the hull.
The cockpit floor itself seems to be ok - there is no delamination in the grp or the foam core.
What should I do?
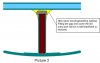
The best solution is ofcourse to laminate (glassfibre+epoxy) the cockpit floor together with the beam, but this seems to be a very tricky job and I don't want to open more inspection ports if I dont have to.
Maybe its enough to fixate the front end of the cockpit to the beam - lets say about 10cm?
Then I can reinforce/laminate also over the aft joints - I have an aft inspection port too.
Even if these joints seems to be ok today this can prevent any future cracks in them and compensate for the "cheating" of not laminating along all of the beam/cockpit floor.
In addition, the front corners of the cockpit can be fixated to the foam stringers in the hull - the distance is larger here compared to the aft corners but a spacer made of marine grade plywood and laminated inbetween the cockpit and foam stringer - will this do any good?
A far more complicated method - which laminates/bonds the whole length of the beam - could be to tilt the hull 90 degrees or maybe more, then I can apply epoxi with a roller on a long stick. Then put layers of wowen glass fibre and roll epoxi over. Then repeat with more layers.
In this way I can do one side at a time, once finished starboard, then tilt the hull on port side. The Port side will be even harder to reach - the inspection port is on the starboard side...
I'm sure there is someone who has experience from similar jobs, please give some advice.
I'm familiar with lamination and boat-building work - but not on a Laser yet.
Regards
Magnus
My new inspection hole continues to reveal the inner secrets of my Laser.
I have discovered that the cockpit floor has separated from the center beam on the hull aft of centreboard trunk.
The problem is the "putty" which is used to bond the beam and the cockpit floor together - it has cracked/separated all way from front back to the bailer hull joint.
I've taken 2 pic's from starboard/port sides which shows how it looks.
Its hard to see on the pic's that the putty has cracked or separated from the cockpit, the separation is about 2 millimeter towards centreboard trunk.
The putty joint around the bailer seems to be ok, also the "putty" which bonds the aft cockpit corners to the foam stringers in the hull.
The cockpit floor itself seems to be ok - there is no delamination in the grp or the foam core.
What should I do?
The best solution is ofcourse to laminate (glassfibre+epoxy) the cockpit floor together with the beam, but this seems to be a very tricky job and I don't want to open more inspection ports if I dont have to.
Maybe its enough to fixate the front end of the cockpit to the beam - lets say about 10cm?
Then I can reinforce/laminate also over the aft joints - I have an aft inspection port too.
Even if these joints seems to be ok today this can prevent any future cracks in them and compensate for the "cheating" of not laminating along all of the beam/cockpit floor.
In addition, the front corners of the cockpit can be fixated to the foam stringers in the hull - the distance is larger here compared to the aft corners but a spacer made of marine grade plywood and laminated inbetween the cockpit and foam stringer - will this do any good?
A far more complicated method - which laminates/bonds the whole length of the beam - could be to tilt the hull 90 degrees or maybe more, then I can apply epoxi with a roller on a long stick. Then put layers of wowen glass fibre and roll epoxi over. Then repeat with more layers.
In this way I can do one side at a time, once finished starboard, then tilt the hull on port side. The Port side will be even harder to reach - the inspection port is on the starboard side...
I'm sure there is someone who has experience from similar jobs, please give some advice.
I'm familiar with lamination and boat-building work - but not on a Laser yet.
Regards
Magnus