coaming replacement

Edward Teach

New Member
Is it difficult to replace a cockpit coaming that is riveted to the deck? How do you go abount removing the old rivets?

Thanks
Edward.
 
Exactly.

Different methods have been used over time to attach the coaming. Or it could be that plaster's coaming has been re-installed.
 
Is it difficult to replace a cockpit coaming that is riveted to the deck? How do you go about removing the old rivets?

Just in case you are trying to fix a broken piece, check out this thread... Coaming Fix

If you are going to remove the rivets it's convenient to have access below the deck. Once in awhile the rivet spins in place rather than drills out. When this happens, it's nice to be able to come from the underside and grab the rivet end with pliers to hold it. Another convenience is to be able to pick up all the shanks instead of letting them rattle around in the hull. Also, if I go back on using rivets, I like to put rivet washers on the back side. Oh, and another nice thing about having a port (aside from helping keep the inner hull ventilated during storage) is it gives you the option to re-fasten using stainless steel screws, washers, and ny-lock nuts.

Traditionally, instructions for rivet removal say to match the drill size with the rivet shank diameter and drill through the rivet head then continue on to drill away the shank. I found this got me more spinning rivets or shank fragments wrapped on my drill bit causing me to reverse the drill and work it back out the hole while chewing up the underside of the deck.

These days I prefer to use a drill size larger than the shank and just drill off the head. Then I just poke the shank out of the way if it doesn't fall away by itself. The caution I must exercise is not to drill any further than the head or I risk making an oversize hole.

One other note, you may discover the coaming is also sealed down with caulk, in which case you'll need to break that seal with a putty knife before you can lift off the coaming.

4705099759_7dd7b2601d_b.jpg


.
 
Wayne and all,
Thanks for the excellent response to my question. I think I should be able make it through my first season with this boat before I replace the coaming as it is more cosmetic then an issue of function, but it is pretty banged up. It looks like this will be a two part project in that I will need to install an inspection port ( I plan to do this any way). To me there would be nothing more annoying than to have rivets rolling around in the hull.

Edward
 
Re: coaming repair/screws

I just did a leak test this past weekend, and traced my small leak (1 & 1/2 cups an hour) to a section on the coaming. My fish is 71/72 - i.e. teak blocks underneath it all. I have screws, not rivets, attaching the coaming. Presently, the screws are spinning on their way back in. I'm fine for now, but what are the screws for this model year/period screwing into? All other forays into inside of the hull (rudder upgrade/bridle replacement) have shown that the teak blocks to be as dry as a bone. Unfortunately, I don't remember seeing any teak blocks underneath the coaming for this time period in any of the previous diagrams. Maybe I'm wrong.

If there are teak blocks underneath the coaming for this time period, and the teak has had it, I'm thinking about Marine-Tex right now as the permanent solution. I have no inspection ports in my well right now from which to go at it from that angle.

Thanks advance for any thoughts/suggestions...
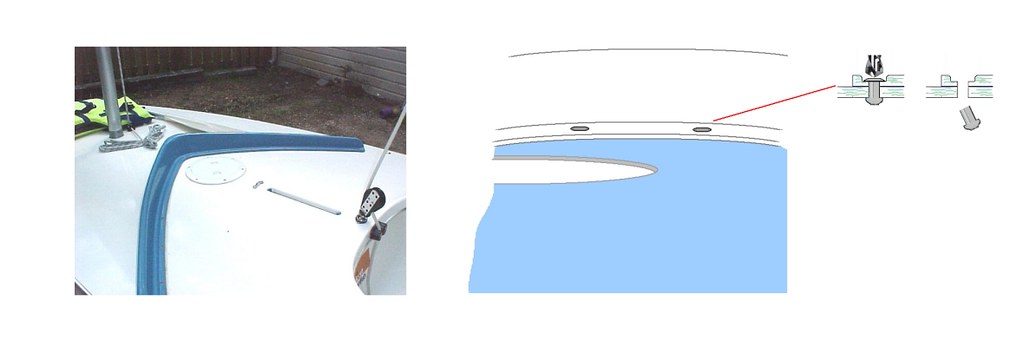
The coaming is the one deck item that does not use backing blocks.

You may have, or have had, a vinyl gasket between the coaming and the hull. These sometimes deteriorated so badly the coaming was left sitting on a crumble of degraded plastic. Newer boats just use a caulk seal around the fastener holes. Caulking is a better method.

If your coaming was originally attached with screws you can unscrew it and lift it off to inspect the attachment points. However, one screw-down method could present more difficulty.

On the early fiberglass hulls the coaming was screwed straight to the hull. On mid-70s to mid-80s models the screws were run into a steel anchor nut.
90186a211_search.gif


Anchor nuts have a potential to leak worse than plain screws when the anchor becomes loose.

Anchors are nearly impossible to remove cleanly. As they come out they leave a ragged hole (aprox. 3/8") that then needs to be glassed in and re-drilled for whatever the new fastener will be.

Anchors do not drill well and more often the anchor spins in its hole . To remove I force the blades of diagonal cutters under the top flange of the anchor and cut it off (screw and coaming already removed). You could grind the flange using a dremel, but either approach is more difficult than drilling off rivet heads.

I had a mid-70s hull where several of the anchors had been leveraged creating half-moon cracks in the hull where their lower flange had been pried up into the fiberglass. Others in the line had been re-tightened on already cracked holes so the fiberglass sandwiched between the anchor's flanges was crushed and just barely holding on by a few glass fibers.

You could plug any broken out holes with Marine-Tex and see if the screws hold. Maybe reinforce that by sealing down the coaming with 4200. You'll want to put 4200 on each of the screws to seal them anyway.

mtplug.jpg

.
 
Thanks Wayne - I ran some 3M caulking over it for now, which should last through the season. I'll pop this whole thing off next year as far as next season's project.

Also, here what some of those bubbles look like after doing a leak test...
 

Attachments

  • IMG_9535.jpg
    IMG_9535.jpg
    50.1 KB · Views: 50
I ran some 3M caulking over it for now, which should last through the season. I'll pop this whole thing off next year as far as next season's project.

Also, here what some of those bubbles look like after doing a leak test...
Are you really getting enough water washing the deck in a day to accumulate a measurable amount inside the hull from that size leak?

I began sailing in Lake Michigan chop and these days often sail in Jetski Hell. I still don't wash the deck with enough water to leak more than a few drips around poorly sealed coaming screws. You may want to investigate other leak possibilities.

.
 
We'll see what happens. I'm in Nantucket Sound which gets fun in a hurry. There was a secondary bubble in a minor dent to a small section of the aluminum trim, which I am keeping an eye on. I rehit both the coaming and this dent with caulking this afternoon. We'll see what happens tomorrow. Also, I sanded down an old Marine-Tex repair on top of the hull on top of the centerboard trunk, and drilled it out with a Dremel bit. I filled it with filler, and then gelcoat, but it suddenly has some flex to hit when I put my hand down on it. So I need to redrill, and do it right with resin and chopped glass. So we learn. This one was perhaps better left alone...

I tried the "Boatlife" brand silicone rubber today, and really liked it. Very "creamy" for silicone product, and it sets in 10-15 minutes. The only drawback to the 3M 5200 brand of caulking is that it is a permanent caulking, and I plan on yanking the coaming of next season and redoing it all.
 
There was a secondary bubble in a minor dent to a small section of the aluminum trim, which I am keeping an eye on. I rehit both the coaming and this dent with caulking this afternoon.
Trouble with caulking the trim is the actual split in the hull seam could be many inches away and dirt under the trim is just channeling the leak to a point where it finally finds a path out from beneath it.


I tried the "Boatlife" brand silicone rubber today, and really liked it. Very "creamy" for silicone product
I noticed that too, then I read it's primarily a polyurethane, but unlike 3M 4200, they mix in a little silicone caulk to get that creamy texture.


The only drawback to the 3M 5200 brand of caulking is that it is a permanent caulking, and I plan on yanking the coaming of next season and redoing it all.
You do have to match the sealer to the job. I was just reviewing the data sheets to decide what to use to bed something that never needs to come out. What I found was...

Tensile Strength
3M 4200 & Boatlife ~300 psi
3M 5200 ~ 450 psi
Epoxy ~400,000 psi

For this application I going to epoxy it in, I don't need the extra flexibility a caulk would add.

.
 

Back
Top