Avances en Rocinante

frx1000

New Member
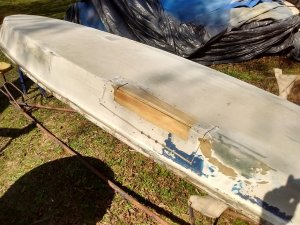
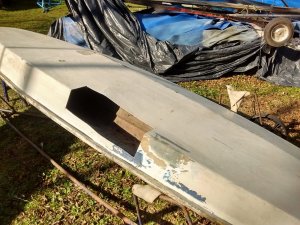
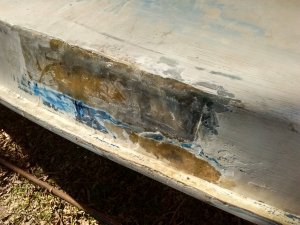
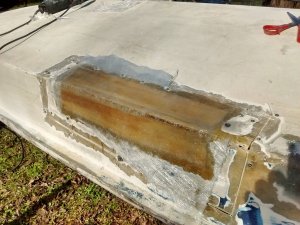
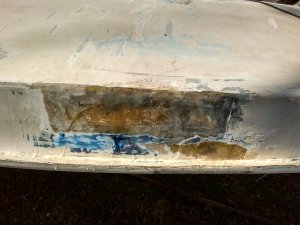
Bueno, es momento de cirujia mayor en el casco de Rocinante
Z8anURjpoLtZWeOIx29-yBTRxjDQYSl569iLMWdEnZTUvm_963OLU13W_CdmPJhHfsaWtjSrLnu7X-5qTriWM_WDmmLdckcFByv9qAtUZ8wI1-wOBfPwuzSCAhPYfpKiVWw6CB7clEpV54EyCquDU-W4xp6bE-16yZWW0YQOX42I0ktCINwMRzYMvw8mjZ3DwcgmXEMFGZ7MeeztbILgiqvi774cG8eFa_jng5exTmX8aSXNb9Nzd1EdMZ5ZFrP480RcF4TMf6pBr_OXA80c9_iGf-u7oLdri7MjGG1TigS_6abu5lKk779mfE2p4p5zxRdzBcAnBgbbToAWzsKh5X7e1JyfSeJ9AhfZ5_Nji_S1caWfLu6Om9Lodbc_4L-V7jrYFglcHccDESYKZLS7B69hs7ylagV4YwXnK6jrsMsWzTIW2S7UHiqwJDohtad9_yGjj9YtOSEf2robL_n4bZM15235cNwg08twPMVyAKN_HQgs0RcRdU_-8GmNrHsGNJtHTXYnhNJ6fI2LTMGDrcUhXB2yXHYIj_2-SHku9FUCA01Cel8HriutTaPmogzHu31JMqXbO_lcr2WbP7IVfQ6vHnmEa1tUvH3_R-s1wTsVdAl7=w815-h611-no
mZ19hSAOz8WYm0xdq5u0M73l_S_4BFA1DzFF-VfVDvkpwZNVH2ee0FjGQDRWc9xjfZVKI_vbkZbbisp4IdkhDZMhYtjrWha3vIvcADnqT2gBx0Wk0WYEISCd_z7GMgostJzvEA2qpmAUz5cAp50zL9Wo00hplDA3_VMC5G_loD4M8wB8Q-ypO6x_56TbrOtdahuuEFZILZqKAd6fMGEyeD7R-cGFRCaJ5i_Xvm4jFidIWd88SoJrFAp12H_OI0hcVdxyRDys-oA7JOZbW1UcMZdMHkfU6NvGpJkD_Lih-p5G5C98sec0R8wECdg8jZLp7QBVDEBzjLNhx6t_q05A9jv0AYLRFztxvkQ7kAAiu67__KTfhPIrCmaR3g6LVPI-etNFi_vOuXG2ukVCK-r5KTj07HgKdkgfj12h8fEPqpoQRS1ViSzsCQ12zxHX4jTczh93J65VpQeXVv2ryy_b2948UvVa2V5CyTKxYd9nZ33dhih_PlIpK1rh9vBiM8ztrR0_RrF5ODw80_OoIKMzJwc6uGGFKEH6L1NJn717dwTvYZp_ugj0Wsr4j644V8oRF-X72pXIiV0RTYGc308gnJpe6Ka5Jy8jwLPBzHiA7ZhnueLc=w815-h611-no
_vJtYjhV9dNgBRed6dLOl0FfHqVtIxbhyfz0qC9FR2Sdz-8fgZGIBfSUnbVkRHc7Gxlr7I_ug-n6tl6fDEdkl9-1BzvG3wePLYcDxT4HYACGjmJGPOZTrSOXo1PoGSGpW7pveynXFpuVrdh8jtn9t9b2aakIJIMThCl7tXO05YGNVZXywLsUSLvk4wsU79u92s90HiFs5ydvEpVPDZh7H3O3-X_DVebDzLw-hKtfcS2WmzZWDGKm67ebG_5YTdf3I8_Y_ELhEXUd0C1_iqWI17IhzZFMypDzG3h7Nc2OBEgyBbYUJJorJiFOntYA3O5FHynRkqrLajtZprd-k83kyVmaCHRmnQQnTcQPbyz9Ls0fYqrfNjpWQfmaAOx9d45AK5p7XoCk-e5zq8eseu7FsMnKmJ45FyZ3kt9CVRXi1PAt5w-ZjdTK2mMgwyTSOUHq-W5EECIHRgfPxNSLWJpoWMckfWMrfDH31DFM8kWLEW1kECy7giZFOsWDPgEvtwwW3DMzbwvWi0f5PkxgvcfLYfwiSOYv_I3_bmTK-jPmoFEepyRs2kgUh5Mg4GBdzw47Pjnnt8TMJiLY2InT9OFlJb9Ee-n4mYryuLCyPGYT_JLBFNpO=w815-h611-no
tWL_icaIR84T4UmXQGMsjbXmPuoyxdnCnX5AwnEH59_LoFxlQzgD2YY9drG0CTfFgCtXwipbfqyv3SSDkaGjv93ftB_CjDxfsZrfHY-7nJhwQOucEjA6h067WVEIod9QZWqsgrw5W2LgJ6bRBZTprMHAEOEwVLicq7lppAyd3Nj_woLYAFJZy42ChMxKeOxFm_eyvnShx2TmDspIsux4dcQaDqHOnF9-kgysi6UlwWeXbhGUT0erh0s4vpeDhCvdM9xHBoVJBWopRv6idKIhzJK37CWAbw0BaUujLGLmX_6j0BXB3L5-Q_-dinGmif2gEur9Bc8oPq_sTphEyiiijdV8_CZv_qLvDtEJg7do-LUsEuckK5t37A1fQ5eHaN6nfmOpa0ujzcd6lbQ5N34BDVXP52pXd5gKl3nvFe8FiRUyCGHxt6559cHZ1-ctPShiygO2I-W_fiE4wh9QCRjU_oMCCLB2MM-3gEDwZzqaUZ82-LVZ3JNanFHZDmwRRw4a6VbO4bD2OeLlGiecXePMve2wvjInIG1tPzcjCKsUsbzekovxfYrJpHHVjTUhoI-MTiqoH0ynyVZeCDSMKcIHACKLcE0dn5EBTy3HoNHwTVGNZLcd=w815-h611-no
8vj6_sLBeaRnPXGsUS9yfcHZIX6dNXKfJ6qLyorHXgnOKpy7P8bQva9dl4T2teLMlah88bb2eEzBk0veyWLU7MIIF6y7MZBo8GUB3MMHrH3Ul7McawQXll0q0VDQp9WmmlrcRdSpWrtTFnCksBwjygOqzTmkwV7XvIK_iCxfuIRR7UzrdEQvO2vW_dCh560uo6K3ABLvwnu73yjSm6qON3QtrM458hy_o7l8Mk8JtWq6VIOsz-s8hmURpy0NcV9mwOxE2HVW-0a0VlXPfJFeweLrwMBfP4ZVS-z-_jS_4PGgXFlndN2JrLkY7PhDMbQ3ghQrJDDyNL1XpcwLajjJTD8Z3xBT6az2T2a4Qoxmi0pi96yVNlMgyefOmm2Xe05GF2gd0IncTcZl6mW1ZwP2PqYID-flJzYzBSgzBCLM66_NxA70ANDJmpn2VHNFOQmhzJEgnlq4IBmPII-8sHtR1hGhKiUn5pmqAexUEyIhqiYHCIJqtkxwSMG2kojsh-pNKaFx6hEFM_siMv7TjHlUYgen4t5geUKJG_pGZq3xLvcbqjvx161C4lqxGwA-4DUGaGAPl8IpzDKO52sWLopHcLKomt0uGTG3hfZqBbbyyxkxG1Gj=w815-h611-no
vJZgzwaZeHlCvwbejq10gTS0JxzGGvR5216kuUySsovDDVOy2ebIYF12kcjBv3aIcgqeu4u5oouhJAMaJCBSsZEuBDW00H7A5l7hiwKA1eGmIhNBjs1n6Ymwo2fnT8qFBisLneghOQgtLPVTZxJ_4Nxa1wPXOYkQP2uIESwBnKMqPNlmsGfr5r4LKt2ckmq8XwLEVpUazzzbEpwKagBZWKiZ9YErJSIL1oa4ElN_A4zX82hMwP_00haM2rL4YCskCkG6z1QIJze1Z0FQTwRP-GWQQHdpiaPllMmARSoYknvo6cjXlcT9Q-dJLCb0d2VBjhppoiHI2elg2EzL4rk2r4p3qgrbgF1zZ6BfyzvBNsK3CgfouomOVIcWWhm2yL_3VG3rccJrFKUXhp0MJIPmMCjCY7mxgxULad7Rccbidj1PoKETFZ1fR_wYOUajTSAAIKRyD_HSEiiLIuT3vVr25hjxEpyRh1BV-BFGnfsVBibf1Dd6t6EZGsch0ew8mivmZxqFuuxswQHpzk8JkLrsgJ9k42vkcHPY4m0QmN_43s0BVQM-52KIEMjbmzCr6uzDXGi3pB2_KMDL5Id0Z6r3J0r03mxaMB1jCY-PsAF3MISFiHcG=w815-h611-no
 
No se cual es el motivo por el que no salen las fotos. Se pueden ver en Yahoo groups/sunfish sailors/rocinante
 
Last edited:
Quizas ahora se vean
 

Attachments

  • IMG_20160826_100544506_HDR.jpg
    IMG_20160826_100544506_HDR.jpg
    523.1 KB · Views: 34
  • IMG_20160826_115727255_HDR.jpg
    IMG_20160826_115727255_HDR.jpg
    558.5 KB · Views: 48
  • IMG_20160826_100654016_HDR.jpg
    IMG_20160826_100654016_HDR.jpg
    580.7 KB · Views: 47
  • IMG_20160826_104908232_HDR.jpg
    IMG_20160826_104908232_HDR.jpg
    588.5 KB · Views: 43
  • IMG_20160826_110915039_HDR.jpg
    IMG_20160826_110915039_HDR.jpg
    439.7 KB · Views: 43
Ahora lo están,

Uso West Systems epoxy. Usar abrigo de Saran Wrap para restaurar el centro, retirar la madera. Restaurar toda la zona dañada.

(Folks, this is the "Google translator"—I don't speak Spanish, but I think I'm close...)
 
I'll let him run the translator... Google doesn't quite get it right.

The hole can be repaired to where it is very difficult to find.

Best is to grind the edges to a bevel kind of like sharpening a knife. appx 50 mm wide bevel

Instead of wood backing, I would find an old campaign sign which can be bent into place.
(made of this stuff )
No gap on the corner and later it can be pulled out from the inside if you have an inspection port. the corrugated plastic doesn't bond well to epoxy, but it will take a while to peel loose.

Mask off the hull (like spray painting) 25mm from the bevel and tape on plastic sheet to the lower edge to catch runoff excess epoxy, rather than having it get all over the place.

First layer course cloth appx 8 oz/sq ft (not sure how it will be listed over there) then 5 oz/sq in the next 2 layers and finally 1/2 oz /sq ft fine weave to make a smoother finish
With the beveled edges and a good fitting backing layer the cloth in just fitting the hole, next layer about 12 mm all around overlapping the bevel, and then overlapping the bevel by 25mm and finally overlapping the bevel by about 35. to.-40 mm. fine cloth just a little wider.
the bevel should be such that the cloth does not come out to the gelcoat.

Use a good, slow cure epoxy 1 hr or longer working time. Large batches "cook off" faster than labeled due to epoxy creating heat. Mix in a WIDE paper (not foam) bowl.

Use a credit card to spread epoxy thinly, apply cloth. Then work in epoxy to make the cloth all change from white to transparent. Then apply the next layer of cloth.

If you have everything cut and ready you can get all the layers applied in one batch.

Excess epoxy will tend to flow down. Use the plastic to guide it back into the paper bowl used for mixing.
Making as little mess as practical.

When that is all cured, peel the masking and sand to match the hull shape. The hull will have an ugly patch at this point but it will float.

Then we can direct you in finishing it.
 
Bueno, ahora esta dada la forma y con dos capas de fibra de vidrio, falta una mas y luego el masillado final. Las maderas de soporte salen luego por el puerto de inspeccion. La otra banda tuvo el mismo tratamiento
 

Attachments

  • IMG_20160831_150728562_HDR.jpg
    IMG_20160831_150728562_HDR.jpg
    462.2 KB · Views: 50
  • IMG_20160831_104239047_HDR.jpg
    IMG_20160831_104239047_HDR.jpg
    485.8 KB · Views: 37
  • IMG_20160831_141306138_HDR.jpg
    IMG_20160831_141306138_HDR.jpg
    477.6 KB · Views: 33
  • IMG_20160831_150719469_HDR.jpg
    IMG_20160831_150719469_HDR.jpg
    375.7 KB · Views: 30
A caution with your last layer of fiberglass cloth: it should not show as "white". :oops: 
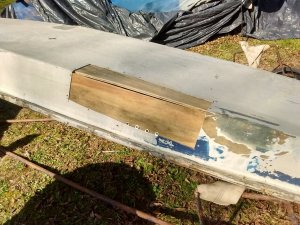
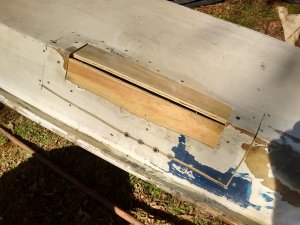
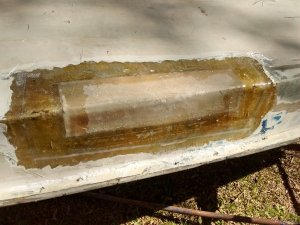
It needs to be sanded down to a "dark" layer, then use a credit card to force the resin into the newest fiberglass cloth better. (An expired credit card). ;)

Google:

Cuidado con la última capa de tela de fibra de vidrio: no deben presentar como "blanco". :oops: Necesita pulirse a una capa "oscura", a continuación, utilizar una tarjeta de crédito para forzar la resina en el paño de fibra de vidrio mejor.
 

Back
Top