Mast Step Repair Questions (continued)

andyatos

Well-Known Member
Got a couple of quick questions. First, let's say I create a more gentle angle where the mast tube meets the mast step pot with West System epoxy and filler so it will be easier to lay up the cloth later over this transition area. See the photo below of my simulation test.

45_degree_sim.jpg


Here's my first question. How long should I let this epoxy and filler mix... or your standard epoxy and cloth combination... cure before I mechanically key it, vacuum it, acetone it and then start laying the next step of fiberglass cloth and resin over it? Specifically, what would be the minimum time I should allow for curing time? I ask because I want to do the steps one after another as quickly as I can to get this project done.

Second question. Let's use Voodoo's recommendations for example of laying up cloth running vertically down the bottom of the mast tube, past the transition and out on to the floor of the hull, with the first phase being sections of cloth at 12 o'clock, 3 o'clock, 6 and 9. Then the next phase doing the same at 1:30, 4:30, 7:30, etc, and all the steps that follow.

Should I do just one phase, let that cure then key it, prep it then do the next phase? Or in contrast, could a guy just keep on laying the subsequent phases one after another in one, long continuous session until the entire mast step project is done?

Accounting for mixing new batches of resin and hardener of course.... and flipping the boat over to do the top of the mast tube... and getting burned out on doing the work for hours on end. :confused:

Thanks,

- Andy
 
I have done alot of fiberglass work in the past, not necessarily this repair, but I think that if it was me I would not use the epoxy stuff to make that smooth wall in the picture. If it was me I would just remove the old donought clean up the fiberglass in the surrounding area and then if I was to use anything in the 90 degree area it would be fiberglass matting, not the cloth, but the matting, you would wet down the area with resin, pack in the matting soak it in resin, then next phase would be to use the cloth over that, and you could honestly put a initial layer of cloth on right wit hthe mat to give it a good flat surface for the next increments of cloth. With the cloth I would run each layer of cloth at different angles for added strength.
 
Here's my first question. How long should I let this epoxy and filler mix... or your standard epoxy and cloth combination... cure before I mechanically key it, vacuum it, acetone it and then start laying the next step of fiberglass cloth and resin over it? Specifically, what would be the minimum time I should allow for curing time? I ask because I want to do the steps one after another as quickly as I can to get this project done.

Second question. Let's use Voodoo's recommendations for example of laying up cloth running vertically down the bottom of the mast tube, past the transition and out on to the floor of the hull, with the first phase being sections of cloth at 12 o'clock, 3 o'clock, 6 and 9. Then the next phase doing the same at 1:30, 4:30, 7:30, etc, and all the steps that follow.

Should I do just one phase, let that cure then key it, prep it then do the next phase? Or in contrast, could a guy just keep on laying the subsequent phases one after another in one, long continuous session until the entire mast step project is done?


- Andy

Using either epoxy or polyester/vinylester, it's always better to do the complete layup before any layer has cured. ie, one right after another before it's cured.. You end up with a chemical/primary bond as opposed to a mechanical/secondary bond between all the layers you have added.

In addition, letting West epoxy cure first before the next layer means you have to do a thorough job of wiping off all the blush that forms on the surface of the epoxy - skip that and you end up with no bond at all.

So, laying it up all at once is , faster, easier and forms better bonds between the new layers.
 
Second the above.
Consideration in when to stop though - if it's getting late and the evening dew is looming , try and gauge if you can commit to a finish before your work becomes subceptible to dew / cold.
The cold isn't much of an issue down to 2 deg celcius, just takes longer to cure ( full cure 30 plus hours ) .
In 15 - 23 deg c you can expect a workable cure in about 10-15 hours...ie you can wash it, sand it etc..
Much warmer and the gear goes off like whores drawers.
Amine blush - aminos rise and form on the surface forming an almost wax like coating that clogs up your grits, soapy water scrub removes it but if your coming back to work on a peice within say 10 hours ( overnight ) it shouldn't be a problem.

Andy, just keep building in one go mate if you have time. Prep is the key. Get everything ready and to hand, cut more cloth than you need, keep the mixes small and fast, put your favourite tunes on and enjoy your time.
 
it's always better to do the complete layup before any layer has cured. ie, one right after another before it's cured.. You end up with a chemical/primary bond as opposed to a mechanical/secondary bond between all the layers you have added.

Excellent point. Ok, I'll do it all at once.

Another question. Below are 2 photos of the point my mast step is at now. Donut removed, area cleaned out, vacuumed, keyed, acetoned. I then bubble leveled the hull so the mast step pot was totally level and poured resin only using a syringe to fill the low points. Now it's a totally flat surface from the mast tube outward.

resin_leveling.jpg


resin_leveling_side.jpg


I was going to add that epoxy and filler step as seen in my simulation photo at the top of this thread but I'm wondering if I should even bother. The only reason to do that extra step was to eliminate that hard 90 degree angle that the cloth has to go around.

But searching my memory banks of when I've done some glass and resin work before, once you've got glass cloth fully wetted with resin it can be made to go around some pretty steep corners without folding and bunching up. Am I right?

So, what do you think... should I just bag the softer transition step and go for the single session, one lay up right from here?

- Andy
 
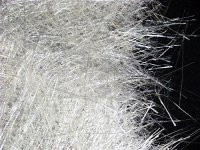
before you use the glass cloth, get some glass matt, it is more of a thick cotton type glass, an aglomarate of glass fibers, this is what you should use first, this can be spread and accumulated, then you use the glass cloth over that in multiple layers
 
Yeah Andy,
I'd cut some thinner strips to go vertical within the laminate - from sole to three/ four inches up the pot.
A couple of layers horizontal around that to finish...ties it all up lovely
 
this is what the fiberglass mat looks like and you can cut it or pull it appart and shape it
 

Attachments

  • Fiberglass-Mat1__76827.1280355983.1280.1280.jpg
    Fiberglass-Mat1__76827.1280355983.1280.1280.jpg
    98.5 KB · Views: 28
I'd cut some thinner strips to go vertical within the laminate - from sole to three/ four inches up the pot. A couple of layers horizontal around that to finish...ties it all up lovely

When you say "laminate" are you referring to the chopped fiberglass matt/resin combo that Cavi is suggesting I use to soften that 90 degree corner? And if so, does that mean you think I should eliminate that 90 degree angle before I do the major re-enforcement stage?

- Andy
 
Think you might be in danger of over engineering a bit here lolz...
Laminate - the job as a whole, x amount of layers laid up on top of each other.
We call what Cavi is suggesting a 'fillet'..
You could theoretically use rolled up newspaper ( I wouldn't ), it's just a substrate to act as a bridge, giving a contour to the real engineering peices.
Make your own chop strand floss, with some scrap ( no such thing as scrap, every bit is useful if you wished ) cut with scissors to ? Small ? lengths and fluff it up, drop it in a pot of small mix ( remember less resin is more strength ) and stir it, add more cut strands and voila ! your very own resin floss. using this as a fillet, lay some on as a bead, then lay some 'fingers up the pot, lay some more filleting bead, another layer of fingers, more fillet until you reach desired shape for your bigger lay up.
Simples, dimples..
 
what I am saying is use the chopped mat soaked in resin to fill in the 90 % angle a bit, then immediatly go over it and the mast tube and base with the glass cloth, again, soak it in resin. Then follow up with a couple more layers of cloth changing orientations for strength, I would probably suggest the mat, then 4 to 6 layers of cloth
 
Oh and I forgot to mention, I would probably cover the whole base and extend out 4 to 6 inches from the base and go up the mast tube half way, and then possibly flip the boat and do the same on the top side of the mast tube. Keep in mind the more area you cover with this repair, the better the forces will be distributed
 

Back
Top