Navigation
Install the app
How to install the app on iOS
Follow along with the video below to see how to install our site as a web app on your home screen.

Note: This feature currently requires accessing the site using the built-in Safari browser.
More options
You are using an out of date browser. It may not display this or other websites correctly.
You should upgrade or use an alternative browser.
You should upgrade or use an alternative browser.
Media Winter Project
- Thread starter gregg157
- Start date
Repete
Sunfish1909
I restored a 1970 Chevy, a Michigan car, needing new floor panels in the driver and passenger floor area. Some companies have ready made pans that were trimmable so you could weld and grind the area to blend versus a trip to the junk yard. Now back to thinking about fiberglass and your keel. I do not know if a keel transplant is possible with using glass. Perhaps you can locate a compromised hull like from a scout camp or marina that you could purchase or take for free. The keel area on that boat would match the keel area of yours since the SF has been so tightly produced over the years. I am more of a metal guy, but I am learning from you guys about glass work and epoxies. Anybody know if my metal idea would work here. Good luck and take pictures as you put her back together.
Alan Glos
Active Member
Gregg,
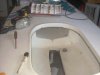
You can repair this hole if you know a little about fiberglass repair. Start by grinding/sanding the edges on both sides of the hole to expose about 2" of bare fiberglass edge. Then fashion a back-up plate (heavy cardboard or very thin plywood work well) that is about 2" bigger than the hole but the same shape. Drill some holes in the plate and run wire through them so you can insert the plate inside the hole and pull it snug against the underside of the hole. Then cover the plate with heavy fiberglass mat (sometimes called woven roving) saturate the mat with catalyzed fiberglass or epoxy resin, insert the plate inside the hole and use your wires to pull it snug against the inside of the hole. Tie off the wires to a board placed over the top of the cockpit and let the resin cure. When cured, the hole will be plugged from the inside. Snip off the wires, rough sand the patched area with 80 grit sandpaper (a palm power sander works well) and they lay up layers of figerglass mat and cloth and resin to finish the patch flush with the inside of the cockpit. If you are using fiberglass resin, your last few coats can be white gel-coat that you can then fine sand down for the final finish. If you are using expxy resin (stronger than fiberglass) you cannot use gelcoat as the gelcoat will not bond well to the epoxy surface. Instead, paint with a paint designed to cover epoxy. As all of these products are heat sensitive, your work area should be warm (say 70 - 75 degrees) and dry. If the area is too cold, the resins will never cure and remain tacky. Been there/done that. Also make sure your work area is well ventelated as the fumes can be nasty.
The other cracks shown in the photo can be repaired with fiberglass or epoxy resin and fiberglass cloth a described above.
Good luck with this project.
Alan Glos
Cazenovia, NY
Repete
Sunfish1909
Thank you Alan, your description of creating a new panel is much stronger than a "transplant" of a hull section. The SF hull is so very "flat" that laying up glass is very easy. The original hull was made from a plywood panel and so is your fix. I appreciate your explanation of the steps and the detail for this for future reference.
Gregg,
You can repair this hole if you know a little about fiberglass repair. Start by grinding/sanding the edges on both sides of the hole to expose about 2" of bare fiberglass edge. Then fashion a back-up plate (heavy cardboard or very thin plywood work well) that is about 2" bigger than the hole but the same shape. Drill some holes in the plate and run wire through them so you can insert the plate inside the hole and pull it snug against the underside of the hole. Then cover the plate with heavy fiberglass mat (sometimes called woven roving) saturate the mat with catalyzed fiberglass or epoxy resin, insert the plate inside the hole and use your wires to pull it snug against the inside of the hole. Tie off the wires to a board placed over the top of the cockpit and let the resin cure. When cured, the hole will be plugged from the inside. Snip off the wires, rough sand the patched area with 80 grit sandpaper (a palm power sander works well) and they lay up layers of figerglass mat and cloth and resin to finish the patch flush with the inside of the cockpit. If you are using fiberglass resin, your last few coats can be white gel-coat that you can then fine sand down for the final finish. If you are using expxy resin (stronger than fiberglass) you cannot use gelcoat as the gelcoat will not bond well to the epoxy surface. Instead, paint with a paint designed to cover epoxy. As all of these products are heat sensitive, your work area should be warm (say 70 - 75 degrees) and dry. If the area is too cold, the resins will never cure and remain tacky. Been there/done that. Also make sure your work area is well ventelated as the fumes can be nasty.
The other cracks shown in the photo can be repaired with fiberglass or epoxy resin and fiberglass cloth a described above.
Good luck with this project.
Alan Glos
Cazenovia, NY