Dave Lilley
New Member
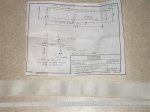
My boat is fairly new to me, but it has been around the block a few times. Some of the parts are showing their age, so I have been updating them a few at a time. This week I'm replacing the centerboard gasket. The gasket on my boat looks as if it may the original that came with my 1986 boat. It was warped, cracked, and generally served no purpose, other than perhaps to funnel water into the boat like a fountain. The first step in replacing the gasket was research, but the only vague links I found had little information about where I could purchase a new gasket or how to install it. I then called Catalina. Not only do they have the gasket (part number 15386), but it is covered with durable sailcloth, which should extend its usable life. With a price less than $10.00, including stainless steel screws and gasket retainers, it is a good value too.
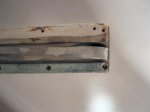
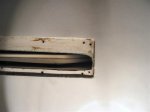
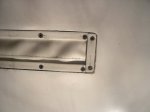
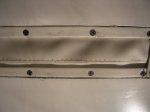
When it came in, the first thing I did was to remove the old screws. Most of these came out fine, but as you may be able to see in the pictures, the boat had an old bottom coat of paint put on. (My boat has been professionally repainted since by Lindsey Marine at Canyon Lake, and the painters were thoughtful enough to leave the centerboard gasket parts unpainted so that I could change out the gasket without having to remove painted screws.) Nevertheless, a few of the heads of the screws that were sealed under the old paint striped when I tried to remove them. Using my Dremel and a small cutting wheel, I very carefully cut new slots into the tops of the screws. This allowed me to remove them easily using a flat head screwdriver. Since I did all of this under my boat, with the wheels chocked and the trailer secured, I was only to able to remove most of the screws. Eight screws were inaccessible due to the rollers on the trailer. However, with the help of my son, I was able to carefully slide the boat back just enough to allow access to the remaining screws. After all of the screws were removed, the gaskets and plastic gasket retainers came off easily. The final clean up work simply required removing the old sealant.
Up to this point, I put in about an hour of work. Tomorrow I will finish the job by installing the new gaskets, which should also take about an hour. When I'm done, I will post pictures of the finished product.
Pictures post below
")
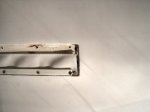
") ), I finally found out that Catalina only stocks the gasket retainers that are pre-drilled, which are provided through a third party supplier. Catalina is going to try to get some un-drilled stock, but this may not be available for a few weeks. I want to sail this weekend, so I cleaned up the old, gross looking gaskets retainers with sand paper and acetone (to remove the old crusty bottom paint). They are nicked up where I had to cut new slots in a few of the old screws, but the retainers should work well enough.
), I finally found out that Catalina only stocks the gasket retainers that are pre-drilled, which are provided through a third party supplier. Catalina is going to try to get some un-drilled stock, but this may not be available for a few weeks. I want to sail this weekend, so I cleaned up the old, gross looking gaskets retainers with sand paper and acetone (to remove the old crusty bottom paint). They are nicked up where I had to cut new slots in a few of the old screws, but the retainers should work well enough.