Opinion please. How much repair might be needed?

Laska

New Member
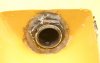
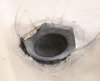
I bought my '79 Laser a few weeks ago and sailed it a few times now. Each time there was lots of water in the hull, so I did a soap test today and found the culprit. It seems to be the bailer hole. See the pictures attached. Bubbles were a plenty both on the bottom and in the cockpit. In fact the floor of the cockpit raised a little revealing that the brass drain isn't even connected to the cockpit.


I don't need the boat to be perfect, just dry enough for club sailing. So here's the question. If I remove the drain and clean the area and re-install it would the boat stay dry? Clearly water could enter the hull if the cockpit fills with water, but as long as water doesn't come up through the bottom of the boat, I think it would be enough. If so, what do you use to seal it? If not, what next?
 

Attachments

  • IMG_4973.jpg
    IMG_4973.jpg
    177.7 KB · Views: 59
  • IMG_4976.jpg
    IMG_4976.jpg
    60.2 KB · Views: 61
I would remove the brass drain, repair with Epoxy and cloth, drill a new hole and mount the brass drain with silcone and rubber gaskets.

Should cost to much, can get small packs of West Systems epoxy.
 
Thanks Corolla,

Seems so simple when you put it that way. I think reading all the threads on leaks might have confused me more than anything. I thought I might have to cut ports and do glass work on the inside. But I guess as long as the drain is well seated at both ends, the hull should stay dry.
 
With all due respect to Corolla, There is a specific reason why this happened, and why the perscribed repair will not permanently fix your problem.

1. What has happend is that the three bonds between the cockpit sole/after bulkhead separated from the inside of the hull.

2. As for why this happened, from my own experience and research, I have found that boats of this vintage originally came with cheap plastic thru-hull bushings and they eventualy broke. This let water into the hull and compromised the goop which was used to hold the two pieces together.

3. A person who pereviously owned your boat probably experienced this and replaced the P.O.S. plastic one with a bronze one. However, this solved the symptom (a leak) but not the problem. The rigid bond between the hull and the liner at this point is still broken.

4. Over time, the flexing of the hull around that one rigid point will cause the next weakest material to fail. In this case it is the hull itself.


Not to worry, as it appears that the boat is still salvageable. I made a repair to my 1979 boat in 2007 (see link below), and a year later we noticed that my friend's 1980 boat had started to crack in the same manner as yours; and did have a new bronze bushing installed. I have also included another link showing what the three bonding points look like when the deck is removed. The repair will take some time and you will need to install two inspection ports. You will also need to grind out the cracks, and I would suggest using some white Marine-Tex to fill them.

Hope this helps and do not hesitate to PM me if you have questions.

http://www.laserforum.org/showthread.php?t=6507&highlight=1979+Laser+separation

http://www.laserforum.org/showthread.php?t=8106&highlight=Deck+the+hulls

This last link is the one with the pics of a laser w/o the deck. look at the one on the lower right.
 
Hi BP,

I get it. I saw the 2 links in a recent thread but wasn't quite sure why go through all that hoopla inside the boat. So the cockpit is attached at 3 points or in my case 2 (maybe?). Is there an easier way to reduce movement at the bailer without cutting more ports? I don't feel any movement of the cockpit at all, so I probably only have a little flex at the center of the boat.
 
I don't know of any other method. Frankly, it is not that bad of a job. The second one we did was a little less elaborate than the first. There is no need for the 1/2 pvc limber holes and the foam.

What we did on the second (1980, which had similar cracking arount the fitting) was cut the holes in the deck and securely attach each corner of the cockpit to the inner hull with a fillet made from thickened epoxyand covered with wetted out cloth. Next, I scraped away the old excess hardened goop from around the inside of the thru-hull joint (the center bond) and repeated what we did for the corners. Now it was safe to remove the bronze thru-hull, repair the cracks, and re-bed the fitting.

Do not be intimidated by having to work with epoxy and cloth. I am a real novice and West System makes it pretty easy. Also, you are dealing with an internal repair, and no one will ever see it. Just mask off really well around the holes so the epoxy will not get on the deck. Lastly, we found that having a fat bag behind the cockpit to be pretty convenient.
 
Brief description of the repair.
Starting around 8 am.
1. Cut a nice big access port just behind the traveler cleat
2. Reach in and knock all the old goop out that stuck the back end of the cockpit to the hull
3. Sand the entire area
4. Mix up some appropriate similar goop and use it to replace the old stuff.
4a. If you want to make the boat better than new, add some fiberglass mat over the well shaped or wet goop in a fashion to hold the boat together better than just the goop..
5. Drill a hole, caulk the area, and install the metal fitting
6. Install the access plate.
7. screw in the lid
8. Sometime around 10 am....Rig your boat
9. go sailing
10. Put your boat away until next time
11. Repeat steps 9,10, and 11
 
Again, thanks. I've never worked with fiberglass and it does make me nervous a little. But I'm pretty handy and have done far more complicated and risky repairs with success.

I will however have to do some fiberglassing work inside the cockpit to make a new seat for the drain. How many layers of glass should I put and how do I go about making that look good? Do I sand and paint?

BP, which cracks are you refering to? The ones on the corners of the recessed part under to boat or near the drain in the cockpit?

Cheers,
 
From looking at the pic on the right above, it looks to me that the cockpit is flexing and the gelcoat has cracked around the only place that is not moving. It also appears that the sole has lifted up because the bottom of the bushing is digging into the glass. If you took the bushing out now, I'll bet you that the holes will become misaligned. This is to be avoided! You can see what happened in my "1979 Laser-Help" thread. In the end, I had to drill the hole oversize, then went to a machinist I know to have a special brass washer made for the cockpit side of the hole.

If you follow the repair sequence noted above, then you should be able to remove the bushing and the two holes will not misalign or separate. As I stated before, for this kind of repair, I would grind the cracks with a Dremel tool and fill them with marine-tex. IMHO, given the boats age I would concentrate on getting it structurally sound and sailable. White marine tex can be faired and sanded and won't be very noticable.

One last thing, and it's just my opinion. I don't like putting inspection ports on the centerline because of the deck camber, and it is much easier to do this repair if you can look in through one hole and stick your hand through the other.
 
Here's a silly follow-up to my repair question. I just assumed that it was normal but my boat did not have a the bailer cover seen here: http://www.laserforum.org/know/index.php?title=Bailer_install

A previous owner seems to have just removed it and siliconed the screw hole. This is standard equipment and necessary right?

It isn't standard equipment, at least on your vintage Laser. The bailer started as an add-on, but has been shipped with new Lasers for the last ~10 years. It does help bail water out of the cockpit, but you don't NEED it to go sailing.
 

Back
Top