Old Laser, Bad Bailer

Cupcake

PaddleHand
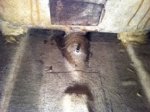
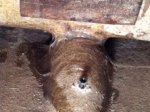
I purchased this 1979 Laser for $200 and am in the process of updating and repairing some stuff. The cockpit bailer hole is totally blocked from both sides with fiberglass resin and some cloth along the bottom of the eliptical well area. My question is... if I drill, grind, sand away all but the two hole that align for the drain, what are all the parts I need to completely redo the entire bailer? Should I put in an autobailer? I will not be racing this boat. Also, my mainsheet block is original and I am wondering if updating to a ratcheting block like the Ronstan Orbit 55 will be less work holding the sheet? And... what is the thinking on Boomvang, cunningham, outhaul updates on a boat this old?
IMG_7732 (1280x960).jpg

thanks all!
 
You have a $200 boat. I'm assuming the condition is consistent with both the price and the picture above. I would concentrate on getting use out of this boat and not spending any more money or time on it than necessary.

I would clean up that mess above so that it is waterproof, not worrying about a bailer. I you get some water in the cockpit, put up with it. No need to shell out top dollar for updated rigging, especially if you aren't racing. Rig up something new with some spare blocks.

Sail this boat. Enjoy it. Don't spend more money on it than it's worth.


Thanks Torrid,
 
You have a $200 boat. I'm assuming the condition is consistent with both the price and the picture above. I would concentrate on getting use out of this boat and not spending any more money or time on it than necessary.

I would clean up that mess above so that it is waterproof, not worrying about a bailer. I you get some water in the cockpit, put up with it. No need to shell out top dollar for updated rigging, especially if you aren't racing. Rig up something new with some spare blocks.

Sail this boat. Enjoy it. Don't spend more money on it than it's worth.
Oops, getting use to replying on this site. I took it out on it's maiden voyage today. 60 degrees air, 55 deg water. Light winds, but it soon became apparent that I will need either a ratcheting main block and/or gloves to handle the sheet. the boat was okay for 30 min or so then started to act sluggish and roll without prompting. A Leak! I headed for shore 1/2 mile away and luckily had enough wind to get there. Upon beaching, I found I could not lift the stern. i drained it for 45 min. before being able to get it on an incline to fully drain it. I figured I had at least 50 gallons of water in it. The aforementioned cockpit drain which I assumed was plugged with epoxy was letting in water at a very fast rate from outside the hull . I returned home and did a water leak test and sure enough, that was the problem. Does anyone have a good idea on how to seal it temporarily so a future owner could possibly fix it or me?
thanks
 
My advice would be to spend the few $$ on the brass fitting that does the job on the newer boats. The plastic fittings were prone to breaking and then leaking badly. The brass fitting is a direct replacement and for a couple of hours work will stop this leak a treat. Whilst you have the boat drying out you may also want to check the hull/deck join out and make good any cracks or small splits. Again for a few hours work and very little in materials it will keep the boat going for longer.

Aside from that just check the mast step and reinforce if it leaks. If this lets go then it is bye bye boat pretty much.
 
The quick and dirty temp fix is either a good quality duct tape or clear packing tape in layers over the bottom (make sure bottom is clean, dry and free of wax) where the bailer recess is. We've done this in the past with boats with leaking bailers and it works like a charm, check the tape at the end of day, replace it when it starts to peel.
 
The rest of the boat is fairly solid with some spider cracks around the bow, mast step, hiking strap plate area, etc.
If the deck is stiff, then go for a permenant repair. From the picture, it appears that you will have to do a fair amount of grinding to get all of that crud out of the cockpit drain area. This may necessitate painting the area with something like Easypoxy or gelcoat.
 
If the deck is stiff, then go for a permenant repair. From the picture, it appears that you will have to do a fair amount of grinding to get all of that crud out of the cockpit drain area. This may necessitate painting the area with something like Easypoxy or gelcoat.
How do you determine a stiff deck? I have the cockpit drain area repaired, auto bailer fitted and waiting for my brass thru hull fitting to arrive before drilling the hole and putting it all together. I have attached pics of my repair, and an inside pic of how I bonded the cockpit to the hull with masonary caulk at the corners, and thickened resin around the drain hole. I'm pretty sure I will not have any movement between the two. Also, when weighing my hull to determine how heavy it is relative to a new hull that supposedly weighs around 130#, do I include dagger and rudder/tiller?
 

Attachments

  • 0.jpeg
    0.jpeg
    3.3 KB · Views: 81
  • 0-1.jpeg
    0-1.jpeg
    9.4 KB · Views: 91
  • 0-2.jpeg
    0-2.jpeg
    10.7 KB · Views: 95
How do you determine a stiff deck?
You'll know when you've sat on one one that is stiff and one that has some give. Essentially, what happens is the three layers that make up portions of the deck where deflection (bending) resistance is required (next to the cockpit, foredeck, etc.) can become delaminated. That is, the outer layer, the foam core, and the under layer become separated and no longer have the strength to support your weight when sitting on the deck. Another way to tell is if the deck on each side of the cockpit looks slightly concave. Regarding your repair, I have uploaded a couple of simple sketches showing how I have permanently bonded the cockpit after bulkhead to the inside of the hull. This illustrates the second one I did and it is easier and allows for more air and water to flow under the cockpit. I cannot determine from the pics you posted how you made the repair, but it does not look like you used anything more than unthickened epoxy. IMHO, this will not hold.
 

Attachments

  • Cockpit RepairJ.jpg
    Cockpit RepairJ.jpg
    33 KB · Views: 113
  • Cockpit Bonding areas.jpg
    Cockpit Bonding areas.jpg
    45.1 KB · Views: 131
If you want to make a winter project out of it, would be fun (I'm a dork like that). As for replcement parts, I would only buy parts that you can take off the boat when you go to sell it like the Ronstan or Harken ratchet. They are rather expensive and don't really add value to the boat.

My advise for new sailors is to get tiller time. Go have fun with the boat. That is why you bought it after all. As you get better and spend some time on it, you will discover what you want to change or re-rig.
 
If you want to make a winter project out of it, would be fun (I'm a dork like that).
As I always tell my wife, "It's therapy and keeps me off the streets." BTW, can you get Carib in Texas?
 

Back
Top