My two new Sunfish

Sprocket

New Member
First Post as I just joined...

Two days ago I scored two complete Sunfish. As it turned out, it was a salvage operation as they were both full of water and duck poop behind the guys house in the lake.

I'm very excited to get them as my daughter has been taking sailing lessons and loves them. Obviously they will need some work (haven't even had time to look at the sails yet. But was assured it was all there).

So a couple of newbie questions.

How can I date them as they are slightly different from each other?

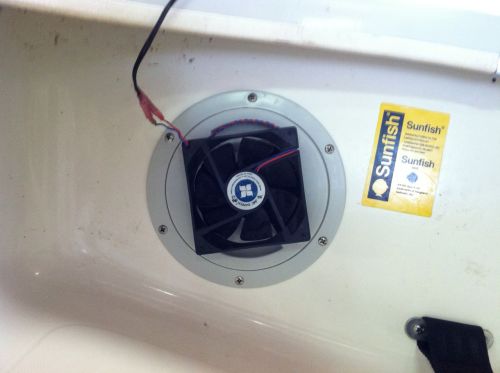
I saw a link for drying out wet hulls but the linked document was missing. Any advice as I believe they were under water at least a week.

Thanks in advance!
 
boats.jpg
 
first of all congrats for the score!!!!

now the first thing you should try is to get them under a roof or dry area and open the 3 inspection ports on the yellow and white one, possible add a fan to one of the ports to help the drying process.
Next would be to open at least to inspections ports on the white and red and repeat the process of forcing some air to help the drying process
 
The red and white one is a 73 or newer . Probably a serial numb r on upper right of transom. Last two digits will be model year. Other boat is a 1971 or older. If there is no storage compartment in the cockpit it's a 70 or older. Might be a serial number plate behind the mast or splash rail. You can th n lookup the age of the boat from th chart on this forum.
 
Any advice as I believe they were under water at least a week.
Thanks in advance!
First, I'd open any drains found next to the splash guard then weigh the hulls—each should be less than 135 pounds. If you're lucky, you may not need to proceed to step II, which would be to cut and install two 6" inspection ports in the newer hull. If you're unlucky, and you want to go sailing by Spring, you'll want to force air through the hull 24/7 through two inspection ports. (As mentioned above). The location of the forward inspection port would be most convenient to cut forward of the daggerboard trunk or, for possible future major repairs to the daggerboard trunk, cut into the forward cockpit bulkhead.

There's more difficulty for the actual cutting operation in the latter, unless you can locate or rent a full-sized 6" hole saw. If there's construction going on in your neighborhood, check with them. The rear port should be located just forward of the rudder. Remove the internal Styrofoam that would immediately block the drying process.

Thursday, I stumbled on a Chinese-made 6" hole saw at Home Depot, but it was priced at $85, and still needed an arbor fitting to start cutting—another $9! :eek: Also at Home Depot, and much cheaper, was this alternative adjustable hole saw:
671094_front500.jpg

Either saw should be turning slowly when cutting. Save the cut out pieces for any reinforcements or epoxy repairs to the hull later.

For even more convenient storage, the two ports could also be placed thusly:

p1010439b-jpg.18834
 
Last edited:
Hi, fortunately you do not need a six inch hole saw to cut a six inch hole. A handheld jig saw will do the trick. Many come with a very simple hole cutting attachment that guides the saw in a circle. You can also free hand it. The port rim itself will cover up an irregularities in your sawing.
 
Hi,

Well Shazam! I also just picked up two free Sunfish that were destined for the scrap yard. Sold my last Sunfish 5 years ago, they always seem to return. Anyway, it will take 4 or 5 months with a hairdryer in one inspection port dry out the boat. The yellow Sunfish has the ports in all the wrong places. The rear one is the trouble since you can't reach the inside rear of the transom to update the rudder mount or fix the backing plates. You'll have to patch the hole and cut a new one more to the rear or pop the deck to get where you need to go. New sails are as cheap as they come, in fact they don't come this cheap on any other boat. Takes two saw blades to cut one hole, I'm going to try a Roto-Zip this time. Hope you boats clean up nice, I'm going to try spraying Gel Coat to redeem myself after my last failed attempt with the stuff.
 
Thanks for all the great advice. The yellow one doesn't have any storage in the cockpit so I guess it's a '70 or older. I will look for serial numbers in the next day or so (dark by the time I get home).

I really haven't had any time to look at them yet, other than to hit them with a hose to get more sludge off em.

As we dragged them out of the lake you could hear the air rushing in as the water drained. I opened the ports on the yellow one to help dry it out. The white one doesn't have any ports yet.

I know normally, two people can lift and carry one as out sailing club has a few of them. These two...three adults could barely push it through wet grass.

I figure I also need to change their orientation to allow more water to drain...the yellow one was draining from one of the back corners when we got it up on the bank.

Still haven't looked at the sails but the rudders and dagger boards are in rough shape too....
 
I don't think it would be wise to run a hair dryer non stop for any length of time.

Airflow through the boats is the best method to dry them out. Some people have had some luck putting a single light bulb in the hull to generate a little heat, but really a fan blowing air through the hull will dry out the foam.

You can also cut the inspection port holes with a Roto-zip tool (my preferred method), and remember to leave the inspection port off (don't install it) until your drying operation is complete, and any repairs made inside the boat (if necessary).
I used a small computer fan mounted to an inspection port cover for airflow sunfish inspection port & hull drying fan
img_0511.jpg
 
I think I used the hairdryer for about a week continuous run. You're correct that the hairdryer could be a fire hazard, although I'm sure I never turned the heating element on. Perhaps I'll use your method this time.
 
So an update from several months later.....

We have been able to date the newer hull to 1977. The older one best we can figure is between 1960-65 as it has two brass deck mounted drain ports (later ones only got one). Have had them baking in the sun for a few months, but hadn't cut inspection plate holes in the white one yet. I took off the rear drain the other day and stuck my finger in there and the foam is still well. Just got some 6" inspection plates and will be cutting them in the next few days...

Turned out both the sails are torn. One is a write off, the other the tear is small enough to patch. Ordered a new sail from intensity along with a few other odds and ends. One new daggerboard and a new rudder blade for the older one, along with sealing epoxy and varnish and my 'free' boats are pushing $500 already lol. Still gotta get a trailer too, but it's all good.
 

Back
Top