well, got the Sunfish...and the can-o-worms with it!

Bud

New Member
Hi gang. Name's Bud and got a "new" Sunfish this past weekend.

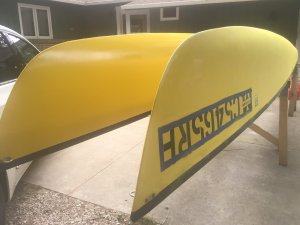
The boat is an "original" Alcort with rutter upgrade (albeit, gudgeon installation hack job). The serial # 56478 (1968?) on the deck is a metal plate just aft of the coaming, and the cockpit has no storage compartment.

This will be a real labor of love as it's the boat my wife learned to sail as a girl. I got it from under my mother in law's porch, and am going to restore it as a surprise to her. It hasn't been registered since '82, so that should provide weathering insight.

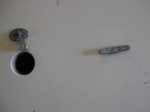
An inspection port was installed for the rudder upgrade and was a mess. I have pulled it off as well as all other hardware off the vessel, including having to dremel cut the old alum self bailer off.

Here's the "can-o-worms"...when removing the alum trim around the boat, the deck popped away from the hull on the starboard bow that extends from about the deck drainplug to 18" from the bow.

How the heck do I fix that? Resin with clamps?

I have been photo documenting my progress thus far and will post photos when I get a chance.

Other than that, this is my introduction to your great site, and I look forward to sharing and learning.

Bud
 
ok, as promised, here are some photos. Any comments are welcome as I try to tackle my first boat/gelcoat/fiberglass project.

Bud

Pic#1-Lots of pine needles and sap which nice acetone bath took care of following all hardware removal.
View attachment 7345
Pic#2-can't wait to see what's under those spider cracks...
View attachment 7348
Pic#3 - 1968? Any ser# decoders out there?
ser-number.jpg

Pic#4-How's that for an original decal?! Friend said she could photshop it to make reproduction decal. Anyone know where I could get one of these, or have an original picture as to what this decal looked like new?
sunfish decal.jpg

Pic#5-note bent screws...gee, think there was some torque on these through the years?
starb-tiller-bracket.jpg

Pic#6-Trim removal was fairly easy. key was proper drill bit matching. This boat had rivet holes going all the way through both seams. Trim's in tough shape with sharp edges from some rough rubs. will need to replace.
trim-remove.jpg

Pic#7-WHOOPS! Guess what? That ol' trim was holding the damn boat together. Yowsers!
cnaOworms2.jpg

Pic#8-Seized bailer removal was not fun, but successful. Key was keeping water misting so fiberglass wouldn't melt as metal heated up during cutting process.
bailer-remove.jpg

Pic#9-The "bathroom calked" inspection port removal. Yes, there were screws too.
inspect-port-remove.jpg

Pic#10-I need help with this one. Is this block of wood (placed in position found below deck) original? You can see screw holes where inspect port screws tapped. This block of wood was adhered to inside top of deck. On aft side of hole was small blocks of wood as well. I suspect the inspection port was cut though it. Is this a structural/support issue?
block-under-port.jpg


More photos to come soon! Thanks Everyone!
 
Having looked at the old style rudder assembly, I just realized the wood in Pic#10 may have been the original support beam for the topside portion of the support bracket.

Bud
 
Bud, welcome to the Forum. pictures #1 and #2 didn't show up for me - can you re-post them?
I would agree that the wood in picture #10 seems like it was backing for the old-style rudder connection on the top of the deck.
If I'm reading the Sunfish timeline document right, I'd agree with your 1968 date.

Thad
 
Bud, in picture #2, my old Sunfish has a small block attached to that little "u" strap for the halyard line. As you work on various repairs, I would recommend adding a horn cleat on the mast to tie the halyard... then run the halyard down to the deck, and back to the horn cleat on the deck. The cleat mounted up on the mast will greatly reduce that upward tensile force on the deck that might have been part of the cause of those spider cracks.

cleats.gif


Cheers,
Thad
 
Thad,

Thanks for fantastic re-rigging advice. I will make those changes. This is the exact type of input I need as I move forward.

Here is newest photo of gelcoat removal down to glass on one of the larger spider cracks along the hull centerline. ughh...

hull sanded1.jpg
 
Hi Bud.

Great idea restoring your wife's boat. I am sure she will be surprised.
I am restoring #53942 with my two boys. Our boat looks the same as yours, with different challenges. We had sand off our original Alcort decals. Our hull had been poorly painted at some point and had some drop damage we had to fix. We wanted to keep the decals, but couldn't salvage anything.
If you find a way to reproduce them, we would be interested in buying a set. My sons decided to paint the deck white and the hull blue (to match the footwell and coaming). Not sure if the black text on the sticker would look good on blue. Let me know if you find a way.
Pic#4-How's that for an original decal?! Friend said she could photshop it to make reproduction decal. Anyone know where I could get one of these, or have an original picture as to what this decal looked like new?
View attachment 7351

Also, I found a picture of our halyard block for your reference. It looks like yours is broken.
IMG_1625.JPG


Good luck,
Evan
 

Attachments

  • IMG_1625.JPG
    IMG_1625.JPG
    887.8 KB · Views: 37
Hi Bud.

Great idea restoring your wife's boat. I am sure she will be surprised.
I am restoring #53942 with my two boys. Our boat looks the same as yours, with different challenges. We had sand off our original Alcort decals. Our hull had been poorly painted at some point and had some drop damage we had to fix. We wanted to keep the decals, but couldn't salvage anything.
If you find a way to reproduce them, we would be interested in buying a set. My sons decided to paint the deck white and the hull blue (to match the footwell and coaming). Not sure if the black text on the sticker would look good on blue. Let me know if you find a way.

Also, I found a picture of our halyard block for your reference. It looks like yours is broken. View attachment 7362

Good luck,
Evan

Evan,

Thanks for the reply and photo. It's literally a labor of love for certain. I'll let you know how the decal reproduction experiment goes. In this day and age of photoshop, I wouldn't be surprised if we matched it perfectly. The key is finding a photo of a mint one (old ad or photo perhaps) so we get the colors right.
 
Hi gang. Name's Bud and got a "new" Sunfish this past weekend.

Here's the "can-o-worms"...when removing the alum trim around the boat, the deck popped away from the hull on the starboard bow that extends from about the deck drainplug to 18" from the bow.

How the heck do I fix that? Resin with clamps?

Bud

The Search function (in the upper right hand corner; use the Advanced search feature and specify Sunfish Talk as the section to search) is a wonderful feature of the Forum software.

Here is a thread that appears relevant:
http://sailingforums.com/threads/disassembling-a-sunfish.10481/

and focus on the message of dphoye (Feb 16, 2006); it is 'spot on' regarding your question.
Wavedancer,

Thanks for the reply. Interestingly enough, I went to the "Knowledge base" section of the site and found the "replacing floatation blocks" tutorial. The last section covers re-attaching the upper and lower in great detail. Here's the link: http://kb.sunfishforum.com/images/Flotation_Blocks.pdf

Cheers,

Bud.
 
Update: Well, can't find any good gelcoat right down to fiberglass. I sand and sand with yellow being the constant color and cracking and orange peeling being the texture. Looks like I'm going right to glass on this boat, throwing down some West epoxy coats for strength, then hitting it with interlux primers and paints to finish it off. The gelcoat for this fish will be history.

More photos to follow soon.

Let me know your thoughts.

Bud.
 
For those spider cracks, the lighter color of the glass around the cracks looks to me like there's some de-lamination of the fiberglass. If left like it is, you'll probably get away with it, but if it gets worse it may cause structural issues and leaks in the future. You may want to think about cutting them out them out and replacing the glass.
 
For those spider cracks, the lighter color of the glass around the cracks looks to me like there's some de-lamination of the fiberglass. If left like it is, you'll probably get away with it, but if it gets worse it may cause structural issues and leaks in the future. You may want to think about cutting them out them out and replacing the glass.

Geophizz,
Thanks for your reply and advice. The lighter "de-lamination" appearance in the photo is deceiving. Reseason being, the dark area is where the foam ballast is adheared to the inner hull. This makes the fiberglass darker in color. The spider cracks formed around the flex/stress points where the foam ends. I think a West epoxy coat (or two) will solve any minor structural and/or potential future leak issues. The only place I see (thus far) where I need to add actual fiberglass with resin epoxy is when I reseal the deck and hull joints on the starboard side.

The BIG question I have is if anyone has replaced the aluminum trim with a more modern (or just different) material. I would like to eliminate the whole rivet process plus once I finish adding glass and resin to the repair might have a difficult time installing the original size trim pieces.

Thanks,

Bud
Not too long ago, rhr posted the following message:

I got the aluminum rub rail at Lowes. It's 3/8" glass channel and comes in 8 foot sticks. I heated the channel to make the bends around corners. Still had to crimp the channel a little where it tried to flair at the bends. Easy to do and much cheaper than the original stuff which is way too expensive and only available in 5 foot sticks.

http://sailingforums.com/threads/25-sunfish-its-true-ill-prove-it.20845/page-2#post-106407
 
Wavedancer,

Thanks for the reply. Interestingly enough, I went to the "Knowledge base" section of the site and found the "replacing floatation blocks" tutorial. The last section covers re-attaching the upper and lower in great detail. Here's the link: http://kb.sunfishforum.com/images/Flotation_Blocks.pdf

Cheers,

Bud.
The tutorial was excellent.

I have done a LOT of glass work. I would add my favorite source for resin, foam, glass and carbon fiber, fillers etc


I use their 635 THIN resin exclusively for all builds and repairs. Use the appropriate thickeners for structure or fairing. 635 THIN is an extremely slow cure epoxy with a working time of hours, not minutes. It’s excellent wet-out. I add 3M microballoons for fairing. Cover your wet work with Saran or PE thin film (garbage bags). I might consider using 3M 5200 for attaching and sealing the deck and hull.
 
ok, as promised, here are some photos. Any comments are welcome as I try to tackle my first boat/gelcoat/fiberglass project.

Bud”


Bud,
My two cents. Go on line to US Composites for glass, epoxy, fillers etc. use 635 THIN epoxy. Great wet out, very long pot life.

REPLY This is probably a fortuitous find. Check inside before repairing. Reinforce the transom with a backing plate for current rudder upgrade. Check your floatation billets. You can reattach the deck and hull with epoxy glass or 3M 5200 adhesive. I’d go for all around separation to guarantee no leaks.
Pic#6-Trim removal was fairly easy. key was proper drill bit matching. This boat had rivet holes going all the way through both seams. Trim's in tough shape with sharp edges from some rough rubs. will need to replace.
View attachment 7353
Pic#7-WHOOPS! Guess what? That ol' trim was holding the damn boat together. Yowsers!
View attachment 7354


“Pic#8-Seized bailer removal was not fun, but successful. Key was keeping water misting so fiberglass wouldn't melt as metal heated up during cutting process.“
REPLY Good procedure. I like a high speed die grinder (Harbor Freight) with carbide burr cutters (McMaster Carr) Cut the ID until the assembly falls apart.
View attachment 7355

REPLY Replace this port but get the new assembly in ABS, not polyethylene. Both materials are available but nothing sticks to PE. Use MarneTex putty to glue the ring to the deck. Use no screws. Let the ring be flat, not formed to the deck curve or you May not be able to install the plug. Ports allow you to inspect and dry the interior.
“Pic#9-The "bathroom calked" inspection port removal. Yes, there were screws too.”
View attachment 7356


More photos to come soon! Thanks Everyone!
 
Update: Well, can't find any good gelcoat right down to fiberglass. I sand and sand with yellow being the constant color and cracking and orange peeling being the texture. Looks like I'm going right to glass on this boat, throwing down some West epoxy coats for strength, then hitting it with interlux primers and paints to finish it off. The gelcoat for this fish will be history.

More photos to follow soon.

Let me know your thoughts.

Bud.

consider using two part paints. These are harder, more durable and easier to deal with later. Many repair compounds will not bond well with one part paint. The best choice is AWL GRIP. One part paints will not tolerate constant water immersion. You may find an automotive paint supplier who can custom blend 2-part paint for you. My guy blends paint into an aerosol canister with a button in the bottom to release the accelerator.

it is also possible to apply new gel coat using a sprayer. I did this once on a laser. The results were shockingly impressive but the procedure was touchy. Depends on your skill level and tool inventory.

Get your epoxy, fillers reinforcements from US Composites on line. Pay less, better wet out, zero blush. Soap and water clean up of unreacted material. 635 THIN resin. Always use a dispensing pump. I have used over 15 gallons of the 635 on various boats. Extremely slow reaction rate makes this easy, no hurry. Use 3M micro balloons for fairing compound. I use small throw away chip brushes for mixing and application. Harbor Freight by the big box and while there, treat yourself to their 9 mill gloves. Pro trick - set your resin, glass repair. Use the crispy sounding polyethylene trash bags and cover the repair with a single layer. Using your hands or roller work out rage air and bubbles. Painters tap the edges down wit the film pulled tight. When it’s cured rip off the film. It will not stick. The surface will be close to perfect with no read-through of the reinforcement. Works upside down too.

USC is the only epoxy I will use.

Used a lot of epoxy under this. Delamination repairs and a new rudder
 

Attachments

  • 82DEC4ED-650A-4B3D-9109-9A3B41CE778C.jpeg
    82DEC4ED-650A-4B3D-9109-9A3B41CE778C.jpeg
    122.1 KB · Views: 33
  • E87EF2B2-C650-4D1B-B723-D187843F5BF0.jpeg
    E87EF2B2-C650-4D1B-B723-D187843F5BF0.jpeg
    117.4 KB · Views: 43
  • 9B38DE08-750E-4763-952F-6FB1D9C9C93B.jpeg
    9B38DE08-750E-4763-952F-6FB1D9C9C93B.jpeg
    2.3 MB · Views: 34
One more paint option. If you are not terribly picky Rustoleum makes a two part epoxy paint, WATER based. Apply with roller or Mohare pad. I think an airless sprayer would work. Dilute with a bit of water. One wet pass, no do-overs. Leave it the heck alone for at least an hour. way easy and seems durable.

you would not be satisfied with this on your car but it was great on my Tornado
 

Attachments

  • C50E3BA4-B509-4E95-B40B-5FBD93CA3EF7.jpeg
    C50E3BA4-B509-4E95-B40B-5FBD93CA3EF7.jpeg
    842.9 KB · Views: 37
  • 6AA14480-2E76-4E66-982D-A260AF8C802D.jpeg
    6AA14480-2E76-4E66-982D-A260AF8C802D.jpeg
    1.7 MB · Views: 37
  • DB2794A7-F4F8-46D6-BC9E-5D5551E02626.jpeg
    DB2794A7-F4F8-46D6-BC9E-5D5551E02626.jpeg
    1.9 MB · Views: 32
  • BFF08B73-4BFD-42C1-A2B2-B1DE92E55BB7.jpeg
    BFF08B73-4BFD-42C1-A2B2-B1DE92E55BB7.jpeg
    2.6 MB · Views: 34

Back
Top