sunfish project

Alcort59224

Member
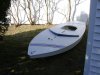
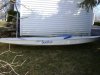
Last weekend i bought my second sunfish, the first one was a 69' in nice shape after last summer i wanted a second one so me and my brother/friends could race them (recreationally). I bought a 1984 AMF in rough shape and i'm going to fix it up and hopefully get it sailing by june. i origionally wanted to find a nicer boat but i got the boat rig a nice sail and the ruddr and dagger board for $100 so i couldent resist: I'm also a high school student without a lot of cash so cheaper is better. the boat weighs in at 190 lbs and has a crack in the cockpit roughly 2 inches long. im not sure yet if the crack is all the way through or if it leaks there. I also want to leak test it. it probally has some leaks to fix because i poured a couple of gallons of water out when i bought it. Heres my plan any comments or sugestions will be helpfull.

-first wash off the hull/clean all dirt off

-leak test and identify all problem areas

-install an inspection port behind splash rail to dry boat out

-sand/grind loose glass out of crack and fill with epoxey

-repair any leaks i find in the leak test

-wax and make it look nice
 

Attachments

  • Picture 001.jpg
    Picture 001.jpg
    172.3 KB · Views: 99
  • Picture 002.jpg
    Picture 002.jpg
    209.4 KB · Views: 99
Sounds like a plan

You appear to be on the right track

Probably will need to leak test again after that crack is patched up.
 
The boat looks great and once you get her dried out and not leaking, you will have a nice boat. The boat will dry much faster if you install two inspection ports, one 6" port centered between the aft edge of the splash rail and forward of the leading edge of the dagger board trunk and another centered on the deck about 1" forward of the transon. Turn the boat upside down on sawhorses, install a small fan and a lightbulb (to get some heat in the interior) and let 'er rip for a month or so. You may be able to get the boat back to the original 130 lb. range.

Good luck - great project.

Alan Glos
Cazenovia, NY
 
I've also got holes in the cockpit. The trouble with the cockpit is it is not supported very well. They used some glue disks between the tub and hull and that was it. I'm afraid if you just epoxy the cracks it will crack again. I used a hole-saw to remove the broken area along with some good fiberglass around the crack. After I beveled the edge of the holes I sprayed in some expanding foam to support the bottom of the tub. I used the wrong type of foam, (Good Stuff type) but luckly for me the holes were big enough to let the foam squish out while it was expanding. As soon at the weather gets warmer I' ll lay down a layer of fiber glass mat and woven roving followed by some Marine Tex.

Takes a long time to dry the boat out completely. I tried a light bulb and a hair dryer, could not speed up the process much. I started last fall and 4 months later I could still smell the boat drying. You're going to need a inspection plate behind the tub also to get at the foam blocks. If you have a old style tiller, the backing block for the bottom tiller strap might not be in very good shape. I replaced mine with a metal block. Six inch inspection plates work really nice.

Bet you sail is better than mine. Guy said, "Sail is in good shape." When I picked up the sail my hand went through it. Was sort of like cheese cloth after lying in the sun for 14 years. Might use the sail on Halloween for a "Flying Dutchman" effect, gonna need a paddle!
 
A question about drying out the boat.
Alan suggested leaving the boat upsidedoun on sawhorses. If the boat is upsidedoun with the ports open would it be better off/dry out faster outside or in a gradge or does it make a difference?
 
Depends a great deal on ambient humidity. Winter is the best time for drying out the boat since the humidity low due to the cold air. If you could get it in a basement where the humidity is controlled (lowered) that would be best. I'm not sure about upside-down outside since water vapor rises from the ground during the day. Anyway, it takes quite a while since the water has to wick out from the center of the blocks. I guess if you really wanted to fix things the correct method would be to pop the deck and replace the foam with high density blocks. From what I have read here you can do it without disconnecting the tub/daggerboard well/mast tube. Does carry the risk of destroying the boat in the process if jigs are not used.
 
I believe the idea behind the inverted position is your boat will be out of doors. That would keep any inclement weather out and also help hold any sun warmed air in a little longer. You do need to have a fan running or tip the hull some to create a chimney effect between two ports when drying this way. The chimney method with natural draft or a light bulb boost is the minimum circulation for active drying. By engaging in active drying you are trying to achieve a couple of processes dependant on one another. With no more water running out the deck drain the hull weight tells you moisture vapor has filtered through the emergency foam’s cell walls and re-condensed inside each cell. Part of the dry-out job is to re-evaporate that water so it can pass back out of the cells. The other part is to move the moisture away from the outer surface once it makes a break for freedom since no more moisture can leave while fresh escapees are hanging around in the way. In other words, moisture vapor will only cross through the cell’s skin when there’s a humidity imbalance between the inside and outside. Warming the hull achieves two things for you. It helps the water trapped inside the foam cells turn back into vapor and it increases the moisture capacity of the air outside the foam cells. Circulation helps move air outside the cells so it doesn’t become totally moisture ladened and stop the transfer process. This is similar to how GoreTex works to carry away sweat and help keep you dry.

If you use a light bulb to warm the air and increase its moisture carrying capacity, be sure your circulation is slow enough to allow the air to warm and take up some extra moisture before exhausting it. This makes a great chimney technique for off-season drying since the rising heat off the lamp is usually just the right air movement for optimal performance. Too fast an air movement, like with a light and a fan, and the air never warms. One web blog refers to this miscalculation as simply well lit air drying. A faster way is to park the hull in a sunny spot, drape a dark colored tarp over the upturned hull, and blow air through the hull with a fan. With this method you don’t care about carrying capacity of the circulating air. Since you are moving it in and out so quickly the slightest humidity difference will be enough due to sheer volume. On top of that, the sun warmed dark tarp is heating the cells and vaporizing the trapped water at an accelerated rate. Use a dehumidifier for your fan and you’ll about reach maximum ability for an active drying system. Still, as Gail Turluck wrote in her blog on the subject of drying time ( and I’m paraphrasing because I can’t seem to locate the post ), it probably took several years of neglect to put the water in, don’t be surprised if it takes several weeks or even some months to get it all out.
.
 
- - I guess if you really wanted to fix things the correct method would be to pop the deck and replace the foam with high density blocks. From what I have read here you can do it without disconnecting the tub/daggerboard well/mast tube. Does carry the risk of destroying the boat in the process if jigs are not used.

I wish it was as easy as just popping up the deck. :eek: That deck is fiberglassed to the hull making them one piece. Higher density foam would have thicker cell walls and osmosis would be slowed, but in the face of neglect water-logging can still happen to HD foam too. And, if you think the regular foam is slow to dry - - slower in, even slower out. :( To top that off, have you priced foam billets? I'll bet to duplicate the factory job you're talking $400 between foam, fiberglass, and tools the average Sunfisher doesn't own. :(:eek::confused:

Drying works and works with a minimum of cost and impact. Once a boat is dry and the leaks all repaired, maintaining a dry inside hull area is a no-brainer. :cool: Better not to risk sacrificing your boat in the name of impatience. :rolleyes:
.
 
Do keep in mind the experience of a friend of mine. He bought a wreck for 1 cent from me that I rescued from a Dumpster. He did the tough job of taking off the alumnium rail, splitting the deck from the hull, and taking out the Styrofoam blocks. He put the blocks in the basement on a shelf, intending to take them in the spring to get new foam when it would be warm enough to work in his garage and have resin flash off.

One day that spring, many years ago, he picked up those blocks and was quite surprised--at first. They were no longer heavy and water logged, they were light as new! What the heck, he surmised, why go spend money, I'll just put these back in! And, so he did.

It's this experience that drives our solid recommendations to NOT separate the hull and deck whenever possible and do repairs through inspection ports and take a little time to dry out the foam.

I would love to get a report from someone who has the capacity to be able to set up a closed space, cut holes for 2 inspection ports, set up a dehumidifier, and see how quickly a hull can be dried out.

I've done the black plastic bag and holes thing and it works pretty well for the first 80% of the water. That last 10-15 lbs. is tough ... and that's where my patience, patience recommendation comes from.

If you want to be competitive and don't have patience, simply bite the bullet and buy a new boat. When you look at the time and effort you'll put into a "wreck," that could just as well be used on getting a new boat, practicing, and getting to regattas. I know my new boat (well, 8 years old now) did make a noticeable difference.
 
If I were to restore my boat to 100% like new, I would have had to pop the deck to replace the tub with a like new unit. I don't see any problem as long at one understands, as you say, the tremendous amount of work involved. Making a jig with all the stations will probably cost $100 or more in materials. Then there is the time involved. I agree it will cost a bunch, however, the "Camping Cruser" Sunfish that was on this forum a while back would be worth the trouble. Just not a project for those wanting to get the boat back in the water quickly or don't have the paitence for touchy expensive projects.

I use to work in a foam factory. I think I remember a 21' billet of foam costing $400 dollars. Price depends a lot on the density of foam. High density foam does weight a lot, I remember some high density foam blocks weighting 600 lbs. Some of the blocks were being cut up for use in boats.
 
A good site for all sunfish sailors is:

http://www.windline.net/how_to.htm

especialy true is the inspection port and how-to dry out the interior -- I've used the Black trash bag method on other boats. I just bought a $25 project sunfish to restore - it also weighs about 200 # and needs to be dried out and inspection ports added.
 

Back
Top