I had seen threads related to these and a picture of the originals, but the picture didn't show the jaws. Here's how I made my pair.
Pick up a cheap paper punch from the Dollar Tree, Staples or somewhere.
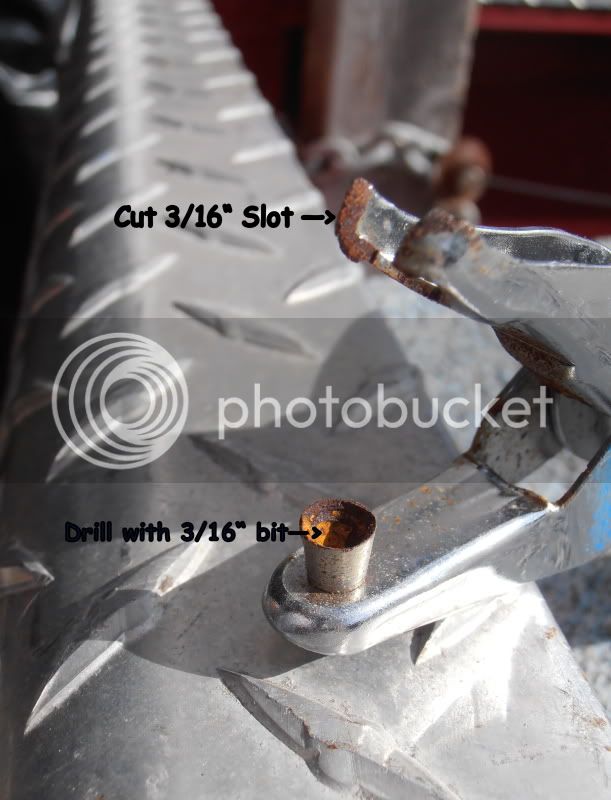
Using a hacksaw, make two vertical cuts on the sides of the bottom half of the punch about halfway through, just behind the hole the punch itself goes through when you use the paper punch
Make a vertical cut in the middle of the front of the lower jaw, so that the cut goes straight through the front half of the hole. You may find it helpful to use a Dremel or a file to roughen the area to be cut before you try cutting.
Using a pair of large pliers, bend the two cut halves away from each other, so the lower half of the jaw looks like a U. Then, bend the sides out, so they are perpendicular to the body of the lower jaw.
Hammer the jaws against a steel plate or flat suface to flatten them out and remove the ripples creeated by the pliers. This will also thin the jaws to help them fit under the closed ring.
Grind or file the lower jaw to smooth any sharp edges. Also, grind the inside surface of the jaw so that the punch slides smoothly through.
USING THE PLIERS
Wiggle the ring open as far as you can. You should be able to get it to just below the wide part of the ring, which holds the ring closed.
Place the lower jaw of the pliers underneath the flat section of the sail ring (the part which the post goes through). Slide the pliers onto the sail ring, with the mouth of the U shape going around the post and the punch resting on top of the post. Squeeze the handles, and the broad part of the post should pop back through the hole.
I was able to completley de-ring a sail in less than 5 minutes using these pliers with only one clip breaking. Considering the clips were all about ten years old, that's pretty good.
Feel free to ask any questions you have.
BRIAN
Pick up a cheap paper punch from the Dollar Tree, Staples or somewhere.
Using a hacksaw, make two vertical cuts on the sides of the bottom half of the punch about halfway through, just behind the hole the punch itself goes through when you use the paper punch
Make a vertical cut in the middle of the front of the lower jaw, so that the cut goes straight through the front half of the hole. You may find it helpful to use a Dremel or a file to roughen the area to be cut before you try cutting.
Using a pair of large pliers, bend the two cut halves away from each other, so the lower half of the jaw looks like a U. Then, bend the sides out, so they are perpendicular to the body of the lower jaw.
Hammer the jaws against a steel plate or flat suface to flatten them out and remove the ripples creeated by the pliers. This will also thin the jaws to help them fit under the closed ring.
Grind or file the lower jaw to smooth any sharp edges. Also, grind the inside surface of the jaw so that the punch slides smoothly through.
USING THE PLIERS
Wiggle the ring open as far as you can. You should be able to get it to just below the wide part of the ring, which holds the ring closed.
Place the lower jaw of the pliers underneath the flat section of the sail ring (the part which the post goes through). Slide the pliers onto the sail ring, with the mouth of the U shape going around the post and the punch resting on top of the post. Squeeze the handles, and the broad part of the post should pop back through the hole.
I was able to completley de-ring a sail in less than 5 minutes using these pliers with only one clip breaking. Considering the clips were all about ten years old, that's pretty good.
Feel free to ask any questions you have.
BRIAN