Right Way of Layering Glass

Trueke

New Member
I've finally got around to patch the holes on my fish an have everything set to spent my Spring Break getting her ready for this season. The problem; I can't find someone to clarify what is the correct way, or rather the correct order to place the layers of fiberglass when patching from the outside of the hull. After beveling the hole, and placing the back-up from inside, should I FIRST lay the smallest piece of mat and work my way up finishing with the largest piece on top (outside)? Or should I start with the largest piece first (covering the whole area), then work my way up ending with the smallest layer on top or outside? My confusion comes from seeing different videos and DIY sites presenting layering in both ways. I have looked in throughout the forum and some sites but have not been able to find this info. Can anyone out there please share some knowledge...please?
 
This is the way:

FIRST lay the smallest piece of mat and work my way up finishing with the largest piece on top (outside)?

Usually the smaller piece is not that much smaller than the large, but the above is how to do it. Pretty easy once you get the hang of it. Just wear rubber gloves and clothes that you don't mind getting covered in resin! BB
 
This is the way:


Usually the smaller piece is not that much smaller than the large, but the above is how to do it. Pretty easy once you get the hang of it. Just wear rubber gloves and clothes that you don't mind getting covered in resin! BB

Thanks Doctor:). Any other doctor would like to confirm?
 
assuming your repairing a concave hole (bevelled edges) you begin with a piece of cloth that is approx. the size of the bottom of the hole, as you work your way outward cut each piece slightly larger than the previous one. Your bevelling should such that the outside diameter of the repair area is approx. 12X the thickness of the actual hull. Do not use resin containing wax as it will prevent subsequent layers from bonding. There are many good books on the market on Fiberglassing, if you are planning on doing lots of this type of work buy one, you won't regret it.
 
I can't find someone to clarify what is the correct way, or rather the correct order to place the layers of fiberglass when patching from the outside of the hull. ...My confusion comes from seeing different videos and DIY sites presenting layering in both ways.
Is this a structural or cosmetic repair?

If structural, might you be confusing guides for the back side reinforcement build-up with those for a cosmetic hole fill?

Perhaps you viewed videos for techniques required by different resins...
For maximum strength, epoxy patches are built-up separately then placed in the hole as a unit, polyester patches are laminated in place as Zeppo outlined.

Also, pay attention to the size boat being repaired in demonstration excerpts. Instructions involving basketball size holes in 1" thick keelboat hulls need to be scaled back considerably when applied to the 3/16" thick hull of a Sunfish.

Thanks for the replies, two of the repairs ARE structural and I will be using West System's epoxy for these repairs. So then if I am getting this right, I should layer the glass in one piece, THEN apply to the boat as a patch? This is what I originally saw at a West System video but the order of the layers in this same video looked to me in the opposite order as to everyone else's. Just checking before I start this weekend. Thanks. And 65; great video!
 
So then if I am getting this right, I should layer the glass in one piece, THEN apply to the boat as a patch? This is what I originally saw at a West System video but the order of the layers in this same video looked to me in the opposite order as to everyone else's. Just checking before I start this weekend. Thanks. And 65; great video!

Ummm..., :rolleyes:

It sounds like you are trying to get a manual full of information from overview & familiarization videos, along with tips off of groups such as this one. These demonstrations and inputs are merely supplemental to, not a substitute for the full monty.

You really should be reading through the appropriate sections of the complete WEST instructions (a free .pdf file) and even get a copy of a good guide book on fiberglass boat repair.


WEST SYSTEM User Manual & Product Guide
(Index of different guides)

http://westsystem.com/ss/how-to-publications


Fiberglass Boat Repair & Maintenance
( This is the guide the video is probably a suppliment to )

FREE Download
http://westsystem.com/ss/assets/HowTo-Publications/Fiberglass-Boat-Repair-and-Maintenance.pdf

yhst-17229297255415_2062_167761


also…

WEST Use Guides
(tips on some of the individual repair steps)

http://westsystem.com/ss/use-guides


- Suggested Study -

The WEST instructions focus on how to work with the epoxy materials, these books concentrate a little more on dealing with different sorts or repair situations.


Fiberglass Repair: Polyester or Epoxy by David Aiken

51X-tOpOY4L._SL500_SS100_.jpg


and / or


Fiberglass Repair and Construction Handbook by Jack Wiley

51Sqn9SYIwL._SL500_PIsitb-sticker-arrow-big,TopRight,35,-73_OU01_SS100_.jpg


In addition, to help assure your success, do a small practice repair on a piece of scrap wood..., something other than your boat..., before attempting your actual repairs.

.
 
So then if I am getting this right, I should layer the glass in one piece, THEN apply to the boat as a patch? This is what I originally saw at a West System video but the order of the layers in this same video looked to me in the opposite order as to everyone else's.
I think I found where the confusion is coming from...

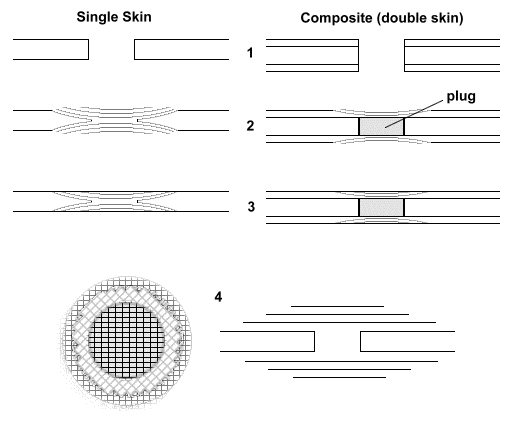
At one boat repair web page they advocate a concave bevel and patch to match (Single Skin Diagram)

hole_patch.gif


at another a flat build-out of a concave bevel.

17_B.gif

Yikes, a monster grinder at work ...
a sander or even a Dremel does just fine
for most Sunfish repairs.


A graph of patch strength gives some insight to the two schools of thought

395a.jpg

The confusion appears to be the difference between the Zone 2 and Zone 3 type of patch.

The philosophy I follow uses the Zone 2 style with a build-out from smaller diameter layers to larger.

If you use the Zone 3 style your patch layers will be turned up slightly where they intersect the original hull laminate. The bonding interface, in this instance, doesn't strike me as being very good and seems to be more of a plug than a structural bridge.

Using the Zone 2 approach, each layer of the patch's fabric lays parallel to its counterpart in the original hull lay-up. Seeing how the overlap of the layers between hull and patch is the bonding surface, flatter contact over more area appears to me to provide a higher degree of secure interleave { -_-_ __ _-_- } than an angled fabric face to fabric edge would { --\ __ /-- }.

Anyway, the Zone 2 approach is what I believe most people here and in most other small boat repair groups I visit are using.

.
 
Thanks Wayne, now you're talking:). The fish is in the garage, and tomorrow will be clean then Monday will be the first day of destruction....I mean, repairs (Spring Break project). Wish me luck.
 

Back
Top