Outhaul Configuration

Gil

Bateau Blanc
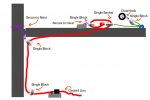
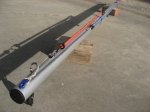
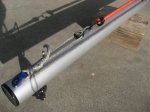
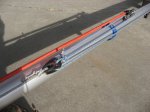
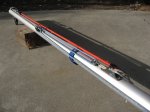
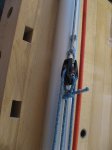
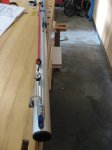
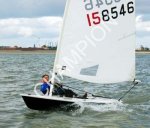
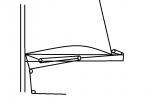
I have my "new" 2011 laser that came with a block on the boom, a block on the sail and all the bits and pieces. I tried a few configurations for my outhaul, and searched on the web but nothing spectacular resulted. I am considering cutting the rope to adopt the conventional system. 2 Questions:
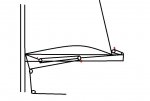
1) What is the best way to set my outhaul in a class legal way with the current block on the boom? Do you like the system?
2) What is the best outhaul configuration you advise?

Cheers

photo.JPG
 
  • Like
Reactions: Gil
I left out one block from the kit - didn't feel it necessary to have that much purchase.
Also binned all the rope and used dyneema - couldn't handle all the ' beautiful' colours in view and bulky looking knots...
 
Thanks guys. That solves my problem and provides great options.
 

Attachments

  • Laser-Rigging-Outhaul-Diagram-Lg.jpg
    Laser-Rigging-Outhaul-Diagram-Lg.jpg
    69.3 KB · Views: 262
Here are some photos of my outhaul, which is pretty much what you have in your diagram. I have a single block lashed at the mast that's not in the photos. I've replaced the the larger Ronstan becket block with a smaller Ronstan Series 20 Ball Bearing Orbit block and have retied the single block to the boom cleat so it is more secure than the photos. The orange bungee is there just to provide some tension for storage. -- Ed
 

Attachments

  • IMG_4313.jpg
    IMG_4313.jpg
    209.2 KB · Views: 266
  • IMG_4314.jpg
    IMG_4314.jpg
    223 KB · Views: 249
  • IMG_4315.jpg
    IMG_4315.jpg
    239 KB · Views: 234
  • IMG_4317.jpg
    IMG_4317.jpg
    223.4 KB · Views: 243
  • IMG_4320.jpg
    IMG_4320.jpg
    165.1 KB · Views: 225
  • IMG_4322.jpg
    IMG_4322.jpg
    150 KB · Views: 239
  • Like
Reactions: Gil
See the white plastic ball in the clew grommet pic 1. - bungee cord ( colour co-ordinated black of course ) spiralled once round the boom - pic 2. To the boom cleat pic 3. Fast and simple to rig and set for the conditions....
If its taken direct to the cleat without spiralling under it catches the sail and holds it awkwardly ....it's 'attached' to the cleat and perfectly compliments the outhaul easing. The clew tie down 'was' the crutch line from a buoyancy aid. I totally didn't get on with the steel slider and went back to webbing
image.jpg
image.jpg
image.jpg
 
What's with the black foils? Aren't they a liability in the sun? The bobble seems a good way to key the hook in place.
 
The bobble is to hold the bungee - it's the clew pull back, the bungee spirals once around the boom and cleats off in the old outhaul cleat at whatever amount of pull is necessary for the conditions. The outhaul hook NEVER comes out by accident, bobble or not.
The blades ? Well they match the hull.. The only time they see the sun / feel the heat is for the five minutes prior to launching ~ or photo shoots =)
Rib crew said it looked like a killer whale with Ahab attacking it when I turtled the other week..heh, gotta have some fun aswell right ?
 
Made it meself Bungo,
it was originally a crotch harness for a junior buoyancy aid.
Just sewn the female buckle on an end of one inch webbing, the male on the open end and heat sealed the frayed webbing end.
I've relied on this in F7 plenty of times, it doesn't threaten to pop and slides so much sweeter than the laser / harken metal slider, it takes seconds to rig also.
Thanks for noticing /asking...
 
bungee cord ( colour co-ordinated black of course ).

Ah... now I know why I took a liking to Voodoo's style back when I first joined the forum; his affinity for black. Same as me with my hang gliding gear.

Harness, helmet, speed sleeves, gloves, bar mitts; all black. So, when I come climbing up to another pilot high over the mountain, all they see is a black missile under the glider. Sort of The Dark Lord effect. See attached photo.

Got a picture of your black boat, Voodoo? I'd like to see it.

Cheers,

- Andy
 

Attachments

  • IMG_1107rs.jpg
    IMG_1107rs.jpg
    225 KB · Views: 184
Xcuse the 'Champion' , that's the photographer...( I've been too tight to buy a proper print as yet ) also you can't see the effigy logo =( The sail, dboard,rudder, transom have it in blood red. Yaarrr

Your kite would look amazing jet black Andy
 

Attachments

  • image.jpg
    image.jpg
    34 KB · Views: 182
Last edited:
Here's a really crude drawing of my outhaul, as you may have
Capture.PNG
guessed, all the circles are blocks and the one on the clew is attached with a shackle
 
Guys, I would like to show you the system I have used the last months and thank all of you for advises. The red rope is 5.5 m; 0.5 m shorter than I would like. I use an Allen hook/block at the end, that has worked surprisingly well in spite of many crashes and the hook not completely closing on the sail. The system works great. The only drawback for me is that it requires a bit of strength to pull rapidly with one hand at the leeward buoy to transition from down wind to upwind. I changed the end of boom rope with a 1 m spectra 4mm to reduce friction. In the next message I will show the new system I am trying.
system 1-2.JPG

system 1-1.JPG
 
And now is the new system I am trying with more purchase; the red rope is 7.5 m long 4mm spectra;it is a bit long and 7m might be better. I am trying the Harken hook/block at the end of the boom which is connected with the 1 m long 4mm spectra. With the wind we are having, it won't be long before I have a few crash to test robustness. I like the system as the downwind position is set when both blocks meet (fixed by the distance of the rope that connects both blocks). I can easily pull with one hand for the windward position. Will tell you how is works soon. Will not post pictures of the green sea nor the nice girls ( and guys too) on the beach; might make a few northern hemisphere mates sick. Merry Xmas to all! Enjoy sailing/reading.
System 2-1.JPG

system 2-2.jpg
system 2-3.JPG
 
It's good to keep playing with your set up to find what works better for you eh...
So Gil, I think about two days after those pics of my set up above I changed it a little, seeing as I was within the six turn limit I could afford another so merely undone the dead end knot on the old cleat (mines was a splice ) and spliced the bitter end through the centre of the aft most block - see pic.
So smooth now.
My calibrations were ( will be again once I repaint em back on ) in increments of half inches through the travel range of the aft most block based on its position relative to the clews distance off the boom end fairlead - from ten inch - massive belly - down to 5.5 - tight like virgin.
 

Attachments

  • image.jpg
    image.jpg
    241.4 KB · Views: 146
I advise 7m; 6.5 m would give you less for the handle. I really like the system which seems popular for lighter sailors.
 
Any reviews on my setup? Its a bit pricier but i find it works great.
 

Attachments

  • Capture.PNG
    Capture.PNG
    9 KB · Views: 76
That's basically the same as I've got, except - using your diagram
the fixed line with block at "1". I've spliced that to the old outhaul cleat on the boom, kept it very close to it - 2 inches.
The block at "2" I use as the reference for calibration - painted lines along the boom, using the centre of the block as marker in relation to distance of clew cringle away from clew fairlead.
I'm using a hook & block at "3" with that primary line spliced to the fairlead one end, the block at "2" the other.
It's a very smooth set up, the clew cringle ranges from about 5 - 9 inches off the clew fairlead, the calibration marks near the old outhaul cleat means minimal focus shift when adjusting.
I was toying with marking the line where it meets the deck cleat but it seemed to be more fussy counting marks / remembering colours while looking down than merely flicking the eyes abeam to a numbered stripe.
 

Attachments

  • image.jpg
    image.jpg
    37.6 KB · Views: 66

Back
Top