I inherited an 80s vintage sunfish that spent the last 20+ years in a barn. Everything seems sound but the top side paint is crazed and worn. I plan to do a light sand and repaint, but am concerned about removing fitting and cowling hardware lest I loose the back side nuts or plates given that that boat has no port to access the interior. What can I do to ensure the hardware is there when I reassemble or are there some things I just shouldn't take off and just mask around?
Navigation
Install the app
How to install the app on iOS
Follow along with the video below to see how to install our site as a web app on your home screen.

Note: This feature currently requires accessing the site using the built-in Safari browser.
More options
You are using an out of date browser. It may not display this or other websites correctly.
You should upgrade or use an alternative browser.
You should upgrade or use an alternative browser.
Looking for advice before top side painting
- Thread starter giannig
- Start date
Does you coaming have rivets or screws? And is it a saltwater or freshwater boat?
Unless you are planning on entering a boat show, our experience is leave the good stuff alone, mask around it, and paint away. Cleats, blocks, fairleads, eyestraps, etc... included.
As for paint, based on our experience and a recent Forum member's experience, we suggest you read the safety data sheets when selecting your coating and know what concoction you are getting into. Proper Personal Protective Equipment (PPE) is a good thing.
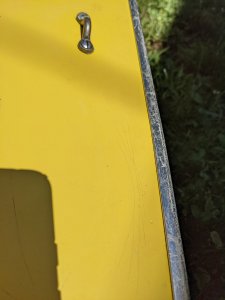
It has been a fresh water boat all its life the best I can tell and will continue to be. The combing is screwed down, but has also been caulked with an unknown product and has some cracks, so getting it off without damage may be an issue. Its not a glamour boat and I plan to brush paint so masking and leaving most of the attachments in place seems reasonable to just get a sound coat of paint on the deck. If the fittings that use two screws (which would be a pain to paint around) typically have a nut plate on the back I would be tempted to remove one screw at a time a replace with a dummies that I could paint over. Is that a reasonable assumption?
You're wise to brush-paint the deck. Those "spider cracks" can't be hidden by spray paint--even if you try to hide them with glazing compound.To illustrate the current state
There are wooden blocks under the deck that the screws go into. The blocks are known to fall off a good amount of time if both screws are removed, that's why we leave them in most of the time. We have taken the screws loose one at a time, but there needs to be screws left in place, whic means you'll be painting around that.
There is some "slop" in the wooden plates that the factory screwed into. When swiveling the hardware, use something like a toothpick to keep the factory's screw holes "in sight".If the fittings that use two screws (which would be a pain to paint around) typically have a nut plate on the back I would be tempted to remove one screw at a time a replace with a dummies that I could paint over. Is that a reasonable assumption?
I'd also stay with the original color: White on the deck produces a lot of glare, and dark colors can get hot. The floor of the cockpit has a necessary texture that almost immediately wears away--showing the original color.

Regarding glare off the deck:
You're already taking a lot of damaging UV-B rays from the sun. Those with cataract surgery are cautioned to wear sunglasses to protect the implanted [plastic] lenses. There is no "going back in"!
Not knowing your paint experience, we'd recommend the Roll and Tip method. We'd also use a compatible fairing compound over those stress cracks in the gelcoat, as they can show up through 1-2 coats of paint. Primer is helpful as well.
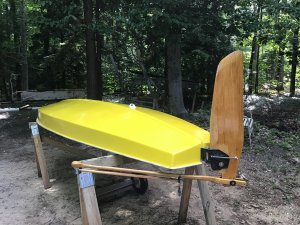
Rolled and tipped the deck with Interlux Brightside or Pettit EZPoxy, can't remember which. Looks great from the shoreline. Sprayed cockpit with Rust-Oleum.

Looks a little better than the mess we started with.


Rolled and tipped the deck with Interlux Brightside or Pettit EZPoxy, can't remember which. Looks great from the shoreline. Sprayed cockpit with Rust-Oleum.
Looks a little better than the mess we started with.
We recommend sticking with the same line of primer, paint, thinner and fairing compound to avoid incompatibilities, so TotalFair would be the best. It is easy to mix, easy to use and easy to sand. And fun, yellow and blue components make blue, so easy to see if there are any spots of unmixed resin and hardener. Very few, if any, pinholes to have to refill. We've used a lot of it!
For those out there considering going the Pettit EZPoxy route, EZFair is great, it comes in a 2 part caulk cartridge that does the mixing for you. We put a lot of EZFair on BARBASHELA.

Jamestown Distributors sells inexpensive mini roller kits if you brush on primer test doesn't work. We've never tried that approach, seems there would be a lot of brush marks to sand, we roll with the mini roller kit then tip with a Redwood double thick "Fooler" chip brush. It's not as good as an expensive Unicorn hair brush but it does the job for a 3 foot paint job and can be disposed of without fiscal guilt.
What color WetEdge are you headed towards?
For those out there considering going the Pettit EZPoxy route, EZFair is great, it comes in a 2 part caulk cartridge that does the mixing for you. We put a lot of EZFair on BARBASHELA.
Jamestown Distributors sells inexpensive mini roller kits if you brush on primer test doesn't work. We've never tried that approach, seems there would be a lot of brush marks to sand, we roll with the mini roller kit then tip with a Redwood double thick "Fooler" chip brush. It's not as good as an expensive Unicorn hair brush but it does the job for a 3 foot paint job and can be disposed of without fiscal guilt.
What color WetEdge are you headed towards?
Thanks. I'm going with Largo Blue for the color. The caulk tubes with static mixers are appealing, but I have so little to do that hand mixing won't be too troublesome. I like the mini roller kit idea and can get that when I buy the fairing compound. Painting will probably wait until spring at this point. I refinished wooden tiller and dagger board (circa 1972) with Gleam varnish and a sponge brush and they came out smooth and beautiful. I'm not familiar with the Redwood brush reference, are they a brand of chip brush?
Redwood is the brand, Jamestown Distributors sells them. They are double the thickness of the basic chip brush and the bristles are a little smoother.
Nicholson58
I’d Rather Be Sailing My Tornado
It has been a fresh water boat all its life the best I can tell and will continue to be. The combing is screwed down, but has also been caulked with an unknown product and has some cracks, so getting it off without damage may be an issue. Its not a glamour boat and I plan to brush paint so masking and leaving most of the attachments in place seems reasonable to just get a sound coat of paint on the deck. If the fittings that use two screws (which would be a pain to paint around) typically have a nut plate on the back I would be tempted to remove one screw at a time a replace with a dummies that I could paint over. Is that a reasonable assumption?
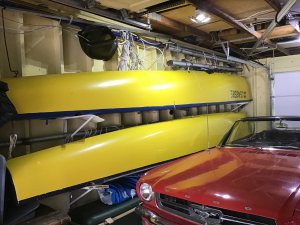
If you can be satisfied with hand painting then ignore the current conditions. The damage in your photo is non critical.
If you want an OK hand paint I suggest Rustoleum two part water based epoxy. Your color is highway safety yellow. A half gallon did my sunfish and my Tornado.
Attachments
Looks green to me!We recommend sticking with the same line of primer, paint, thinner and fairing compound to avoid incompatibilities, so TotalFair would be the best. It is easy to mix, easy to use and easy to sand. And fun, yellow and blue components make blue, so easy to see if there are any spots of unmixed resin and hardener. Very few, if any, pinholes to have to refill. We've used a lot of it!
")
LVW just checking to see if anyone paid attention ") Yes, I should have typed yellow and blue make green.
Yes, I should have typed yellow and blue make green.
Yes, I should have typed yellow and blue make green.Nicholson58
I’d Rather Be Sailing My Tornado
LVW just checking to see if anyone paid attention
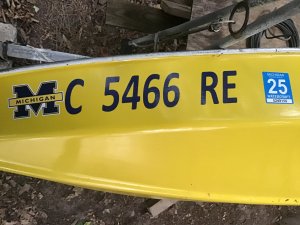
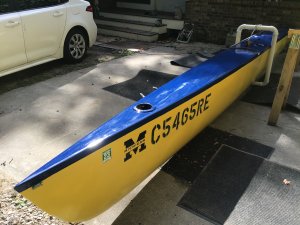
Maize & Blue makes Wolverine! My boats above. Note the theme