Laser II restoration

n_canovas

New Member
Hi everyone!
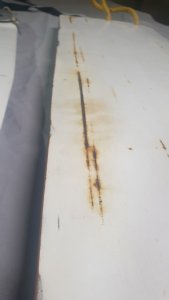
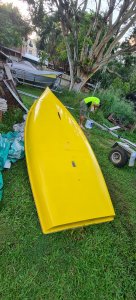
Im very happy to show you my new project. I Just bought a old but complete laser II with the idea to do some restoration and put it back on the water. Fortunately the boat is in ''not to bad'' condition. I would say that the main job it going to be on the deck. Even thought the deck is solid and I couldn't fine any deslaminated area, the paint is worn out and is a few spots ist possible to see the fibreglass. I have in mind to clean, sand and paint the deck but I would appreciate some advise of experienced people. I have read some previous post too so im not 100% lose but I have 2 subjects im not 100% yet.

1. what to do with the non skid texture in case I sand the whole deck till have a clean surface ready to paint.
I thought to install some grip tape or I know in old boats people apply quartz dust and decks.

2. what paint could be better.
I guess it would be necessary to apply primer before the paint but also im not sure if gelcoat or polyurethane it would be better. I have a compressor (40 liters 2.5 hp) and spray gun I can use)

I hope someone can give me good advice and I'll be uploading info and photo about the progress.

Thank you guys
Screenshot_20220108-135035_Facebook.jpg
Screenshot_20220112-202455_Gumtree.jpg
20220113_180610.jpg
20220113_173233.jpg
20220113_173239.jpg
20220113_173329.jpg
 
wow.....i thought i had a project with mine. but you got one rigged for a spinnaker which is cool. if i was you id cut a port in the forward cockpit bulkhead if here isnt one already and check that mast step. they like to rot. the way they are assembled is a mess inside. and look at the plywood bulkheads around it. it seems the screws for the step dont both catch the piece of hardwood inside and one can strip easily. the rear area under the aft deck should have a flotation jug in it. there should be one in the forward deck area too. theyre like 5 gal or something like that. basically a large plastic milk jug. check the seam for the dagger trunk too. check the deck to hull seam. it should be solid with no gaps. it looks like you have one of the later stainless anderson type bailers which is nice.

ill beat @LaLi to the punch. post up your boat number. haha. it doesnt matter so much. do you have the orange and yellow sails?

oh....theres an additive for the deck paint. its like rubber pellets for that kind of non skid. theres a bunch of different kinds. i wouldnt use sand style griptape. that will be hell on youre skin, lines and sails.
 
Haha :D I won't say anything about the paint job, except that it looks like there's already one extra whitish layer on top of the original ivory gelcoat. I'm not sure exactly when PSA dropped that latter colour, but that boat surely is about 40 years old.

But I see you have the first surviving L2 spinnaker bag seen in a long time :eek: Could you take and post its measurements, as it would be really nice to be able to make some new ones :)

Are there many Laser 2s in Australia anyway? That's where it's from, but I've understood that it never gained much popularity on its home ground.

_
 
wow.....i thought i had a project with mine. but you got one rigged for a spinnaker which is cool. if i was you id cut a port in the forward cockpit bulkhead if here isnt one already and check that mast step. they like to rot. the way they are assembled is a mess inside. and look at the plywood bulkheads around it. it seems the screws for the step dont both catch the piece of hardwood inside and one can strip easily. the rear area under the aft deck should have a flotation jug in it. there should be one in the forward deck area too. theyre like 5 gal or something like that. basically a large plastic milk jug. check the seam for the dagger trunk too. check the deck to hull seam. it should be solid with no gaps. it looks like you have one of the later stainless anderson type bailers which is nice.

ill beat @LaLi to the punch. post up your boat number. haha. it doesnt matter so much. do you have the orange and yellow sails?

oh....theres an additive for the deck paint. its like rubber pellets for that kind of non skid. theres a bunch of different kinds. i wouldnt use sand style griptape. that will be hell on youre skin, lines and sails.

Hi Joe! Thank you very much for your reply and for yours advise, it is nice to start a project like this with people how can guide me to have a better result. I have opened the back cover hatch and I found big cubes of styrofoam. Definitely I'll cut a port in the forward cockpit bulkhead and check how is everything inside. All the seams looks solid and without gaps luckily. I put the boat upside down to check the hull and doesn't look to bad, of course some scratches. I would like to paint the whole boat white, I know that the best option is to keep it as is just polish and go sailing, but I will decide after I paint the deck. The boat came with white salis and spinnaker, but I tried to find the hull number and i found a very random one at the back (1727). Not much to do with that because I understand the number code that is possible to decode is a long with with number and letters.

One think I noted is that the bailer is not to even or flush with the hull (photo attached). I think that part has a old and not to good reparation because doesn't look very good.

Talking about the deck what would to recommend? I bought orbital sanding disc (400) to do it very lightly at the first step and then i have a pack of mixed sanding papers (400 - 600 - 800 and 1200) for the finishing process. And also then would you recommend gelcoat or polyurethane for the paint?

Thank you very much again and sorry for my terrible english, I have been living in Australia for a couple of years but I still needing to improve it a lot.

Cheers!


20220113_182214.jpg
20220113_182227.jpg
 
Haha :D I won't say anything about the paint job, except that it looks like there's already one extra whitish layer on top of the original ivory gelcoat. I'm not sure exactly when PSA dropped that latter colour, but that boat surely is about 40 years old.

But I see you have the first surviving L2 spinnaker bag seen in a long time :eek: Could you take and post its measurements, as it would be really nice to be able to make some new ones :)

Are there many Laser 2s in Australia anyway? That's where it's from, but I've understood that it never gained much popularity on its home ground.

_

Hi LaLi! Thank you very much for the reply, For sure I'll take the measurements of the spinnaker bag tomorrow and I'll post it for you guys. I'm not sure if here the L2 was a very massive class. I tried to find any kind of facebook page or some group of sailors here and no results. Personally i think is a great boat and a so much fun. I would love to buy new sails but here I would say it going to be very hard.

Cheers and tomorrow I'll have the measurements for you.
 
Looking at your pictures it doesn't look like the bailer will function as it is, even when open. It doesn't look like it will be lower than the hull. The bailer needs to be in the flow of water to suck the water out.
 
The bailer is very curious. Oooohhh.....good catch on that spinnaker bag! I didn't even see it first go around.

I don't know when they used foam.for the flotation..mine and the other 2 I've come across all were fitted with the milk jugs. But they've been early 80s boats.

The bottom of your boat looks way better than topside. You have a lot of work ahead of you. They are a blast to sail.
 
I tried to find the hull number and i found a very random one at the back (1727). Not much to do with that because I understand the number code that is possible to decode is a long with with number and letters.
Not random at all! That's how PSA (the Australian builder) did it. The different "long" codes are a North American and European (since 1998) thing. So yes, that is your sail number, and the boat was built in early 1981.

The bailer does indeed look weird the way it's inset like that. From the outside it looks like it's an outside mount bailer attached where you're supposed to have an inside-mounted one. It's also strange that it's not through-bolted (like it's supposed to be). Could you post pictures from the cockpit side?
Anyway, unlike thistle 3863 suggests, I think it should work - it's still below the waterline, the inset shouldn't disturb the water flow too much, and even the non-return flap probably opens completely. (Does it?)

_
 
Hello everyone! Sorry for disappear the last couple of days, i have been working on the deck already, removing everithing and start sanding and finiding each spot that need some gelcoat. Also I decided to change the trailer bearings and rollers so a bit o everything.
I attached a few photos of the little progress and also the measurements of the spinnaker bag (let me know if is confusing to understand the basic diagram).
For me the bailer looks a bit messy, I thought to take it out and have a look what is going on there... what you reckon?

20220123_210921.jpg
20220122_150753.jpg

20220122_150700.jpg
20220122_150713.jpg
Screenshot_20220124-205005_WhatsApp.jpg
20220122_150731.jpg
 
I assume that ”1727” is also the number embossed above the lower rudder fitting? (Don’t paint over, or do anything else to it... it’s the identity of the boat.)

Thank you so much for the drawing! Is there any flap on the top of the bag? If not, I wouldn’t want to capsize with the spinnaker down!

The bailer is, as I suspected, a model that is intended to mount on the outside. (And it has the lever backwards.) Do take it out, remove all the old sealant, measure the hole, and we’ll go on from there.

_
 
Lali has written a book on L2s here, my only sensible contribution is if you have them to take out the bolts that hold the shrouds and trapeze wires and check for corrosion underneath, particularly if it has been near salt water.
Ours snapped off like a carrot when the boat got blown over.
New masts are expensive, old ones tricky to find.
 
Hi guys! Thank for yours messages, unfortunately im isolated because i tasted positive for covid... so bored! At least I do a deep research for all the next steps of the restauration.
I attached a few photos of the spinnaker bag so its easy to copy.
The mast is the next thing after paint the hull, but im pretty sure it broke and was fixed exactly where Riv is saying.

20220126_125957.jpg
20220126_125957.jpg
20220126_125918.jpg
 

Attachments

  • 20220126_125923.jpg
    20220126_125923.jpg
    630.2 KB · Views: 48
Happy to be back on the project!
After a week off, I went back to work on the boat. I had ordered the bearing kit for the trailer so installed them and I finished to remove the laser II graphics by the side.
Now without the graphics is possible to see the original yellow tone of the hull (beautiful!). So now I'll try to fix the old faded color of the rest of the hull. I went to the boat shop and the guy recommended me to use a 3m polishing product, but I also know some people recommend to use wet sanding papers. Any advise? After I polish the hull I'll keep going with the deck( finis sanding, fix some spot with epoxy or gelcoat and paint.)

Thanks guys
20220205_171131.jpg
20220205_174103.jpg
20220205_141719.jpg
 
the 3m stuff works. i think someone posted here to use the maquires if you can get that. i wouldnt start attacking that hull until i cleaned it thoroughly so getting all that smeared eraser off or whatever that is. you should be able to use acetone. if you go with a wetdry paper id probably not go less than 600 with water as a guess. i spent hours compounding out my hull and it wasnt anywhere near as bad as your yours and its not perfect. just a ton better. good luck!
 
20220205_174103.jpg
20220210_184742.jpg
20220218_161958.jpg


Hi everyone.
I leave you a few photos of the process on the boat. I have removed the adhesive band by the side of the boat and I have this difference of colours tones. After i sanded the hull for a bit I removed all the faded paint but I couldn't mach the colour tones on the sticker side. I will use the 3M product and Polish the whole hull with a wool pad and the buffer. Ad the same time I want to start working on the centreboard and on the rudder.
On the centre board you can see some rusty spots. I did a quick research on Internet and it looks like inside the centerboard runs a few thin steel rods. Sanding those rusty spot and applying epoxy in case is necessary should be enough to prepare and paint both.
 

Attachments

  • 20220220_103233.jpg
    20220220_103233.jpg
    362.6 KB · Views: 48
  • 20220220_103243.jpg
    20220220_103243.jpg
    278.4 KB · Views: 59

Back
Top