Sailing Sasha
New Member
Now before anyone gets mad at me for posting about an imitation sunfish in the Sunfish Forum, here me out! I have a Lockley-Newport Panther that is essentially the same thing as a Sunfish, so I imagine the hull repair would be the same, hence this seemed the most relevant place to ask. Also, some of you may already be familiar with the tale of this boat from my first post here. TL;DR: I wound up buying this boat for a mere $25, but it is not seaworthy. I wound up sailing my minifish (acquired 2 days before the Panther) a lot last year, but this year I want to get the Panther lake-worthy since I want to sail with others and the minifish is a solo experience. The Panther spent some months in my yard with a tarp, but on some storms water may have gotten in as the tarp blew off. I hauled it in my garage for the winter where it has remained, bottom-side up.

The most apparent issues are:
-missing drain plug (easy)
-self-bailing device either gone or not working (it is completely duck-taped over by previous owner, I'll need to investigate but it should be watertight for now
-evidence of crack / holes around inside of daggerboard trunk, around what seems to be the seem where one half of the hull meets the top half.
-can't remember if mast-step hole leaks, but probably. will need to test this.
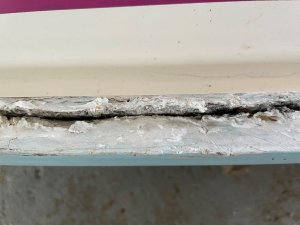
-The big one, the most obvious issue and the reason the seller gave it to me for half his original asking: The entire perimeter of the hull, where the hull is joined to the top deck piece, is a crumbly, cracked mess. I think the daggerboard trunk is the only thing keeping the two halves together. Here's what I'm talking about:

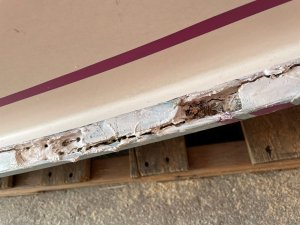
The previous owner tried to seal it back up with white caulking of some sort, but clearly that didn't work. In some places it's really bad:


So, I am looking for wisdom on how to go about repairing this. My guess is that I will need to use some sort of tool to chisel out the irregular crumbly bits, and then use epoxy to fill it back in and rebond the deck to the hull. I'm not sure what tool would be best, would a chisel and hammer work, or maybe some sort of hand saw? Second, I've never worked with epoxy, so I would appreciate recommendations on what kind / brand to use, where to buy (preferably something available on amazon or home depot), and how to go about applying it. One thing that seems like an issue is that after removing the chunks I will need to fill a volume with epoxy without having it all simply drip down inside the boat.
Also, you can see in the photo below that the seam in the daggerboard trunk appears to have had a sub-bueno repair job as well, and looks like it would let water in. Would this be easy to fix properly with epoxy, or would fiberglass and sanding be required?

Any help is appreciated, I would love to get this thing in the water by July! I am dreaming of racing it against my minifish to see which is faster..
The most apparent issues are:
-missing drain plug (easy)
-self-bailing device either gone or not working (it is completely duck-taped over by previous owner, I'll need to investigate but it should be watertight for now
-evidence of crack / holes around inside of daggerboard trunk, around what seems to be the seem where one half of the hull meets the top half.
-can't remember if mast-step hole leaks, but probably. will need to test this.
-The big one, the most obvious issue and the reason the seller gave it to me for half his original asking: The entire perimeter of the hull, where the hull is joined to the top deck piece, is a crumbly, cracked mess. I think the daggerboard trunk is the only thing keeping the two halves together. Here's what I'm talking about:
The previous owner tried to seal it back up with white caulking of some sort, but clearly that didn't work. In some places it's really bad:


So, I am looking for wisdom on how to go about repairing this. My guess is that I will need to use some sort of tool to chisel out the irregular crumbly bits, and then use epoxy to fill it back in and rebond the deck to the hull. I'm not sure what tool would be best, would a chisel and hammer work, or maybe some sort of hand saw? Second, I've never worked with epoxy, so I would appreciate recommendations on what kind / brand to use, where to buy (preferably something available on amazon or home depot), and how to go about applying it. One thing that seems like an issue is that after removing the chunks I will need to fill a volume with epoxy without having it all simply drip down inside the boat.
Also, you can see in the photo below that the seam in the daggerboard trunk appears to have had a sub-bueno repair job as well, and looks like it would let water in. Would this be easy to fix properly with epoxy, or would fiberglass and sanding be required?
Any help is appreciated, I would love to get this thing in the water by July! I am dreaming of racing it against my minifish to see which is faster..


 Now, there's no abrasive disk, and they're over $10 dollars each!