Hull Chine Fiberglass repair...

rem984

Member
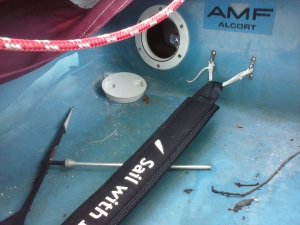
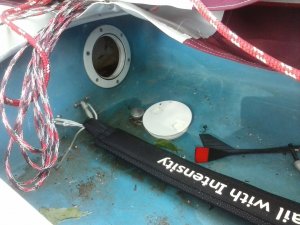
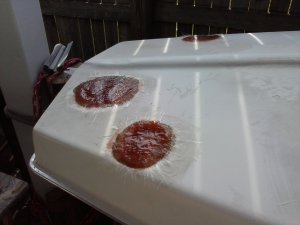
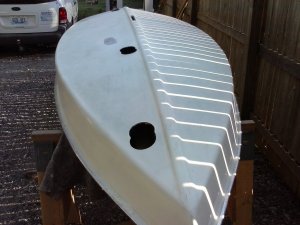
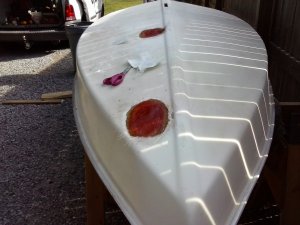
Alright, so I have a sunfish with a large crack in the fiberglass right along the chine where the starboard side of the hull meets the bottom of the hull, pretty much right next to the cockpit. Pictures attached.

Once I sanded down the crack to clear out the damaged fiberglass, I discovered that there's a foam strip running the length of the joint (presumably for reinforcement) which is also cracked. The hull surrounding the crack is solid, but there's a good amount of flex in the bottom directly under the crack (because there's nothing keeping it rigid to the side of the hull).

What's the best way to repair this?

My initial thought was to put an inspection port either on the deck next to the daggerboard slot or on the front wall of the cockpit, but I'm not sure if I should either glass over the broken foam strip (is this recommended?) or remove it and just glass over the corner joint on the inside and outside. I'm also not sure if I'll even be able to access this portion of the boat given the diagrams of where the larger foam blocks inside the hull are located.

Thoughts.....?

3.jpeg 1.jpeg
 
It's best to have access to the inside, so you can "sandwich" the repair. However, you should be able to use a grinder and grind away all the shattered or discolored (will be lighter in color) fiberglass and totally do the repair from the outside. Grind a good 2-3" past the damage with a taper. Watch YouTube in how to lay up fiberglass. Finish with gelcoat (cosmetic only) or paint with a rattle can of white paint, if you don't care about looks too much. Skip the inspection ports unless you need to get to the backside of some of the hardware. Once you learn how to fiberglass, you can cut holes on the bottomsides of your hull, to access your hardware if you don't want deck mounted inspection ports (which I personally don't like). Then patch up your new holes, like you did in this repair. Easy peasy!! ;-)

BTW, that damage looks for sure to leak and would not just "fill" only with some epoxy, etc. At least a layer or two of fiberglass would be best. That said, some epoxy "putty" from the various manufacturers, will get you on the water quick and do the repair right, during the off season.
 
OK - so on the assumption that interior access is best, any opinion on the location of an inspection port and what to do with the broken piece of foam? Or, would it actually make more sense to cut a hole in the bottom of the hull, do the repair from the inside, then glass over the hole in the bottom, as you've said? Either way, though, I'll still have to deal with the broken piece of foam.

I definitely plan to put glass on both the inside and outside of the repair.
 
If you cut a hole in the bottom, you won't have access to both sides when you seal it up. Basically the same if you just do the repair on the outside for your existing damage. So I don't see a logical reason to do that for THIS repair. Unless the foam is totally loose, I wouldn't worry. I smaller piece loose inside isn't going to be an issue.
Another thought is to put inspection ports on the walls of your cockpit. Good for storage and internal drying. With one near your repair, you'd gain your access. No so much putting one on the deck somewhere.
Although I'm not that fond of deck inspection ports, I did add one to the forward and rear walls of my 69 fish. Mainly for drying and then for the storage. The aft one is because my cockpit doesn't have the cuddy spot, and it allowed for backing plates for my hiking strap attachments. Same with the forward one
BTW, here's a picture of glassing up the bottom cut holes. These were for new backing plates on the rudder gudgeon and traveler straps. Didn't need to glass on the inside of these patches, but there is a way you can "pull" a resin'd piece of glass up to the hole, from the inside. A little tricky but not tough to do.
 

Attachments

  • 0710160837a.jpg
    0710160837a.jpg
    348.2 KB · Views: 65
  • 0710160838.jpg
    0710160838.jpg
    405.5 KB · Views: 72
  • 0523161711a.jpg
    0523161711a.jpg
    244.9 KB · Views: 79
these were for the bow handle and the mast base block for the halyard
 

Attachments

  • 0515161841a.jpg
    0515161841a.jpg
    317.8 KB · Views: 77
  • 0523161711.jpg
    0523161711.jpg
    341.8 KB · Views: 73
Not much really to add, just a 2nd to mixmkr's good advice.

The chine of a fiberglass boat is a long hardspot, much more rigid and less flexible than the hull or deck sections adjoining the chine. This damage looks like a big drop onto something hard, right on the chine. Just grind out the broken and splintered roving from the outside and repair with resin and fiberglass reinforcement. Definitely easiest & fastest to do this kind of repair from the outside. Your repair that will make the hull structure as strong as when new.

Your mention of seeing a "foam strip" behind the damage is interesting. Sunfish construction doesn't use foam risers or sections along the chines, so I assume you're seeing some of the yellowish foam used to glue in the white foam blocks that help support the deck. If the foam you see is at all solid (or if you can solidify it or glue it in place with resin, hotmelt, contact cement, whatever) this foam inside the hull will help support your repair until the fiberglass patch kicks off.
foam_blocks.jpg
 
A photograph of the "foam strip" I mentioned is attached here. It doesn't feel substantial, and runs longer than the length of the 10" crack. I'll try to see if I can affix the foam into place -- it's presently loose, as it's wholly cracked towards the aft end of the boat -- and if I'm able to do that, will attempt to fix from the outside without installing a port. If I do this, it would probably make sense to make the repair a bit wider than it currently is?

The variation in color on the foam is from where my sanding disk ate into it a little bit.

IMG_3385.JPG
 
The hull surrounding the crack is solid, but there's a good amount of flex in the bottom directly under the crack (because there's nothing keeping it rigid to the side of the hull). What's the best way to repair this? Thoughts.....?
Tape a 16" single layer of plastic grocery bag to the right of the damaged chine. Brush epoxy resin on the plastic, lay down one 5" x 14" layer of fiberglass cloth, and brush on more resin. (You're making a "form").

While it's curing, take a saber saw and totally remove the damaged area. (It's shattered, and no longer has any strength). Grind away the gelcoat 2-3 inches back all around the "injury". (Gelcoat has no strength). The factory's fiberglass "roving" will appear darker.

By hand, sand the inside around the "injury". The new form will need support, so cut or fold a swim noodle to provide that support. (You can use cardboard or wood, but a swim noodle won't rot).

Cut two or three layers of cloth to cover the entire area you'd previously ground-out.

Sand, then pry, the now-cured splint from the hull. Bend a flux brush to apply new resin to the inside of the sanded "injury", and brace the "wet" splint inside the hull.

Apply more resin, and add layers of cloth until the new surface is just "proud" of the desired height. Starting with coarse grades of sandpaper glued to a 12" flexible form, sand down the new fiberglass until the desired shape is achieved.

What I would do. :)

EDIT: Wow, I took 40 minutes to answer? :confused:

Forget the foam: it's of no consequence.

Epoxy resin won't damage foam, while conventional resin will dissolve it.

.
 
Last edited:
I'm imagining that I see yellow foam in the area you've ground away. Before the hull and deck of a Sunfish are joined together, a swatch of expanding foam (usually yellow when cured) is laid down with a gun inside both deck and hull where the (white) reinforcement foam will go. The white foam blocks are positioned in the expanding foam and the hull and deck are glued together.

A boat can have lots of expanding foam applied, or not very much at all. If there's lots of expanding foam, it can almost fill some areas of the hull. I think the foam in your boat spread right out to the chine (in the attached pic the big yellowish blob is expanding foam). If you're fortunate, this foam an be a perfectly acceptable backing for your repair patch.

I think you have a reasonable bevel started for the repair. There are lots of rules-of-thumb: "12 to 1" (a bevel 12 times as wide as the thickness of the laminate you're repairing) is sometimes quoted, but I would only go with such a wide bevel if I was repairing a very thin laminate (like a hole in the center of a Sunfish deck) where I wanted to match the flexibility of the original layup as closely as possible. As noted, A Sunfish chine is already way stiff. If I bonded a chine repair to a bevel 1.5" to 2" wide all around, I would be happy (and the smaller the repair the easier the fairing and surface finishing). If the old surface is rough sanded, clean, and sound, any polyester, vinylester, or epoxy resin system will bond indivisibly.

Neither polyester nor vinylester (nor epoxy) resin will dissolve the urethane expanded foam used when a Sunfish was constructed.

sunfish4.jpg
 
Last edited:
Thank you all! I think I'll probably grind away more around the crack for a bigger repair area to work with, and will leave the foam in place to act as a backing for the repair, after I try to stabilize it or secure the broken portion of it. If I need to install a port I can always do it afterwards.
 
foam_blocks_factory.jpg
rem984--
This picture of a 2013 Sunfish hull under construction shows expanding foam just where you found it--along the chines on either side of the cockpit. Older boats do not seem to have expanding foam here (this pic surprised me) and they don't have the extra rectangles of fiberglass mat under the cockpit and between the mast tube and centerboard trunk. I think the drop that damaged your boat knocked some of this chine foam loose.
 
Last edited:

Back
Top