shorefun
Well-Known Member
Some basic steps.
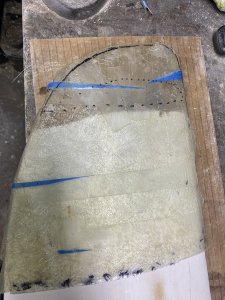
Made simple fiberglass mold from a good dagger board.
Cleaned up the edge of the bad and put in some nails and a couple of stainless screws.
Keep in mind there are the spring steel rods that run the length of the board. I added the nails to give sideways structure. So hits from the side will keep the MarineTex in place. The 2 screws give some more attachment to the upper part.
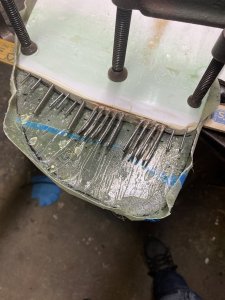
I used the PVA as a release agent. I ended up spraying it on with an airbrush. Just 2 coats.
The fiberglass mold was not the smoothest and at the forward point it bulged down a bit. Nothing a bit of sandpaper would take care of.
I used a paint stirrer to hold the mold close to the board with C clamps.
I calculated I needed just shy of the whole 14oz Marine Tek to fill the area. I left a some in the can, basically what did not come out easy with a wood paint stirrer. I left some activator too. All by eyeball.
I was right about the volume. I messed up in did not get the top area high enough in a couple of places. It was hard to tell because of the way the mold was and how the C clamps were placed.
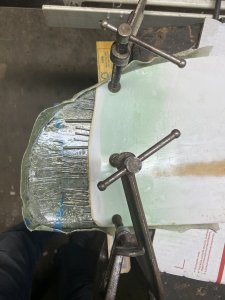
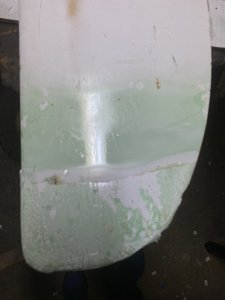
This morning I took off the mold and found it to be very good. The major issues were some areas on the bottom side where I did not get the epoxy to move into as I was using the L end of a scriber for sheet metal to move the epoxy along the edge of the dagger board. There were also some air bubbles at the bottom.
Did some basic shaping of the epoxy to know where the low spots were. I sanded down into the low spots, epoxy does not always stick to cured epoxy, and used a pick to open up and scratch into the air bubbles.
The thick epoxy is tough to get to go into the small air bubbles. I had to used the pick to work it into the holes.
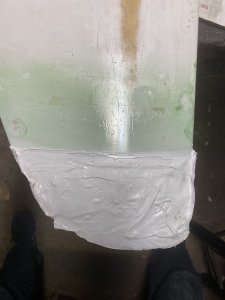
I also needed to work the bottom side edge where the epoxy met the board. It did not flow all the way into the angle I sanded into the dagger board.
In retrospect, I think laying in a very thin layer to just above where the dagger board is broken would be better. This would help with the air bubbles and the interface to the dagger board.
Now I am waiting for the epoxy to cure in the holes I filled. I only have like 4 months or so to get this done.
I will add more picts as I move along.
Made simple fiberglass mold from a good dagger board.
Cleaned up the edge of the bad and put in some nails and a couple of stainless screws.
Keep in mind there are the spring steel rods that run the length of the board. I added the nails to give sideways structure. So hits from the side will keep the MarineTex in place. The 2 screws give some more attachment to the upper part.
I used the PVA as a release agent. I ended up spraying it on with an airbrush. Just 2 coats.
The fiberglass mold was not the smoothest and at the forward point it bulged down a bit. Nothing a bit of sandpaper would take care of.
I used a paint stirrer to hold the mold close to the board with C clamps.
I calculated I needed just shy of the whole 14oz Marine Tek to fill the area. I left a some in the can, basically what did not come out easy with a wood paint stirrer. I left some activator too. All by eyeball.
I was right about the volume. I messed up in did not get the top area high enough in a couple of places. It was hard to tell because of the way the mold was and how the C clamps were placed.
This morning I took off the mold and found it to be very good. The major issues were some areas on the bottom side where I did not get the epoxy to move into as I was using the L end of a scriber for sheet metal to move the epoxy along the edge of the dagger board. There were also some air bubbles at the bottom.
Did some basic shaping of the epoxy to know where the low spots were. I sanded down into the low spots, epoxy does not always stick to cured epoxy, and used a pick to open up and scratch into the air bubbles.
The thick epoxy is tough to get to go into the small air bubbles. I had to used the pick to work it into the holes.
I also needed to work the bottom side edge where the epoxy met the board. It did not flow all the way into the angle I sanded into the dagger board.
In retrospect, I think laying in a very thin layer to just above where the dagger board is broken would be better. This would help with the air bubbles and the interface to the dagger board.
Now I am waiting for the epoxy to cure in the holes I filled. I only have like 4 months or so to get this done.
I will add more picts as I move along.