
CampSailor
New Member
Howdy everyone! I am a counselor at a summer camp in Maine currently in possession of four sunfish sailboats. These boats are very well loved and highly under cared for, with ages ranging from 4 years - long before my time. I grew up and learned to sail in some of them and would love to provide the treatment they deserve, however I am a complete novice in boat repair. Our director has agreed to send a couple of them off to a professional in the fall; in the meantime it is my goal to have four sailboats for our campers to use this season that will not sink. I would also like to keep our nicer boat(s) the way they are. Any advice, comments or gentle ridicule would be greatly appreciated!
I have in my tool belt a few nights of research into boat repair and material specs, also TotalBoat fairing compound, epoxy primer, wet edge topside paint and thinner (200). Basic tools as well such as a rotary sander, vacuum and PPE. Below I've attached a number of photos of the boats and possible issues with their hulls; there are a lot of them and I've left out redundant examples of damage. Safe to say most of them share quite a bit of problems.
I'll start off with Quaker Boys, our oldest boat and one that is near and dear to my heart:


Next we have Hector, a recent acquisition:


The Kathy Dyer, another recently acquired vessel that came with several DIY repairs already installed. It looks like epoxy or some kind of filler has been applied directly to the damaged areas.


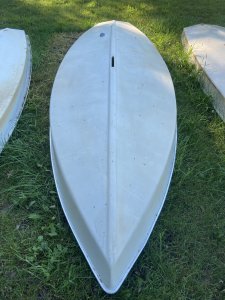
Finally we have Lady, our newest and slickest (and unfortunately dirtiest) sunfish with what I believe is a mostly intact gel coat. I would like to do everything I can to keep her this way.


 The prow and stern of the hull are bright and shiny, with a duller, faded surface below the waterline. I was only able to find the one blemish.
Thank you for checking out all of this material, I am excited to hear your thoughts!

I have in my tool belt a few nights of research into boat repair and material specs, also TotalBoat fairing compound, epoxy primer, wet edge topside paint and thinner (200). Basic tools as well such as a rotary sander, vacuum and PPE. Below I've attached a number of photos of the boats and possible issues with their hulls; there are a lot of them and I've left out redundant examples of damage. Safe to say most of them share quite a bit of problems.
I'll start off with Quaker Boys, our oldest boat and one that is near and dear to my heart:
Next we have Hector, a recent acquisition:
The Kathy Dyer, another recently acquired vessel that came with several DIY repairs already installed. It looks like epoxy or some kind of filler has been applied directly to the damaged areas.
Finally we have Lady, our newest and slickest (and unfortunately dirtiest) sunfish with what I believe is a mostly intact gel coat. I would like to do everything I can to keep her this way.
The prow and stern of the hull are bright and shiny, with a duller, faded surface below the waterline. I was only able to find the one blemish.Thank you for checking out all of this material, I am excited to hear your thoughts!
")
