Best product for patching a hull hole in a Phantom 14

Lucasfreshman

New Member
Hi. Very novice sailor and DIY boat fixer here. I have a 40 year old Phantom 14, sailed maybe 5 times, which mostly sat outside through the seasons of upstate NY. I'm planning on trying to sail with it in a small lake in the Adirondacks.

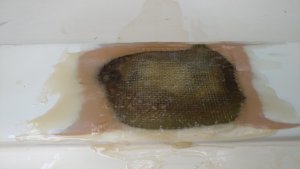
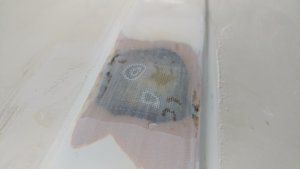
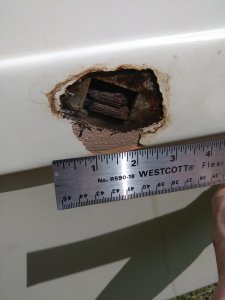
There's a fairly superficial but open hole in the bottom of the hull, directly below the mast, which I think is a result of a leaky mast cup. I did the leak/bubble test, and the leak appears very, very slow.

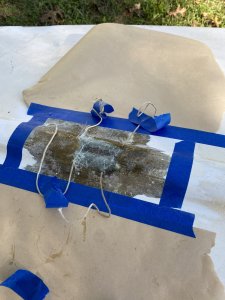
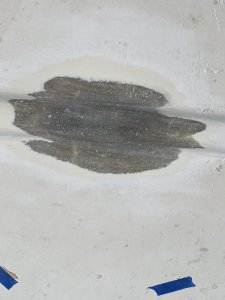
I want to patch the hole in the hull, but I'm wondering if there's more to this repair than just a superficial fix. So, any suggestions as to the best product for this patch, and am I going to need anything more complex? Pics attached and thanks!
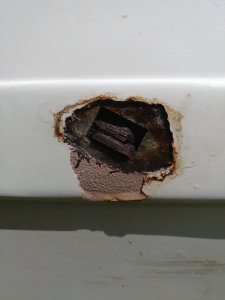
 

Attachments

  • 20210520_143945.jpg
    20210520_143945.jpg
    577.1 KB · Views: 54
  • 20210520_143813.jpg
    20210520_143813.jpg
    517.1 KB · Views: 58
That seems like it's a lot more involved than a superficial fix. I'd say you need to grind and replace the missing fiberglass especially if this is under the mast step.
 
There are some great YouTube videos from BoatWorks that reviews how to do different types of repair. If you have access to the other side of this damage, you’ll ideally want to fix it from both sides. Make sure to grind/sand out a bevel all around the hole to give more for your patching material to grab on to.
You’ll get different opinions regarding using epoxy vs polyester or polyvinyl resins for your repair - a lot of that will depend on what reinforcement material you are using (use PE or PV with CSM - there are different fiber types to use with epoxy), as well as what you are planning to use for your final coat (paint or gelcoat). If you’re using gelcoat, I would recommend PE, because it binds easily without needing a primer first. Paint is by far more popular for a variety of reasons - in which case you can use almost any repair material as long as you use a primer.
Others have more experience with epoxy. I just did a repair with PE and CSM - I can tell you I used 1.5oz CSM on a sunfish hull. If your hull is thicker, you might consider 1708 - especially for the inside. It’s really not that hard, but be sure to read the product instructions! Most good distributors will have a tech support, which can be invaluable for first times using a product.

You will also need a fairing compound to fair the area after the repair before you paint or gelcoat. Again, there are PE, PV and epoxy options available - match that up with what you use for the repair.
 
Does the pink part indicate a previous repair? (Suggesting a larger area needs attention).
Was this ice damage? (Suggesting a larger damaged area than what is apparent).
Do you have pix of the interior?

You could try a quick "diagnostic" using MarineTex. :eek: The reason?

I think it will indicate the need for a more comprehensive fiberglass repair, as it will likely start cracking where the hull has been weakened. (It is stronger than the questioned area).

If it holds up for a full season, then MarineTex was all that was needed. :rolleyes:

But when I have a repair to make, I make it stronger than than the factory made it. A weakened mast step is especially able to create a monster of repair headaches. I suggest my MarineTex "diagnostic" with some hesitancy. :oops:
 
Forgot...

Any spider cracks (topside) around the mast step? (Indicating the bottom of the mast step is unsecured and loose).
 
It is too hard to tell what is going on with this one.

Is that piece of wood there?

This may be a case of opening up the bottom to find out what happened. There seems to be something behind the hole. You say is is below the mast step.

Shoreline Sailboats has a few youtube vids about opening up the bottom of a sunfish. You may have to go the route, or not. Something is up there and you kind of need to know.

 
Amazing replies. What a great, responsive community.

Some follow up for those interested:

I wound up Bondoing (or reBondoing if that was what the underlying pink material was) using a a kit from Pep Boys. This kit had fiberglass cloth, epoxy, hardener, and I bought a surface degreaser as well. I removed as much of the wet rot as I could, and tapered/sanded the edges of the hole with 80 grit. I cut several patches and kind of made a lasagna of epoxy, patch, epoxy, patch etc., gradually increasing the size of the patch. I let it dry, then sanded it flat. The next step is to gel coat it but I think my dad isn't going to wait and if he can register the 1989 trailer he's going to take it out tomorrow or Tuesday.
 

Attachments

  • 20210522_104658.jpg
    20210522_104658.jpg
    2.9 MB · Views: 56
  • 20210522_104651.jpg
    20210522_104651.jpg
    3.2 MB · Views: 45
  • 20210522_130526.jpg
    20210522_130526.jpg
    3.2 MB · Views: 56
Please do not take this the wrong way.

I would recommend you redo the the repair. Too much resin on top, your feathering should go further out and multiple layers of glass. You do not have enough on the sides. You neatly put a glass patch that

I would grind out like 1" back all around and have the glass go out that far. You glass barely overlaps front and rear and has no real overlap on the sides. Too much resin which gets hard but is brittle without the glass. My guess is a minor hit and it will crack open. It has little structure. You should not see the clear layer of resin on top when you are done. That is always a real bad sign in a repair I have learned. When your done the glass should be out on the edges and it should look messy. The surface should look dryer and you should be able to see through the layers and know you do not have any large white areas indicating you have a bubble.

I would start with a large mat piece, then woven, then mat, then woven then 2 layers mat.

The mat is better for bonding and woven adds strength. The 2 layers of mat are for sanding and it gets a better finish, but it is the bottom so it is less needed.
 
While more feathering and a larger patch would be preferable, I think the best approach is go sailing! If the patch does have problems it can be fixed again. Most likely it’ll be fine, but if it’s not, just break out more cloth and resin!
 
@shorefun I appreciate the advice, and I'm totally sure my repair is about as amateur as it gets. I'm happy to learn from mistakes.

My ultimate goal - given enough time, the correct tools, etc. - would be to refinish the whole hull. If this patch survives the summer I will take your suggestion into consideration and probably add more glass. Thanks!
 
Fiberglass is forgiving.

Honestly, I would not trust what you did. Grind it out with 80 grit and feather the surrounding area back an inch or two all around it. make an over size patch out of the mat and then a slightly smaller one out of woven, then slightly smaller with mat. Let that cure. Then take out any high spots and finish up to level with matt.

It might help if you wet it out first on cardboard. Use a squeegee to make sure you do not have a lot of resin. You want it well wet but not dripping. Buy some cheap 1" brushes to help you wet it out. Then wet out the hull and transfer the wet glass. Use the brush to tamp down the glass and get out the air bubbles to have it lay nice against the hull. If you are doing it right with will look messy around the edges. No problem cause you are going to sand it off. Once it cures sand it level and expect to remove like 1/2" or so around the edges until it lays level, well technically you want the patched area to be a bit below the surface so you can put a layer of gel coat on top.

Gel coat is not critical. You could make it look pretty, but that is not critical.

These are picture of my first repair I did. It is a sunfish hull that came with my 2006 that had a smashed section on the side. Here I needed to put a backing patch in place using strings and cardboard. It is messy and does not go as planned, but it works. You can see the finished surface in the last after putting on like 6 layers. This 1988 vintage hull is fairly thick on the keel. There is a reason why these older boats run like 10+ pounds heavier then the newer curved edge hulls.
 

Attachments

  • IMG_2109.JPG
    IMG_2109.JPG
    839.1 KB · Views: 39
  • IMG_2181.JPG
    IMG_2181.JPG
    862.1 KB · Views: 58
  • IMG_2187.JPG
    IMG_2187.JPG
    791.5 KB · Views: 48
You may find this article helpful:


Back
Top