Navigation
Install the app
How to install the app on iOS
Follow along with the video below to see how to install our site as a web app on your home screen.

Note: This feature currently requires accessing the site using the built-in Safari browser.
More options
You are using an out of date browser. It may not display this or other websites correctly.
You should upgrade or use an alternative browser.
You should upgrade or use an alternative browser.
LaLi
Well-Known Member
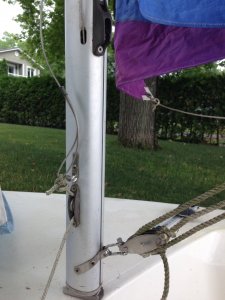
The halyard should run inside the mast, come out through the exit block, do a 180° and attach to the hook. It's the wire that's installed wrong, not the fittings.
What do you have at the top of the mast? Isn't there a similar exit block up there?
What do you have at the top of the mast? Isn't there a similar exit block up there?
Yes, there's a small block there. I've used it this way a few years' ago, knowing it was not right. It would be quite a job to remove the wire - I wouldn't like to do it. I can see drawing the wire loop through the block and coming back up to attach to the hook, but how would I attach the cord to the wire loop to be able to draw it through?The halyard should run inside the mast, come out through the exit block, do a 180° and attach to the hook. It's the wire that's installed wrong, not the fittings.
What do you have at the top of the mast? Isn't there a similar exit block up there?
LaLi
Well-Known Member
More pictures please. Of the mast top, and how the halyard runs from there.
If with "removing" you mean threading it inside the mast (where it belongs), then yes, it is a little tricky, but not impossibly hard by any means. The two-part mast of the Laser 2 actually makes it easier.
Your current main halyard tail doesn't look very spliceable, so you'd probably have to sew it into a loop around the wire.
How so? If it's external, what's the trouble?It would be quite a job to remove the wire - I wouldn't like to do it.
If with "removing" you mean threading it inside the mast (where it belongs), then yes, it is a little tricky, but not impossibly hard by any means. The two-part mast of the Laser 2 actually makes it easier.
By splicing or sewing. I think the original Laser 2 halyard tails were three-strand ropes (like your vang) spliced to the wires. What does your jib halyard look like?how would I attach the cord to the wire loop to be able to draw it through?
Your current main halyard tail doesn't look very spliceable, so you'd probably have to sew it into a loop around the wire.
Last edited:
Here's the pic of the top of the mast. Yes, it's inside the mast. Sewing into the wire sounds like beyond my capabilities.More pictures please. Of the mast top, and how the halyard runs from there.
How so? If it's external, what's the trouble?
If with "removing" you mean threading it inside the mast (where it belongs), then yes, it is a little tricky, but not impossibly hard by any means. The two-part mast of the Laser 2 actually makes it easier.
By splicing or sewing. I think the original Laser 2 halyard tails were three-strand ropes (like your vang) spliced to the wires. What does your jib halyard look like?
Your current main halyard tail doesn't look very spliceable, so you'd probably have to sew it into a loop around the wire.
The jib
Attachments
andyatos
Well-Known Member
That's exactly how my 470 was set up. A small diameter line that was spliced to the small loop on one end of the wire. This made up the total of the jib halyard.I think the original Laser 2 halyard tails were three-strand ropes (like your vang) spliced to the wires.
When not rigged, what exited the sheave at the bottom of the mast was the small diameter line section of the jib halyard. When rigging the boat you attached the wired end of the halyard to the head of the jib and raised the jib by pulling the end of the halyard with the line on it from the bottom of the mast.
And right as the wire that ran through the leading edge of the jib became tight, the looped end of the wire section of the halyard would appear from the sheave at the bottom of the mast. Give a good tug upwards on the halyard and place that wire loop over a hook on a separate multi purchase device that allowed you to really tighten the wire running through the leading edge of the jib that was attached to the wire section of the halyard.
And, voila... you now had, in effect, a nice, tight "forestay" supporting your mast. As Lali has pointed out, there's no way the current set up will work on your boat. You need a small diameter line spliced to the loop on the end of the wire in your photo. So that it can pass through the small opening at the bottom of the sheave in the photo.
- Andy
andyatos
Well-Known Member
The jib halyard wire is not in the mast. See my other inquiry for jib.That's exactly how my 470 was set up. A small diameter line that was spliced to the small loop on one end of the wire. This made up the total of the jib halyard.
When not rigged, what exited the sheave at the bottom of the mast was the small diameter line section of the jib halyard. When rigging the boat you attached the wired end of the halyard to the head of the jib and raised the jib by pulling the end of the halyard with the line on it from the bottom of the mast.
And right as the wire that ran through the leading edge of the jib became tight, the looped end of the wire section of the halyard would appear from the sheave at the bottom of the mast. Give a good tug upwards on the halyard and place that wire loop over a hook on a separate multi purchase device that allowed you to really tighten the wire running through the leading edge of the jib that was attached to the wire section of the halyard.
And, voila... you now had, in effect, a nice, tight "forestay" supporting your mast. As Lali has pointed out, there's no way the current set up will work on your boat. You need a small diameter line spliced to the loop on the end of the wire in your photo. So that it can pass through the small opening at the bottom of the sheave in the photo.
- Andy
LaLi
Well-Known Member
This is getting even more enigmatic.
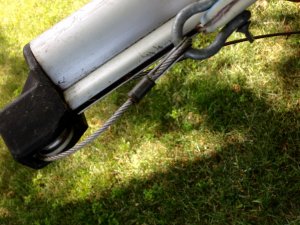
If the halyard goes into the mast at the top, where does it come out so you end up with picture 1?
In picture 2, what is the wire behind the mast? It isn't the main halyard that somehow comes out again right after the block, is it?
If the halyard goes into the mast at the top, where does it come out so you end up with picture 1?
In picture 2, what is the wire behind the mast? It isn't the main halyard that somehow comes out again right after the block, is it?
I have, and I would NOT recommend it! The author just doesn't know very well how a Laser 2 (or any other boat of its type) works. There is some pretty crappy advice there.
andyatos
Well-Known Member
I think the best approach for us to help you figure out how to rig your boat is as Lali suggested; photos... lots of photos.
Or better yet, video. Shoot footage from the top of the mast slowly down to the bottom, including all hardware, upload it to YouTube and post a link here.
- Andy
Or better yet, video. Shoot footage from the top of the mast slowly down to the bottom, including all hardware, upload it to YouTube and post a link here.
- Andy
Yes. I saw it, read it over and over, printed it, read it again and again and again. The problem with instructions like this is it is written by an expert, for experienced sailers! There's not enough pictures and detailed instructions written in non-technical English so the non-experienced laser owner can understand it. I don't need the trapeze and spinnaker instructions; I do need more pictures and details on the outhaul setup. I know you're not responsible for this guide; I'm just venting at all the authors of guides, whether for rigging, for computers, printers, etc., that don't write for their intended audience. I guess that's why there's so many of "The Dummy" books sold.
LaLi
Well-Known Member
Norgold, as I said in my previous post, the author of that guide comes across as a "dummy" himself, definitely not an expert. Don't take anything there too seriously.
LaLi
Well-Known Member
I would like to see more pictures!
1. Of the mast top from the other (port) side, and from directly behind and from below,
2. of the topmast/bottom section joint from a bird's-eye view, from behind and close-up, and
3. with the top and bottom sections detached, of the top section bottom end from below and close-up.
This to determine whether the halyard is supposed to enter the mast at the top of the bottom section (it's a possibility) or the whole mast. Then we can go on from there.
(The problem is that this is an "old-style" rigged Laser 2 mast, with which I am not familiar.)
As Lali says this is an old boat, one where the diamonds are adjusted by screws in the mast foot rather than like on mine with bottle screws on the side of the mast.
The fix for all this is to rig the halyard where it should have been, the sheeve on the top of the mast is a bit offset to allow the halyard to enter the top of the lower mast section. The two section are almost certainly corroded together so do not attempt to separate them.
So get a piece of wire like a bicycle spoke, (cut off the bend) and tape a long thin length of string to it, remove the lower sheave by drilling out the rivets. then push the length of wire alttached to the string down the top of the lower mast section (remember to use the side the sheave is on), then stand the mast upright and the spoke will go down the mast and you can pull it out of the sheave hole with fine nose pliers. Use the string to pull the wire halyard through and assemble it all.
Somewhere there is a lovely you tube clip of Aussies washing halyards down 18ft skiff masts with hose pipes....I've never been able to get that to work for me, maybe they have more water pressure in Oz!
LaLi
Well-Known Member
I suspected something like that, which is why I wanted the photographic evidence. Thanks for confirming it!the sheeve on the top of the mast is a bit offset to allow the halyard to enter the top of the lower mast section.
Now that we've determined that the halyard rigging is all wrong, and since I'm not about to undo everything and attempt to install it in the mast until late fall, what can I do with the wire loop as shown in my first post to secure the mainsail?I suspected something like that, which is why I wanted the photographic evidence. Thanks for confirming it!
I'll start a new topic for my next question - the cunningham.
LaLi
Well-Known Member
The simplest option would be to take the halyard completely out and tie a short piece of rope to the mast top, and shackle the sail there. You'd have to tilt the boat over every time you hoist or lower the main, though.
If you don't want to do that, you could tie a block to the mast foot to lead the halyard (externally) to the hook. You would have to adjust that tie line to get the right effective length for the wire. The risk with the external halyard is that the wire (which wants to take the straightest route) might do unexpected things to itself and the equipment along the way when the mast bends.
But really, you wouldn't have to "undo everything" to get the halyard inside the mast. I believe that the bottom plug is held in place only by the diamond wires (Riv, do you know if this is so?), so you wouldn't necessarily even have to drill out/re-rivet anything. You'd just unscrew the diamonds and then do like Riv explained a few posts up, except you'd have access to the leader line without taking the bottom exit block out.
(BTW, I'll post the link to the original manual here, too: Laser 2 owners manual 1982 | SailingForums.com)
Last edited:
I've never seen a boat this old in the UK, my mast plug is rivetted in....
However getting rivets out is really easy, just use a 10mm drill to remove the heads and then drill through with the size the rivets are, or punch the remains out.
As a long time boat bimbler I have a pop rivet gun and a large selection of rivets, come in really handy!!
BTW, you do not have to put stainless steel rivets in, aluminium will do fine for the sheave box and you will not have eletrolysis problems.
These are my final pics with a last few questions:I've never seen a boat this old in the UK, my mast plug is rivetted in....
However getting rivets out is really easy, just use a 10mm drill to remove the heads and then drill through with the size the rivets are, or punch the remains out.
As a long time boat bimbler I have a pop rivet gun and a large selection of rivets, come in really handy!!


BTW, you do not have to put stainless steel rivets in, aluminium will do fine for the sheave box and you will not have eletrolysis problems.
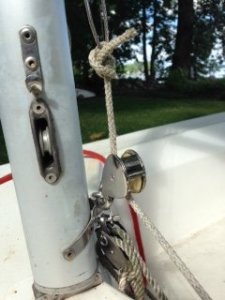
1. The mainsail - you can see there's a few more inches at the top, which I can raise. The rope attached to the wire loop of the halyard is through the jib winch right now just to hold up the sail. Even if I was able to attach a rope to the loop, small enough to go around the block, I still wouldn't be able to bring the wire loop up enough to go over the cleat. Would a thin spliced plastic rope, sown together on the wire loop, be strong enough if I got it around and over the cleat?
2. The sail seems to bunch up and is not smooth.
3. The leftover cord of the outhaul is just hanging there. What can I do with it?
4. As mentioned in the outhaul post, the cords going double through the cleat are not smooth. Should there be a small block there?
Any other suggestions would be most welcome. I'd like to get it into the water this weekend to see how everything works.
LaLi
Well-Known Member
1. I have a hard time understanding what you mean here, but I'll try to explain what I think you'd need to do.
First, take the halyard tail out of the exit block on the mast, completely. You won't need that block until the halyard runs on the inside of the mast again.
As you want to use the existing halyard wire externally and the existing halyard hook, you need a new turning block on the outside. The simplest way to attach one is by tying it with a piece of rope below (or possibly through) the vang fitting. Adjust the length of that rope so the sheave of that new block on the outside is approximately at the same height as the sheave of the exit block. This way you'd have a halyard working like the original, but on the outside.
Another option would be to install a new halyard hook or rack approximately at the same height as the vang fitting.
2. Doesn't matter. If it's still "bunched up" on the water, we'll talk about it later.
3. Tie it around the mast.
4. No, there shouldn't be any blocks there. And the line shouldn't be twisted around itself like that! No wonder it doesn't run.
But most importantly, please rig a clew tie-down. That is, a piece of rope through the clew eye and around the boom: http://lasersailingtips.com/wp-content/uploads/2011/06/Clew-Tie-down.png
And one more point from the outhaul picture... it looks like you're using a knot that unties itself pretty fast. This is what you want: Ulkosorkka – Wikipedia
I'd actually like to see how the traveller is rigged. That's the only thing I see is wrong with the original manual: it lists quite a few options, none of which does the job very well.Let me know if I'm missing any pictures.
LaLi
Well-Known Member
Ok, that's rigged like a Laser traveller. In the Laser, you want the traveller block almost always to be as far outboard and as low as possible. The Laser 2, however, has a sloop rig which means the boom is sheeted on the centreline up to fully powered conditions, and even when overpowered, you use the mainsheet as the sideways adjustment by keeping the vang tight. This means you don't want the traveller block to "travel" sideways at all, and you want it to be as high as possible. Which is the opposite what yours is doing. 
What you want is essentially this: http://laser2.est.org/rigging/Traveler.png
In short, the smaller traveller block is removed, the larger one is tied so that it's always on the centreline, and the tails of the line are taken through the same fairlead and tied together. If you can unscrew the hook from the larger block, fine, but you can keep it, too. If your existing line is too short, don't worry, just extend it with another piece.
This would be pretty much perfect: Harken 29mm Bullet Block for WireTo your point #1 above, what size block or type to get?
Thank you for all your assistance and advice. I'll let you know how everything works...Ok, that's rigged like a Laser traveller. In the Laser, you want the traveller block almost always to be as far outboard and as low as possible. The Laser 2, however, has a sloop rig which means the boom is sheeted on the centreline up to fully powered conditions, and even when overpowered, you use the mainsheet as the sideways adjustment by keeping the vang tight. This means you don't want the traveller block to "travel" sideways at all, and you want it to be as high as possible. Which is the opposite what yours is doing.
What you want is essentially this: http://laser2.est.org/rigging/Traveler.png
In short, the smaller traveller block is removed, the larger one is tied so that it's always on the centreline, and the tails of the line are taken through the same fairlead and tied together. If you can unscrew the hook from the larger block, fine, but you can keep it, too. If your existing line is too short, don't worry, just extend it with another piece.
This would be pretty much perfect: Harken 29mm Bullet Block for Wire
Norm
I forgot, the Laser 2 class association in the UK has a good set of videos on you tube
UKLaser2Class There is a good video on an effective traveller set up and plenty of others.
Sail it flat.
UKLaser2Class There is a good video on an effective traveller set up and plenty of others.
Sail it flat.
Here's the redone Traveller.Thank you for all your assistance and advice. I'll let you know how everything works...
Norm
Attachments
Wrong picture.Here's the redone Traveller.
On the other picture you see that I used an ordinary pulley that I had so your idea is great and works well except there's still the problem of getting the knot small enough to fit through the block. Obviously it doesn't with this one. Will it with the one that you suggested ?
Attachments
LaLi
Well-Known Member
Traveller: now you're halfway there - the block doesn't move along the line anymore, but the line itself will move from tack to tack. Just copy the setup that I linked to in post #25 and you'll be all set.
Halyard: it's about how thick your halyard tail is. Harken classic bullet blocks have an opening of about 10 mm, and if you want a bowline to go through, the rope can't be more than 3 mm thick (just tested). 4 mm is ok if you sew or splice it to the wire.
Halyard: it's about how thick your halyard tail is. Harken classic bullet blocks have an opening of about 10 mm, and if you want a bowline to go through, the rope can't be more than 3 mm thick (just tested). 4 mm is ok if you sew or splice it to the wire.
The rope is 3mm. Is bowline the smallest knot that can be used?Traveller: now you're halfway there - the block doesn't move along the line anymore, but the line itself will move from tack to tack. Just copy the setup that I linked to in post #25 and you'll be all set.
Halyard: it's about how thick your halyard tail is. Harken classic bullet blocks have an opening of about 10 mm, and if you want a bowline to go through, the rope can't be more than 3 mm thick (just tested). 4 mm is ok if you sew or splice it to the wire.
LaLi
Well-Known Member
Several different knots that could be used for this are just about equally bulky, but the idea with the bowline is that you can make it into a long loop (in this case, at least 5 cm), so you wouldn't be pulling the knotted point in the line and the actual wire/rope joint through the block at the same time.Is bowline the smallest knot that can be used?
LaLi
Well-Known Member
Not tied. Sewn or spliced.... how is the rope tied onto the wire loop in order to allow it to pass through the small block at the base of the mast?
Or then you go for a 2 mm halyard tail, which is getting a bit uncomfortable.