Sunfish Question

melodie volante

New Member
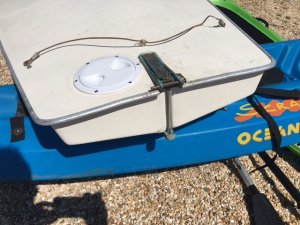
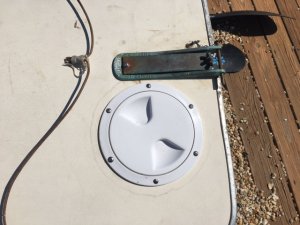
I have a sunfish my dad bought in the mid 60's. I am having a problem with the tiller frame. This is a brass/metal frame that attaches the tiller to the boat it runs from the top of the sunfish hull down to the bottom. The Metal plate that rests on the top of the hull has come loose. It seems that it was attached with one screw and that no longer holds the top of the frame in place. Is there a bigger screw I can use or maybe an epoxy / glue I can between the hull and plate? I am not sure what to do I think this plate definitely has a lot of stress put on it when sailing in some good strong wind. The rest of the boat is in good shape so I would like to try to fix this. I also have 3 grandsons I would love to teach how to sail; and the sunfish is just a perfect boat to learn on. Thanks and I would appreciate any information/solution to my problem...
 
Possibly a larger screw would hold but normally when the screw quits holding it means you need to replace the backing block inside the hull. That requires cutting an inspection port.

A simple check you should do is to weigh the hull. If its much over 130 lbs it probably has accumulated water soaked into the foam. An inspection port in the aft deck and one forward of the cockpit are normally cut to allow using a fan to dry out the boat.
Water inside the hull causes the backing blocks that hold the hardware's screws to rot out.

All fixable.

Most people put bolt-on inspection covers on the hull but the holes can be closed back up so you can't find they were ever cut. But eventually they may have to be opened again, so they may as well be permanent access holes.
 
The Metal plate that rests on the top of the hull has come loose. It seems that it was attached with one screw and that no longer holds the top of the frame in place.

Hi, a little clarification would help. When you say the "metal plate that rests on top of the hull" do you mean the metal plate that is on the hull or on the deck (the deck of course being the top of the boat that has the cockpit.) I ask as the plate on the bottom of the boat is supposed only have one screw and be loose enough it swivels some from side to side. How loose is it??

The metal plate on the deck has four screw holes in it, so if it is loose you have a real problem!

There is a long bolt that runs from the fitting on the bottom of the boat up thru the plate on the deck of the boat. Do you have that? Also, that bolt MUST run thru a plastic tube for the rudder to work properly. need diameter for tightening nut (old style rudder system) | SailingForums.com Note that the tube should be plastic, not metal, and the length is not critical (there is an erroneous comment in there that the length is critical.)

BB
 
There are three screws that hold the bronze plate to the deck. There is a fourth hole where the carriage bolt connects the bottom and top plate together. When installed, two screws are underneath the spring plate and the third is at the front of the plate. From your description, I am guessing, as others have suggested that the wood around the screw has come loose.

If it were my boat I would:
  1. Remove the visible screw and take the spring plate off
  2. Check to see if the other screws are holding properly is so then
  3. Fill hole with thickened epoxy and then re-drill. I would not make the epoxy too thick as you want it to soak into the wood.
  4. If the other two screws are loose, then after re-drilling the first and putting the screw back in, then repeat #3. Others will tell you that the backing block can fall off if you take out all three at the same time.
Hope that helps you.
 
Mine came out. (my fault though as the rudder popped out the bottom and only the pin was holding it on and then stresses made it pop out while sailing.
I cut an inspection port that I wanted to do anyway. (ran into some foam on the outside edge of the port). I used stainless hardware, flange washers and nylon lock nut. Right or wrong, Thats what I did Made sure screw would push at least 1/2" through the wood block on the inside to accomodate the washer and nut
 

Attachments

  • IMG_1323.JPG
    IMG_1323.JPG
    131.8 KB · Views: 41
  • IMG_1324.JPG
    IMG_1324.JPG
    111.2 KB · Views: 40

Back
Top