Need help/advice on how to repair fiberglass

michaelb

New Member
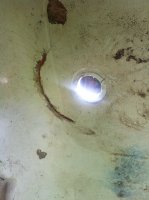
My wife was sitting in my new to us sunfish when I noticed all the water in the cockpit quickly drained...:(

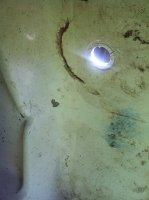
The old metal bailer had pushed up and there is a crack around the cockpit edge. Looks like it did not get much resin in the build process....

I know I need to come from behind but I cannot figure out where to put an inspection port in or how to tackle.
Was going to just fill the slit with marine tex.... or thought to start stuffing it with fiberglass fill so it touches the bottom and adds support. No hull number so I am guessing a dreaded 72
 

Attachments

  • IMG_6607.jpg
    IMG_6607.jpg
    305.7 KB · Views: 83
If there is no number on the transom, you have a 1971 or prior. It will either have the bronze tiller fittings, or show signs of having been converted to the "new style." The only dreaded years of Sunfish are those made by Pearson from 89 thru 91 or so.
 
If there is no number on the transom, you have a 1971 or prior. It will either have the bronze tiller fittings, or show signs of having been converted to the "new style." The only dreaded years of Sunfish are those made by Pearson from 89 thru 91 or so.
It has the storage compartment at the rear and I cannot see signs of a conversion to the new style tiller.
Everything seems great except the fiberglass rip I have and not sure how to get behind it
 

Attachments

  • IMG_6608.jpg
    IMG_6608.jpg
    306.4 KB · Views: 79
I know I need to come from behind but I cannot figure out where to put an inspection port in or how to tackle.
I have a similar problem (winter wind damage—a two-inch break across the keel).

A friend who is very knowledgeable with epoxy resin advises to grind the fiberglass down to paper-thin about 6-inches all around. (using a mask designed for such "operations".) Then, using West® Epoxy, build up layers. In your case, you can get by with making it a bit "fatter" than necessary. The fiberglass is made in different thicknesses, so you may want the thinnest kind. Oh wait, I just found the instructions he gave me:

WEAR A GOOD RESPIRATOR, not just a dust mask FOR ALL GRINDING AND SANDING OPERATIONS!!!! Wear nitrile gloves to keep the epoxy off your skin. Clean hands with vinegar as it is kinder to your system than alcohol.

Grind away the fiberglass at least 4 inches on either side of the crack 6 would be better so that the glass is paper thin at the crack and tapers evenly to the original thickness at the outer perimeter of the ground area. Cut a piece of fiberglass to cover the ground area. Cut additional pieces of glass each successively smaller than the previous one. The number of layers and amount each one decreases in size will depend on the weight of cloth (use cloth or biaxial not mat or woven roven) used. Orient the fibers so that they cross the crack at 45 degrees so as both the warp and fill contribute to the strength of the repair.

It is for this reason that biaxial tape is best for this type of repair as there is no crimp to the fibers. Clean the ground area with alcohol, not rubbing alcohol as it has glycerin. Apply mixed epoxy to the ground area and lay down the fiberglass using the largest piece first and working to the smallest piece. Make sure each layer is completely saturated before applying the next.

If you do not complete the lamination in one go you will have to wash the area with soap and water sand and alcohol wipe before continuing. Mix in a coloring agent for the last 2 layers.

Sand smooth and paint and go sailing.


You won't need to install an inspection port. Yes, epoxy has gotten expensive, but it won't be long before you have the repair down pat, and want to fix everything around you! :)
 
That kit is too small, and probably doesn't have the epaxial tape that is best. (Although you don't need to make a perfect repair by using epaxial cloth, and "fatter" is stronger in your case—remember to saturate the cloth to "clear" to keep out the air bubbles).

My friend's directions means you don't need to make a hole, although a few small holes are likely to "happen", but might actually make the repair somewhat stronger.

Because of the higher expense, I really hate to suggest you go to your local hardware store. Collect all the information you can gather. The hardware store may be able to point you to the right stuff, and then compare with Internet prices and "speedier" availability.

You don't have to buy the expensive West® pumps—just measure the volume of each "ingredient" to get the right ratio of resin-to-catalyst.
 
Is the crack all the way through the cockpit tub and hull? If not, I think you really only need to grind or file away the damaged gelcoat and fiberglass, probably less than an inch around the crack. Once you clean out the fractured fiberglass taper the edges and rebuild the area with woven roving or layers of fiberglass cloth. That area looks too tight to slide in a backer patch, if so just build up multiple layers of cloth.

I've used that kit before and it is good to start with, gives you an idea on what tools and materials are needed.

Good luck
 

Back
Top