Height of front hiking strap attachment

upnorthduck

New Member
I am going to be installing hiking straps on our 2 sunfish. I have looked online extensively but have not discovered a consensus on what height to install the front plate. I surveyed the fishes at our club and the newer ones are about 2-3 inches above the cockpit floor. The older ones are about 2 inches below the deck. Quite a difference. Having not used a strap before, can anyone give advice on where they should be attached? Also, why do they use an eye strap in back and a plate in front?
 
Plate fwd holds strap in a fixed position. Eye strap aft allows for adjustment in the tension of the strap. Some make like looser others tighter. There are even ways to tie the strap that allows for quick adjustment for upwind vs downwind sailing.

Most will add a piece of shock chord to hold the strap up to make it easier to tuck your feet under. Usually attached to the mainsheet block eye strap of thru holes in cockpit face forward.

Lower mounting forward keeps strap out of way when you don't want to use it.
 
Thanks for the info. I've seen installations where there are two eye straps aft instead of one. Besides spreading the load out, are there any advantages in doing this?
 
Like this install.
 

Attachments

  • image.jpg
    image.jpg
    16 KB · Views: 544
Like this install.

If your cockpit is like the one pictured, that is a nice sturdy set-up. If you look closely you will see that the eyelets are through-bolted with the nuts visible. If you do this, be careful on placement, so you can tighten the nuts properly but not so very close to the edge that it might rip through. Also, be careful to use good marine sealant (3m) at the holes on both sides of the lip so there is no chance of leakage into the hull. And keep the drilled hole diameter as tight as possible to the bolt diameter so there is no play, both for sturdiness and to minimize leakage.

Aside from the obvious need for two in this illustration because of the cubbie lip shape, I like two eyelets versus one because it at least gives me the illusion that the strap won't twist, plus since I'm not using a backing plate there it seems sturdier. If you don't have storage cubbies, as pictured, then you will want to use a backing plate of some sort, which means installing a port. That is a separate discussion but be sure to check in here if you need to do that.

It is good to hear you are putting in hiking straps, because that is one of the first 'musts' with any Sunfish. Even if you don't hike that much due to sailing conditions or body weight, they are very helpful for transmitting your body energy (legally of course) into the boat, which can be very beneficial even in lighter air. For me, lower and tighter helps with that, but there are times when looser can be good, for example downwind for bracing your ankle forward.

There are some good hiking and strap position discussions on both a (former) Sunfish sailor's Proper Course blog and also on the Sailing Anarchy site, if you google those.
 
Last edited:
All good advice!

(I installed a strap on my fish years ago, just like the one posted by upnorthduck).
 
Last edited:
That is usually on boats that did not have hiking straps to begin with. This 4 screws without a back up plate is better than two. The newer boats have an aluminum plate that the screws are threaded into. I have seen a clever install thru bolted right at the dip for draining the storage compartment.
 
I think I've got a plan after reading all of this. Two more questions. Has anyone ever used stainless toggle bolts on the front rather than cutting an inspection port? The drawback here is that you have to drill a rather large 1/2" hole. Also, ever heard of using stainless steel barrel bolts for the cubby lip thru bolts for a more finished look?
 
I think I've got a plan after reading all of this. Two more questions. Has anyone ever used stainless toggle bolts on the front rather than cutting an inspection port? The drawback here is that you have to drill a rather large 1/2" hole. Also, ever heard of using stainless steel barrel bolts for the cubby lip thru bolts for a more finished look?

i see Intensity added this $12 hiking strap hardware kit to their Sunfish hardware offerings:

www.intensitysails.com/mahistfakitf.htm
 
Well, a year later and I'm finally getting around to installing the hiking straps. All 4 of them :D 
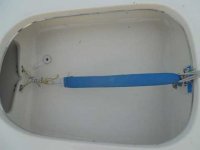
! I used a masthead hiking strap kit from intensity sails: http://www.intensitysails.com/mahistfakitf.htm In the front of the cockpit I used an inspection port to install the hardware. This is really easy using a rotozip. As a bonus, I was able to add some expanding foam to secure some partially loose foam blocks. I also added a bottle port. I struggled with the back. I don't like the looks of the thru bolted storage lip solution. The posts that follow show what I did.
 
For the back, i decided to use snap toggle toggler bolts. This picture shows everything I used on the back.
 

Attachments

  • IMG_5857[1].JPG
    IMG_5857[1].JPG
    300.7 KB · Views: 460
After you mark the position of the cleat for the strap, commence drilling. The 1/2" holes look scary, but don't worry.
 

Attachments

  • IMG_5856[1].JPG
    IMG_5856[1].JPG
    226.1 KB · Views: 373
The next step is very important. Depending on where the foam is on your boat, you need to make sure it does not interfere with the toggle. I had to take a nail, cut the head off, bend a 90 degree angle and use a pair of vice grips tI had to drill on four boats, half required some clearing. You want the fiberglass cleared of foam so the bolt can secure properly.
 
The next step is to slide the plastic collar down as far as it will go and break off the long tails. The collar won't snug up because the fiberglass isn't thick enough. No worries. Now, insert the bolt thru the strap and then thru a stainless steel fender washer. Screw the bolt into the toggle. Make sure it is in at least several turns. Do the same on the other side. At this point, the assembly will be loose. Using a razor knife and\or pliers, break off the plastic collars. Now, liberally apply caulk to the hole\back of washer and tighgten down the bolts. Note: You may need to use a cordless screwdriver for the very last turn, as the toggle sometimes wants to spin at the very end instead of the bolt snugging down. Do not overtighten - use a screwdriver to finish.
 

Attachments

  • IMG_5860[1].JPG
    IMG_5860[1].JPG
    216.5 KB · Views: 361
  • IMG_5861[1].JPG
    IMG_5861[1].JPG
    238.8 KB · Views: 358
Wipe up the excess caulk and you are done. This setup seems to be rock solid and looks nice to boot. Hope this helps!
 

Attachments

  • IMG_5862[1].JPG
    IMG_5862[1].JPG
    237.1 KB · Views: 391
I think that your sailing venue, condition of the boat and sailing style will dictate whether this attachment method works - but regardless, only time will tell for sure if you have discovered a viable approach or not. If you sail in fresh water, your chances of success are best, whereas if you are in salt water and your boat is not 100% watertight, the toggles will rust, with unknown consequences. Despite their claims of rust-resistance, it looks like these were designed for use in interior walls, not a marine environment - drop one is a glass of saltwater and you can see what happens and how fast.

I can't tell if there is anything to keep those skinny screws centered in the 1/2 inch holes. If there isn't anything, or if what keeps them centered are plastic, you may be ok if you don't sail really hard. If you really hike hard and jerk a lot on the strap as serious racers do, the screws will get uncentered, move the caulk and result in leaks. These toggles were obviously designed for a static load, and not a 150 lb or more force jerking and tugging on them from differing angles.

Please let us know what happens!
 
Last edited by a moderator:
upnorthduck - did you use the screws from the masthead hiking strap kit? I'm looking to do the same thing but I'm ordering parts online and don't know how to make sure the toggle threads will match the screw threads.
 

Back
Top